


FlyCanadianGuy
-
Posts
22 -
Joined
-
Last visited
Content Type
Profiles
Events
Forums
Gallery
Downloads
Community Map
Posts posted by FlyCanadianGuy
-
-
Good luck Tony. This is a great forum for other users to help troubleshoot and "retro-fit". Once I do get to my trooper out for the spring I'll load up a pic for you. What year/model is your machine?
-
How did you make the connection to the 3/16" pin and keep it water-tight? Can you send me a picture of the connection to the diff?
Thanks,
Tony C.
Sure give me a week or two as the buggy is on the farm and im flat out at work at the moment but I will eventually get back to you. I know for a fact SOMEWHERE on this forum there was a how-to or explanation where someone has done the same thing. In short all the electrical motor is doing is pulling back a lever to engage the 4wd system. Using the SAME housing (minus the electrical motor that is just bolted to the side of it on a "U" plate you simply need to attach a simple braided cable (like found on a kids bicycle or throttle cable) to manually actuate it. I do hope were thinking about the same thing.
 This is based on my 2006 Trooper T2. If you could supply a pic of yours I wont have to make a run to the farm and can simply edit your pic to show you what I mean.
 -
All three of the circuit boards burned-up and I threw the first one away. The second I sent to a friend to see if it could be rebuilt, and the third is still on the diff. If I can't get this to work maybe I'll send you the parts for th cost of shipping. I'm working on developing a simple unit for a bolt-on.
Thanks,
Tony C.
I just used a standard PTO engagement lever. Came with the cable and mounting bracket for like $20. Problem solved...
-
I do most all my welding with a MIG. They can be great for welding. Unless you have an old peice of junk your mig should be just fine.
Lenny
Im using the wire without gas, so the bead is not the best.
Once I have it set up on gas it will be a different story. After alot of beers last night we got a little carried away and welded up the trooper. Never got any before pics, but will take some after shots. -
Interesting, I have never worried about the computer. I have welded on the Trooper & racecar (both have computers) and never a problem. Should I worry? If so, what precautions can you take?
rocmoc n AZ/Mexico
What is your race car
-
Thanks for the info, I figured thats where it was, just wanted to make sure and see if there was anything else that I should possibly disconnect before hand. Using a 230V Mig welder, not the best for welds but its what I got, so got to make due!
-
Have 2 cracks in my frame, I will post pics of where and how big later. Seems that its not directly related to a stress point per say, more of a bad weld opening up. Anyways, curious to know where the computer is and what else I should remove before welding on the frame? Will be using a 230V Mig and will post pics before/after.
-
Payment sent.
-
I bought mine privately, so I have no dealer
-
I have door screen over the front to keep out mud and bugs. the fan is pulling right now but i reverse the wires for winter, it actually works OK for a heater. Do you not have trouble pulling coolant from the overflow tank when the unit cools? i couldn't get mine to suck so i had to move the tank.
If I try to reverse the wires on mine, it blows a fuse instantly. I havent had any cooling issues yet, but could you show me a pic of where you re-mounted the overflow incase I need to. Thanks!
-
i looked at the wires for a 1.3 and they was way off. im going to go take the trooper down to my local parts gouroo and see if he can match them up for me.
Keep us updated please! Im always curious to know what other routes for parts other than from Joyner are available.
-
I just built a roof over my rad when I moved it. I figure it should be fine considering it is below the roll bars for the most part.
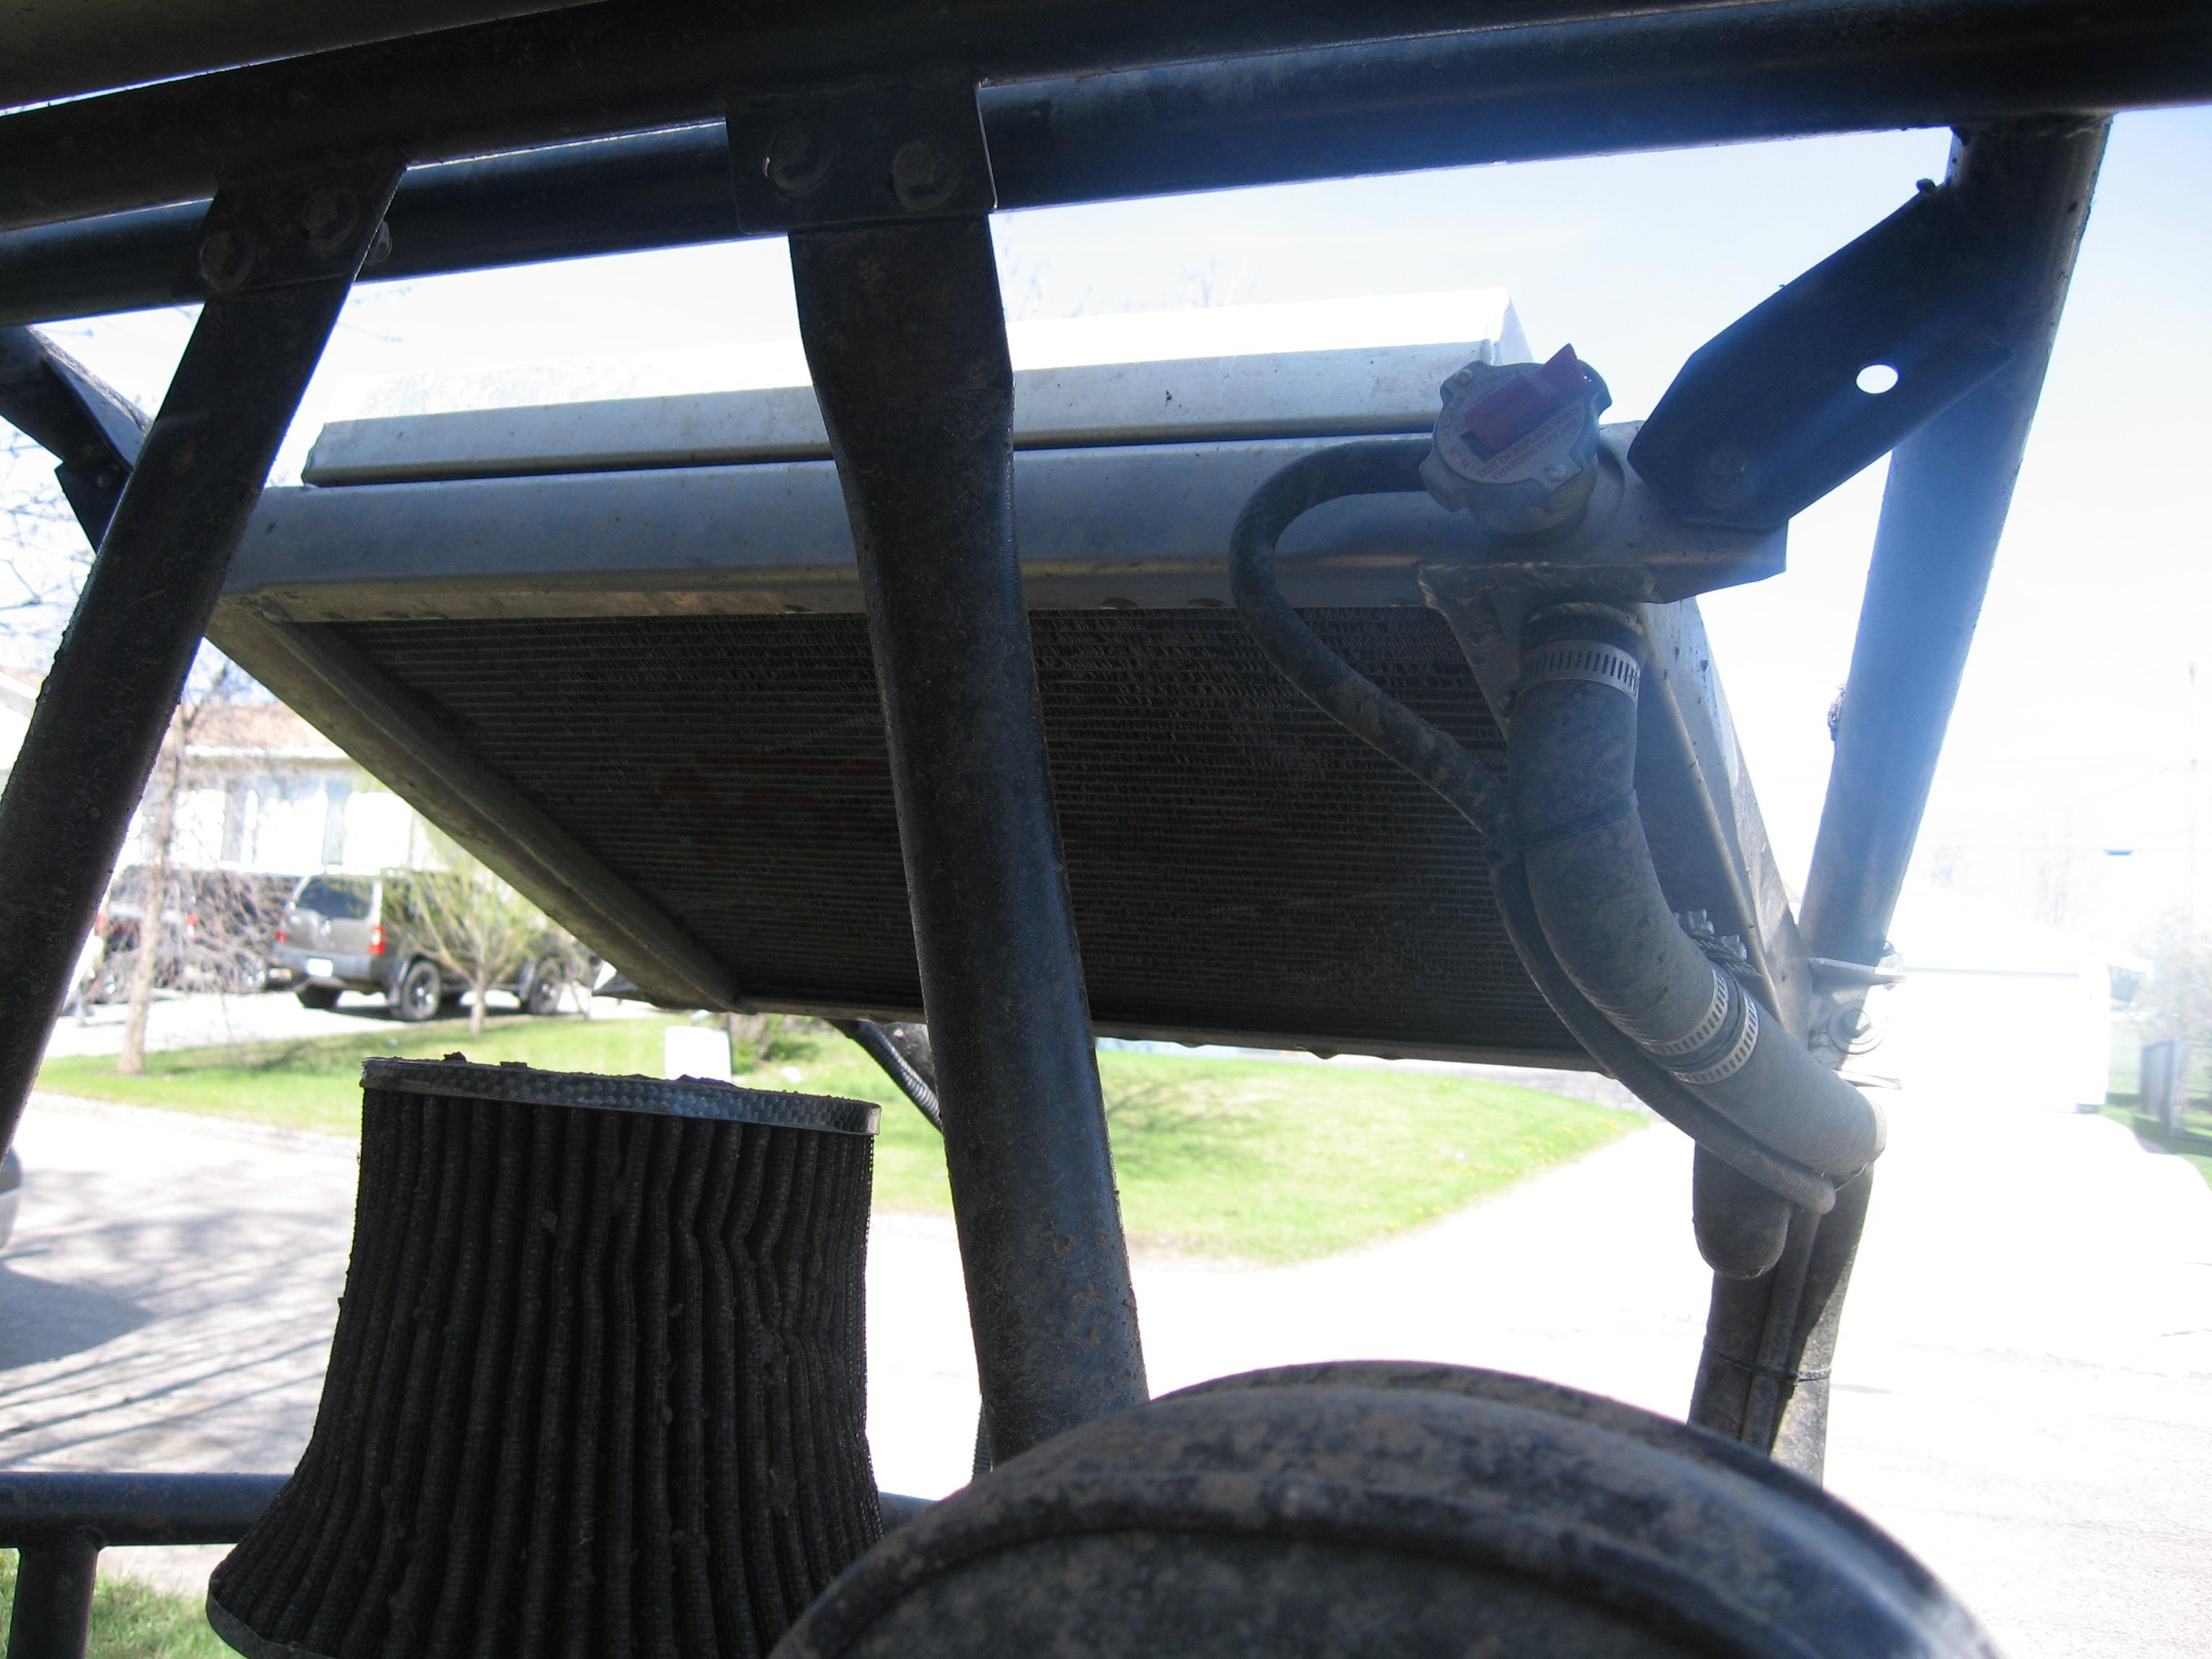
Why does your rad look so different on the front? Did you add some kind of metal mesh to it? Also, which way do you have your fan going? Blowing THROUGH the rad or PULLING air through it?
-
I sure hope Lenny comes through with his kit. We all really appreciate you taking the time to make other riders lifes easier and head-ache free! And at almost cost of the parts, I highly respect you.. now just hurry up!
-
My gauges appear to be working fine ... when I first start up everything seems normal but after running for a while the temperature gauge is almost in the high end red .... when I come to a stop with the engine still running the oil pressure is almost at zero. I don't believe this should be the case. If anyone can let me know what their normal readings are that would be beneficial. Thanks
Barry
Obviously if the oil is becoming VERY hot it will be hard to keep oil pressure, as the oil will become less viscous. My temp gauge usually shows normal even after prolonged rides (my rad is moved though) and my oil pressure shows low (almost 0 ) with the engine at idle when it is at operating temp. I have checked the oil time and time again, and its always at the perfect amount, so I have a feeling the gauges on these are not that accurate. Once I idle up the engine past 1500 oil temp comes back up to operating range (30-40psi)
Can you post pictures of your cowling Lenny? I have an overheating problem too but I attributed it to the location of the rad. It is pretty tight around the fan though, a little mud threw it off balance enough to hit the cowling and make an awful noise. Its funny how ALL the Joyner buggies have the rad out in the open but the SXS's don't. Right now this is on the top of my list. The grass, mud and dandelion fuzz aren't helping the heating situation either!I really really wish I knew how to post pictures on the board. The simple fix is a rad relocation (as many here have already done) the hard part is creating custom braces to protect the rad incase of a roll-over. Im still in the process of making that. I have mounted my rad about half-way up the rear roll-cage and have not had issues (YET) with the water pump being unable to push fluid through the extra plumbing and up to the higher rad. The rad sits roughly where the drivers head would be for height.
-
i havnt had any problems but i was in a mud hole and was playing in it and i filled it up full of mud and had to pull it and clean it up but i put a new one in it and just put the old one up it was in good shape though. that dang driveling goes right through the bellhousing and when your in mud it sucks it right up and filles it up with it.
How much was the new clutch?
-
One of my concerns brought on by something Lenny said is that the threaded part of the bolt is also the support part like the shank. My feeling, developed from when I had my airplane, is that the shank should go all the way through with a washer and nut so the shearing forces are all taken by the shank and not the threads. I have been thinking of looking or longer bolts to make this happen for me, and since there is no warranty and no reason not to, I just may be doing some drilling myself, as you can see by this foto, there is room for a larger hole. The main disadvantage to switching to easily found, easily replaced American Standard Bolts is you may have to use 2 sets of wrenches, metric and standard, WAAAA
It's too bad bolts are sold like AN hardware, for instance, A breakdown of a typical bolt AN number follows:
AN4-8A
* AN means the bolt is manufactured according to Air Force-Navy specs.
* 4 identifies the diameter of the bolt shank in 1/16" increments
* 8 identifies the length of the shank in 1/8" increments
* A means the shank of the bolt is undrilled (no letter here means a drilled shank
and the threaded part is always the same length.
I think the two holes are from the stamping operator not getting the part out of the press and it got double stamped and never rejected.
I think welding on a good thick washer and using longer American Standard Parts is a good way to go. That's my 2 cents worth.
Kinarfi
Fellow Mechanical Engineer?
-
Have the bolts but still struggling to find all the required shims. Will keep you informed. Just need more time.
Thanks
Lenny
Not a problem, work is hectic so I dont have the time for the Joyner (or the lawn, or the basement... new hot tub... upstairs washroom... ugh, it keeps piling up )
-
Im in for both diffs if your still making this "kit"
-
2300km mostly with abuse. Engine seems strong/reliable.
-
Why thank you Cinda, and you beat me to introducing myself! I just recently purchased a 2008 Joyner Trooper T2 with some slight modifications, and I found this forum so far to be INVALUABLE with information on what people are doing to their SideXSide's etc. I live in Grande Prairie Alberta Canada, and you can find me on the weekends usually sunk in muskeg or a mudhole I should never have attempted!
I uploaded pics to my computer but have no idea how to add them to my "gallery". Im sure a few searches on here and I will find out! See you guys/gals out in the trails. -
If my dad didnt live 3000km away I could get my hands on his CNC machine..
I was starting to look around for a nice small turbo to run about 3-6 psi (no idea what the top/bottom end on these engines would be good for) and by searching that I stumbled onto here! BTW, hello fellow Troopers! I have a slightly modded Trooper that I will post up pics later for all.
 This is based on my 2006 Trooper T2. If you could supply a pic of yours I wont have to make a run to the farm and can simply edit your pic to show you what I mean.
 Once I have it set up on gas it will be a different story. After alot of beers last night we got a little carried away and welded up the trooper. Never got any before pics, but will take some after shots.


Does anyone have the manual 4WD system to replace the electric one?
in Joyner UTV SxS Forum
Posted
If you decide to fix it, I do have a spare oil pan I might sell if it gets you back on the trails!