


Kinarfi
-
Posts
2,186 -
Joined
-
Last visited
-
Days Won
37
Content Type
Profiles
Events
Forums
Gallery
Downloads
Community Map
Posts posted by Kinarfi
-
-
I was having trouble getting the drive line to slide all the way out after I finally got it sliding, the carrier bearing bracket was hitting the frame, so I had to remove the bracket from around the carrier bearing rubber mount, a bit of a pain, but necessary, I suggest some form of lubrication such as windex or denatured alcohol. After I got it out, I found that the yoke closest to the tranny was bad and the bearing could be spun in the yoke. A local drive line specialist said to tack weld the bearing and put a zerk in the bearing, pump it full of grease and run it until it fails. I did a bit more than a tack.
Please take a look at this photo and see if I have the U joints of the two pieces aligned properly. https://drive.google.com/?authuser=0#folders/0ByQAhs0e-yF9NEg1c1IwMlR0djA
Here's the rest of the associated photos,
https://drive.google.com/?authuser=0#folders/0ByQAhs0e-yF9NEg1c1IwMlR0djA
Thanks,
Kinarfi
-
Another thought about front drive lines, I know Lenny changed his to a single piece, but he said he had to move the engine back or diff forward to put it in. I'm wondering if it would be possible to put a CV set up similar do the axles and do away with that carrier bearing, and then if I do that, I'll probably probably do it with a heavier gauge aluminum pipe of a larger diameter so I can put electro or permanent magnets close to it to create drag when going down hill, but that's probably cost prohibitive, goto http://en.wikipedia.org/wiki/Eddy_current_brake if you want more info on what I have in mind.
-
-
It's been quite a while since I had to pull my front drive line and I don't remember if it has a snap ring or what! Any way, it's not sliding off by hand and I'm not sure if I just need to pry it or what. Anyone know what it takes to get it to separate from the transmission, I have the carrier bearing loose and the forward half out already.
Last time out, it started making a metalic popping noise from time time and it looks like I may have a problem with the U joint nearest the tranny.
Haven't been able to find any thing in any of the manuals yet either.
-
Where did you go? doesn't sound like little sahara. I've been all over that place, but I don't even try sand mountain any more, but then I have street style snow tires. Want to go do Killpecker dunes out of Rock Springs some day.
-
Fuse box is not under the seat, it's under the dash high up on the fire wall on the passenger side.
Kinarfi
-
When Lenny and I put zerks on our ball joints, we found that as grease is pumped in, the ball plug the path for the grease and it comes out through the threads, what I did was disassemble it by grinding the welds off the top, if it hasn't already cracked, unscrew the top which I then drilled, tapped and zerked, then I took the ball and dremelled 3 spiraling, very small, grooves for the grease to flow through, screw the top back on till snug but free moving, weld the cap back on solidly, now when I grease it, it goes clear through and fills the boot up. I highly recommend this be done to all ball joints,even new ones.
-
When ever I pull the CVs, before put them back on, I cut a piece of 1/2" polyurethane foam into a circle with a hole in the center and put over the shaft, it seems to being a good job of keeping the dirt out which should prevent your problem and keeps it away from the seals also.
-
http://www.mcmaster.com/#96144a227/=ovaziv
These are the bolt that I recommend, they are too long, but they have shank in the mating areas between the mating surfaces of the 3 parts of the ring gear assembly instead of thread. The original had a 10mm head on an 8mm bolt for clearance of the bearing plate and the threads are fine threads, these allen head bolts will still need some machining for clearance. The way I did it was to put the threaded part in a drill and spin it against a grinder. Also, sand the surfaces from center to outside leaving scratch marks and then clean the mating surfaces with soap and water, Lenny's suggestion, loctite (red or better) and bolt together.
Kinarfi
-
I have had failures in the 4X4 box also, so I tore it apart and rebuilt it and because the board was burnt, I redesigned the circuit to use FETs instead of the relay that is inside. Works well, but you have to rewire the switch or install a new switch. If any one is interested, let me know and I will elaborate, or if you want, for a nominal fee, I will rebuild yours'.
I have put a bunch of photos on google drive and if you want to look at them: https://drive.google.com/folderview?id=0ByQAhs0e-yF9X2VNSnFvekFMUjA&usp=sharing
-
kinarfi i took my trooper to super atv an let them us mine to make all brackets they were desiening new bigger motor for them at that time..
That's probably the 220 watt job instead of the 170 watt, think I'll call them and see what I have and and if I can get the higher wattage motor.
-
a couple of years at least, I don't know why the unisteer is so much, the satv has increased in price since I got mine, it works well and the only times is doesn't have enough power is in 4x4 & locker. Other than that, it's been good. If you order one, get the 220W model, there are several different mount methods on this site and the ujoints supplied do not match the trooper spline pattern so you have to do some creative matching. I suppose both units have this problem. I was just looking at the satv polaris ranger set up and it may have parts that work with joyners, call them and see what they offer.
-
have you looked at superatv.com yet? That's what I have and I'm happy with it and they've given me support.
-
got any photos, do you use chrome for a browser? if so put them in Google drive and share.
-
Not problem, after I misspoke my self about old tales, I googled WD40, they had some pretty weird uses for it, 51 of them, how ever they hadn't found out about loosening circlips.

-
Ok wd40 it. Then get a buddy to help. Use a pry bar 3' is what I used on my rear placed in where you can then straight across from it use the punch bar and big hammer. Wood dont work we'll cause it gives to much. But saves on damage. That's why I use brass bar.
I have been told that WD40 (Water Displacement formula 40) is not a lubricant, so you may want to try something like Triflow or some other product that actually claims to be a lubricant
-
It may be possible to disassemble the inner CV, remove the seal that is in there and squirt, blow, wash the crap out of the groove so it comes apart, or even just leave it and do the rest of the repairs and then reassemble it. After you get the boot off, there's just a large circlip holding the parts together and once removed, the ball cage and shaft just slide right out.
I get my CV grease from O'Reilly's
-
How much mud have you played in? is it probable that you got enough mud in the grooves and it dried so the circlip can't collapse and release the CV. You may want to try squirting water into the spline, maybe even high pressure washer, but if you do that, you may want to open the differential to see how water got by the seal. Another thought is blow air and see if you can blow out the dust.
http://www.utvboard.com/gallery/image/979-2187422630104282158sgqwax-fs/
Question, are you familiar with this method?
-
http://www.utvboard.com/topic/629-fuel-tanks-mods/?p=1554
Here's the first post I made on this subject, I had lots of photos linked to it, but the outfit with the photos decided they wanted money to have my photos, so now the photos aren't available anymore.
-
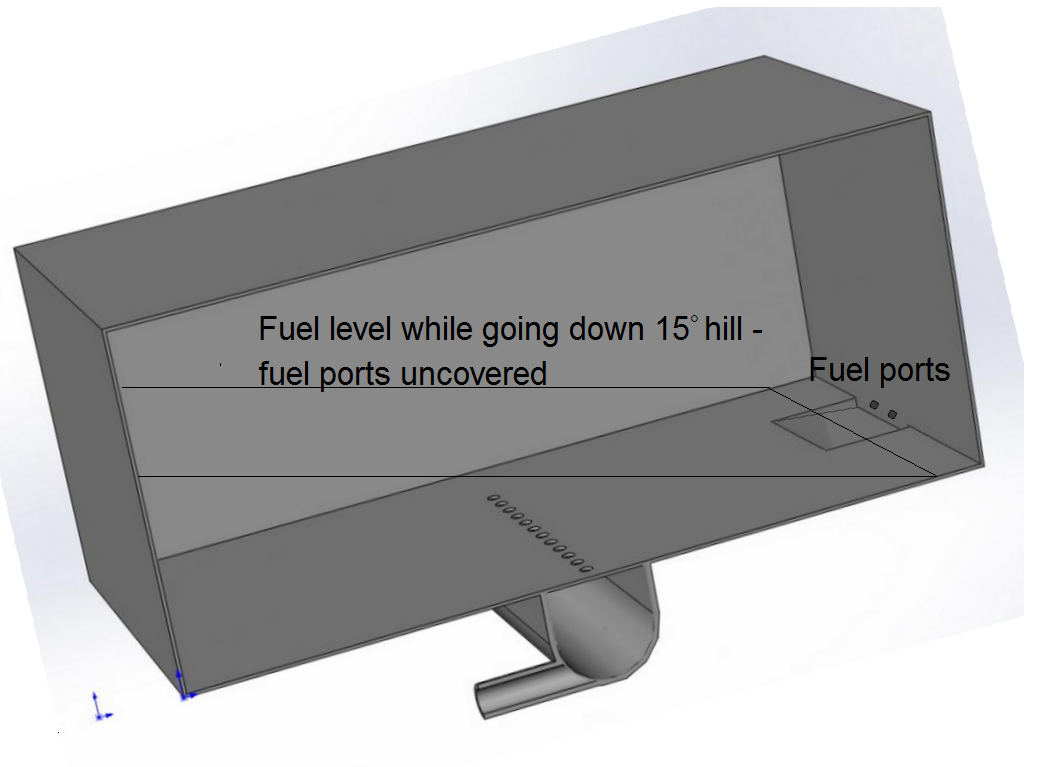
Here's what's happening as you go down hills and the fuel runs to the front of the tank when you have less than a full tank.
What have you decided to do?
-
usually I can get that CV joint to pop loose using a 2 foot nail bar but if that fails take a 3/8 inch chain and the grab hook and wrap it around it and then stand back and slap the chain 2 or 3 times and I'll pop it off good luck
Kinarfi
-
A surge tank is the way to go, you need an auxiliary gas tank, surge, and a secondary fuel pump, low pressure. The low pressure pump fills the surge tank and it supplies fuel to the main pump, so you have to do a little bit replumbing, There are two ways to do this, one is to have the secondary pump sending fuel to the surge tank and the excess drains back into the main tank, the second is to have a float system that shuts down the pump when the proper level is reached and starts the pump up when the lower level is reached. That's what I have. The main pump draws it's fuel from the bottom of surge tank and the pressure regulator return line MUST empty back into the surge tank or you defeat the purpose of the surge tank. The advantage of having fuel flowing into surge tank and then overflowing back to the main tank is it will keep the fuel cooler because the fuel cools the main fuel pump because the fuel flows around the pump armature.
I'll see if I can find the photos I have and put them in google drive and supply a link.
The surge tank only needs to have enough fuel in it to get you down the hill and keep you idling while you sitting on the hill, I'd say a quart would be min, but nothing wrong with having an extra gallon or two, the tank needs one or two ports at the bottom, one the main fuel pump, one for clean out or to get gas out for other stuff, like starting a fire, and at least 2 at the top, one for the aux fuel pump and one for the overflow back to the main tank, the return from the main fuel pump should be in the middle, IMHO, so the fuel is circulated with in the surge tank. When I did mine, I moved the main pump forward and mounted behind the passenger seat as well the aux pump and the filter too, but that may not be as safe as keeping it out of the cab, just a thought.
Kinarfi
-
Got it all back together and everything is fine, locks up and unlocks like it should, I will add one or two more photo of some polyurethane foam that I put between the diff and the CV to keep dirt, dust and mud from getting into the splines and the seals.
-
I lost my rear locker and finally decided to see why after getting hung up on some rocks yesterday that I'm sure I could have made if past if the lock was working, I don't know if you are aware of how easy it is to open your rear differential, so i decided to post a few pics,
to do this, you need to pop both CVs and the locker bracket, drain the oil, pull the screws and to pop the cover off, replace the drain plug and blow air into the vent tube, KEEP YOUR HANDS OUT - DON'T TRY CATCHING IT WHEN IT POPS - IMHO
https://www.dropbox.com/sh/ehrnt8och6bbd8b/aBUvA1AY4y
I didn't really find anything wrong, except for maybe I had the cable really out of adjustment, but I did find that I was missing a snap ring and some aluminum filings, so I plan to wash it with diesel and put it back together, I take these photos for my own references and because sometimes it's just easier to look and a photo than to get my head in there to look at it. I'll probably add a few more photos, so stop back in later.
Kinarfi
Just in case you like to snoop, here's a link to my dropbox


Front Drive Line
in Joyner UTV SxS Forum
Posted
I would guess that the loss of carrier bearing(5lb) and the bracket that holds it (2 lb) and the center U joint vs the tube all and all 10 lb +-
alignment doesn't matter now that it's in, but I think it's correct.