


Kinarfi
-
Posts
2,186 -
Joined
-
Last visited
-
Days Won
37
Content Type
Profiles
Events
Forums
Gallery
Downloads
Community Map
Posts posted by Kinarfi
-
-
Sounds like you may have lost a ground point, there is a ground point up by the horn that is important if, I remember right.
Charlie's right, but what you have to do is unbolt the fuse/relay block to look at the back side for burnt/hot wires. This is pretty common on Joyners
Can you tell us more, year, miles, modifications, and fill out your profile, may some one live just around the corner from you.
-
I see that, thank you,
-
Kinarfi, I have the head disassembled now... do you want pictures of the bucket and shim? I found out the shim is a generic 25mm shim found almost everywhere. Still pricey little jewels.
Yes, Please, How the bucket fits into the head and pushes the valve. When I had my valves done, they offered to set my valve clearances for me and I said ok, they did one valve and then said they couldn't do it. The method they used was to measure measure the clearance, and then grind off the end of the valve stem to get the clearance needed. Neat trick if you have lots of excess stem, but Chery motors don't, the keeper is to close to the end. I picked up a few shims at Honda and sanded a few down on a belt sanded and got them all within specs and have been running since, but I fear it may be getting time to do it again come next winter.
I bought my Trooper mid 2008, rebuilt the engine in early 2011 because of the cheap stock air filter and bad location for it. Had a fine powder coating on the inside of the intake system and lousy compression. It would start if I had a hill to roll down or a push and run and start fine for the rest of day if the engine was warm, but wouldn't do a starter start if cold. I tore the engine down and replaced the ring and gaskets, (Don't remember for certain if I honed the cylinders or not, but I think I did, seems there was a slight lip at the top.
Still running good, but some what anemic on the hills in higher gears.
-
I let gas sit in the combustion chambers over night and one did leak out. So I'll be taking it in for a valve job. Should I take the shims with me or is this something I need to do myself?
Bad news is I tripped carrying the shims and got them out of order... I was too careful I guess lol! damn! I'm not too worried about it though. There is hardly any sign of them being used. I think a quick polish and it wont be any different than putting a new spacer in.
btw, how do you get the spacers out? The manual says screwdriver but it wont budge... they rotate fine, but refuse to dislodge (or disintegrate like the manual says, lol!)
The alternative that I saw, used by the people that did my valve job is to position the head and fill the back with water or oil and see if it leaks into the cylinder head.
If you disassemble the head, would post a photo of the valve pushing mechanism, please?
-
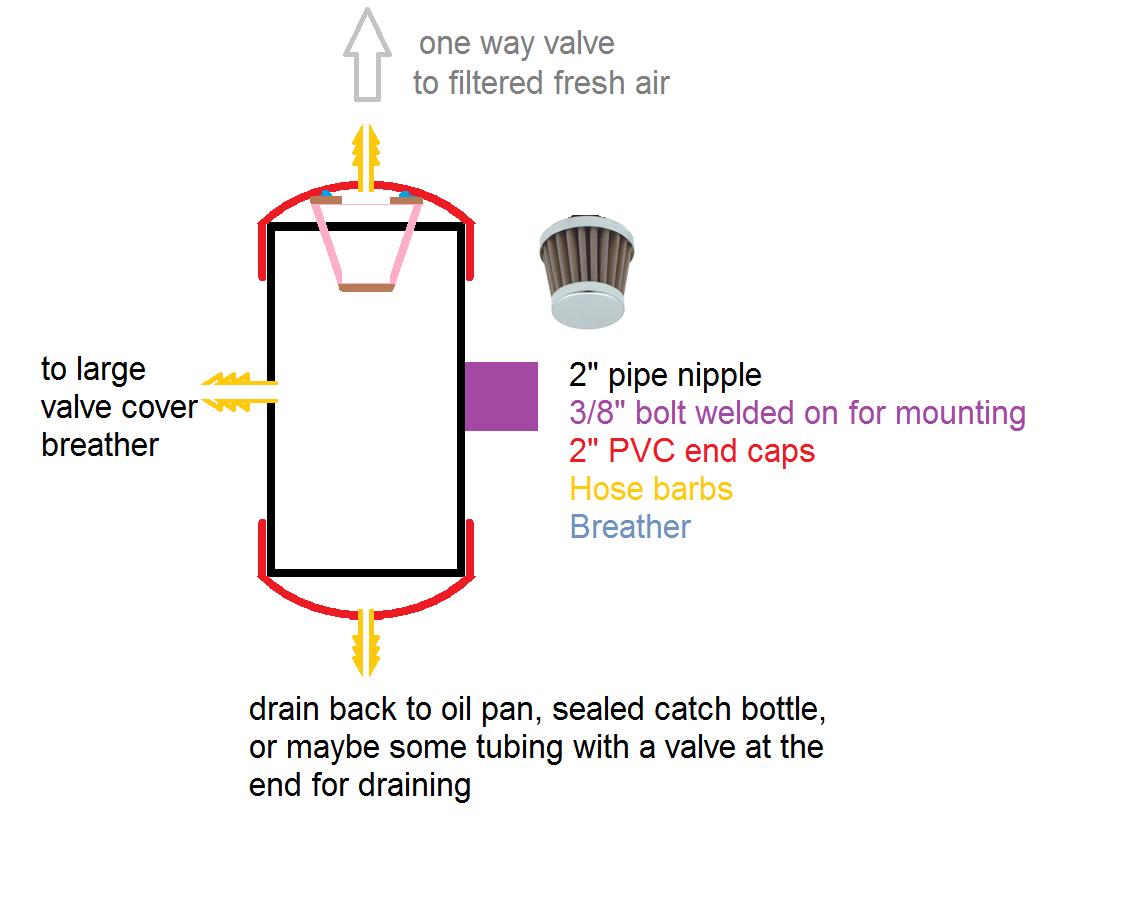
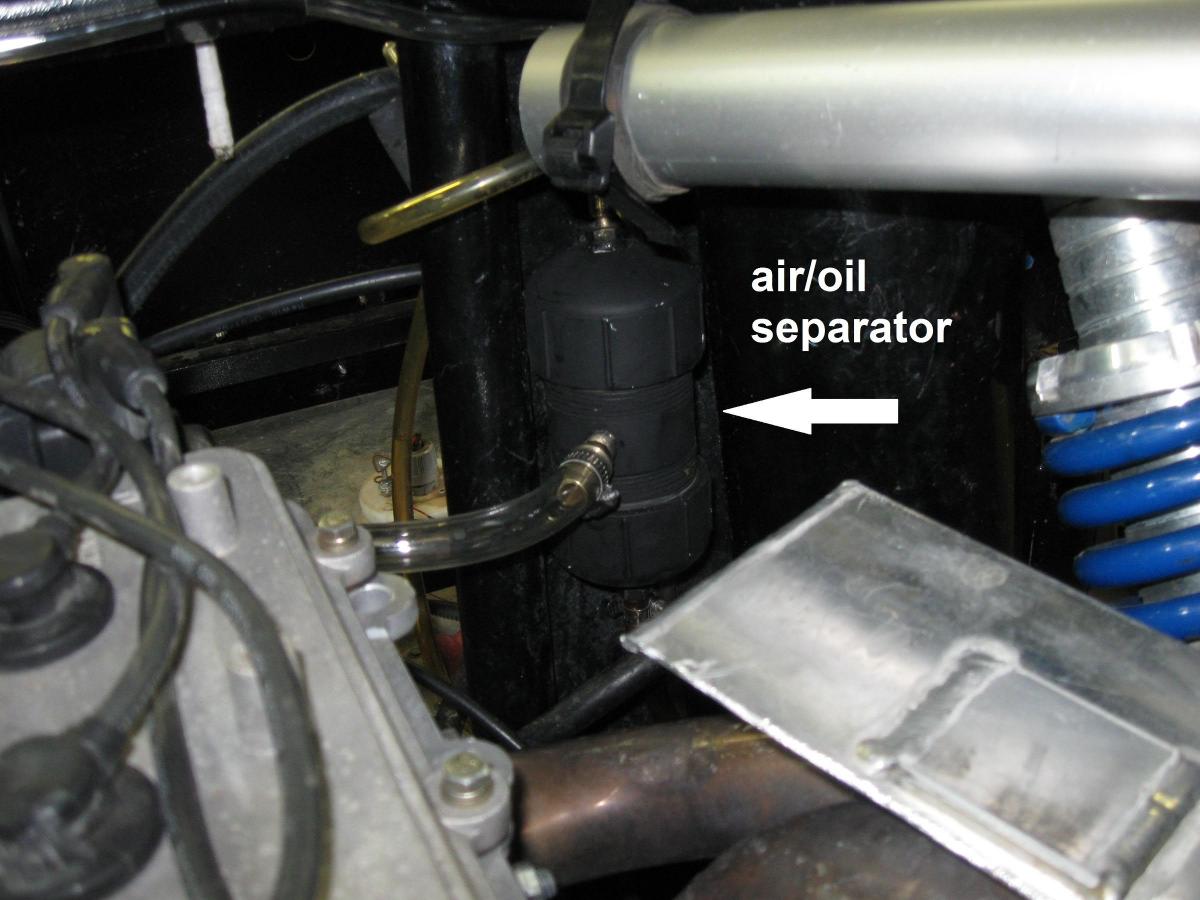
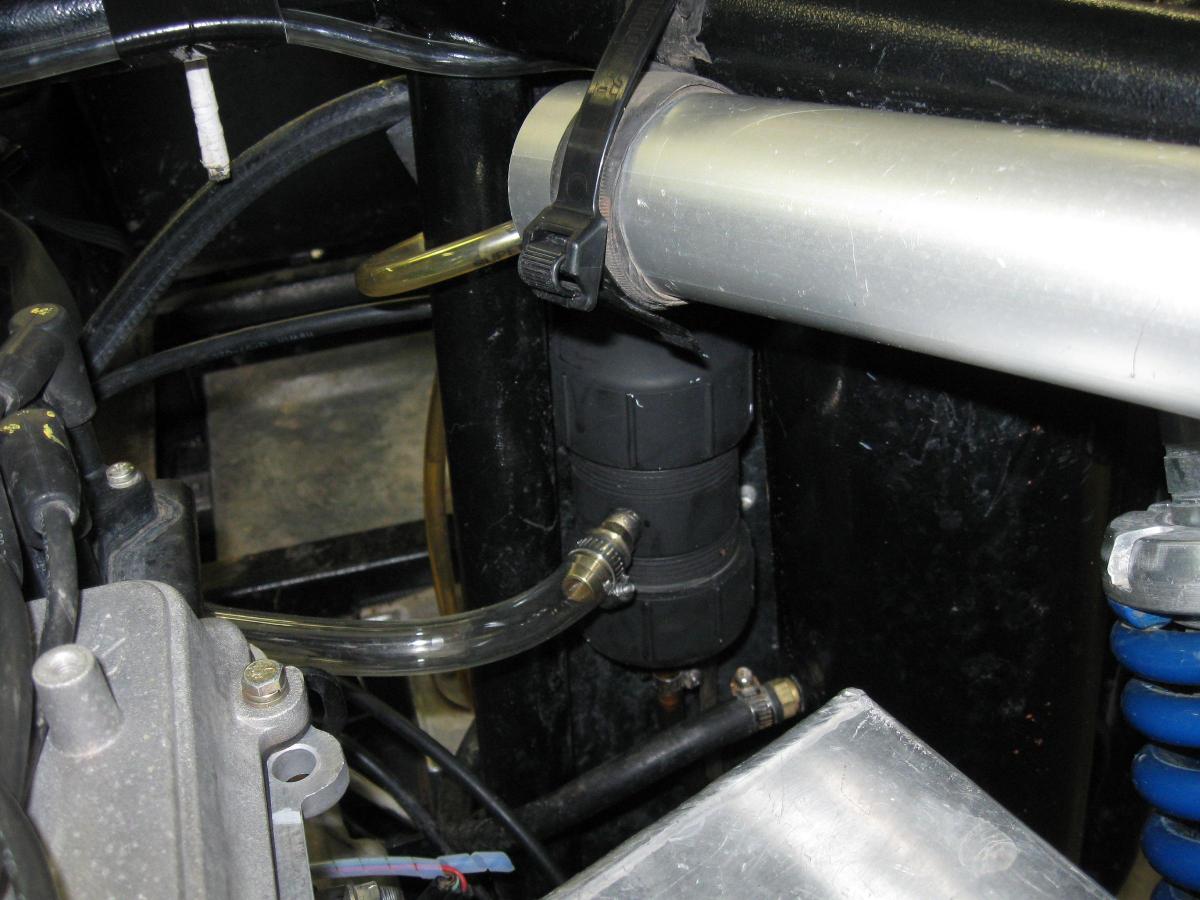
I made my own canister, see attached, the port on the valve cover goes to an oil/air separator, the oil returns to the pan on the forward passenger side and the air goes to the intake after the filter. Mine was bypassing so much that the chrome canister had oil running down the outside, this contraption won't leak. If you have questions, ask

-
I remember using a flat magnet and some small channellocks to lift the the shim pucks out of there pocket, it was about 1/8 inch thick and 1 X 2" and it was a Neodymium magnet.
-
You are correct about fuel pump relay feeds fan relay and always on in stock set up, you could break the wire to the fan relay and put a controller in line there, but it would have to be really really annoying for me to do that, and where are you going to pick up the temperature to turn on the fan?
-
What ever you do, take lots of photos before you take things apart so you can refer back to them later as you put it back together, especially the wiring parts and how the harnesses are routed,
there aren't that many bolts holding the engine to the tranny, just don't forget the plate at the bottom of the clutch housing, I would suggest leave the tranny in
-
Just another option, I'm using FOA shocks, easy to rebuild, don't put more than 180# pound shocks in the front
-
I agree will pulling the motor, don't let the shop that you take the head to adjust the valve by grinding on the stems, knuckle down and get the shims, some can be had at Honda, some can be belt sanded, I did it, but don't recommend it, some may be able to be adjusted by adding thin shims under main shim, that how I think some have done it, but not sure. I hope some one here can give more advise about how to adjust the valves.
I had my whole engine apart and photos of it, but the photo web site shut down,
Your 30 pound cylinder is probably an open valve, don't panic until you actually look at the cylinder walls, I had over a 1/4 inch end gap on my rings, If you open the tranny up get a 3rd gear synchro if you're grinding going into 3rd, I think I have a doc in the parts and pieces thread
-
I don't think I have ever pin pointed where it's coming from, but I do think its every little ounce of play in the suspension bottoming out all at once, I still have it after 20,000 kilometers!
I tries using limit straps, not help, It seems like my most productive attempt was to make the front end suspension as lightly sprung as I could, but I have some 200# springs which I think is a bit too much. Seems to happen on rebound.
-
I bought 100' of 5/16" AmSteel-Blue AS-78, 13,700lb. Breaking Strength, Blue, rope for my winch and found I could put twice as much of this stuff on my winch spool as I could the wire rope that was on it. Doing it just because you can is not always a good idea. Later I needed my winch, real bad, and I let out the necessary amount of rope and started pulling. Because the new rope does NOT hold it's shape like the steel rope, the inner windings compressed and created a side pressure on the ends of my spool and blew it off. Some of the rope got damaged by being forced into the break and I ended up cutting a little less than half off. It will be carried in the Trooper, just not in the winch spool. Also, you have to consider that this is the original winch and has got me out of a few jams, but it's not the best winch out there and this is what I think happened.
-
While I was out for a putt today, I notice the lack of noise coming from my diff, it was fully shimmed and very little play any where, Hope it's good for the rest of the life of the trooper!!
-
I was out for a little putt today and the fuel pump was running fine, but making enough noise / sound to be heard, easily, I'm worried it may be about to fail. Has anyone noticed their fuel pump being noisy and then failing?
Thanks,
Jeff
-
Mine does the same, but not as bad as you make it sound, IMHO, this is caused by the play around the bolts, one of my reasons for using longer bolts with shoulders, Also, IMHO, the fix would be to remover the smaller half of the case and loosen the ring bolts and try to adjust, then tighten, then pull one ring bolt at a time and reinstall with loctite.
JUST MY 2 CENTS WORTH
-
 1
1
-
-
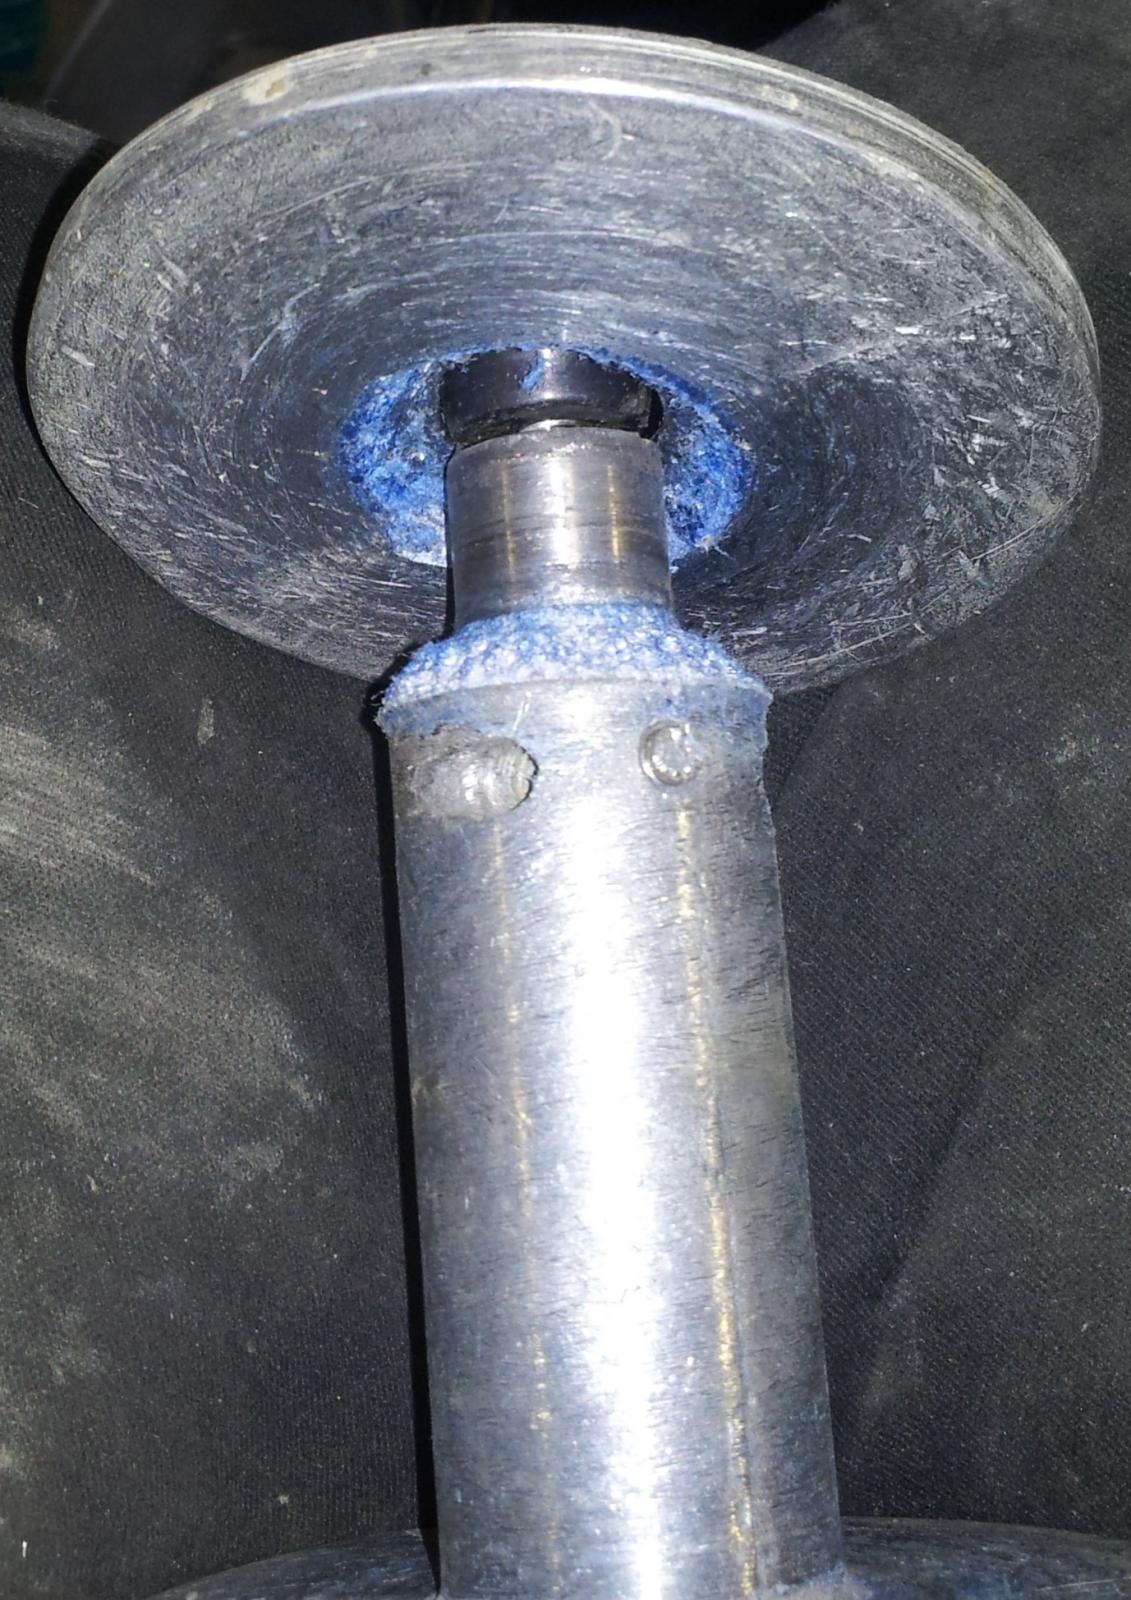
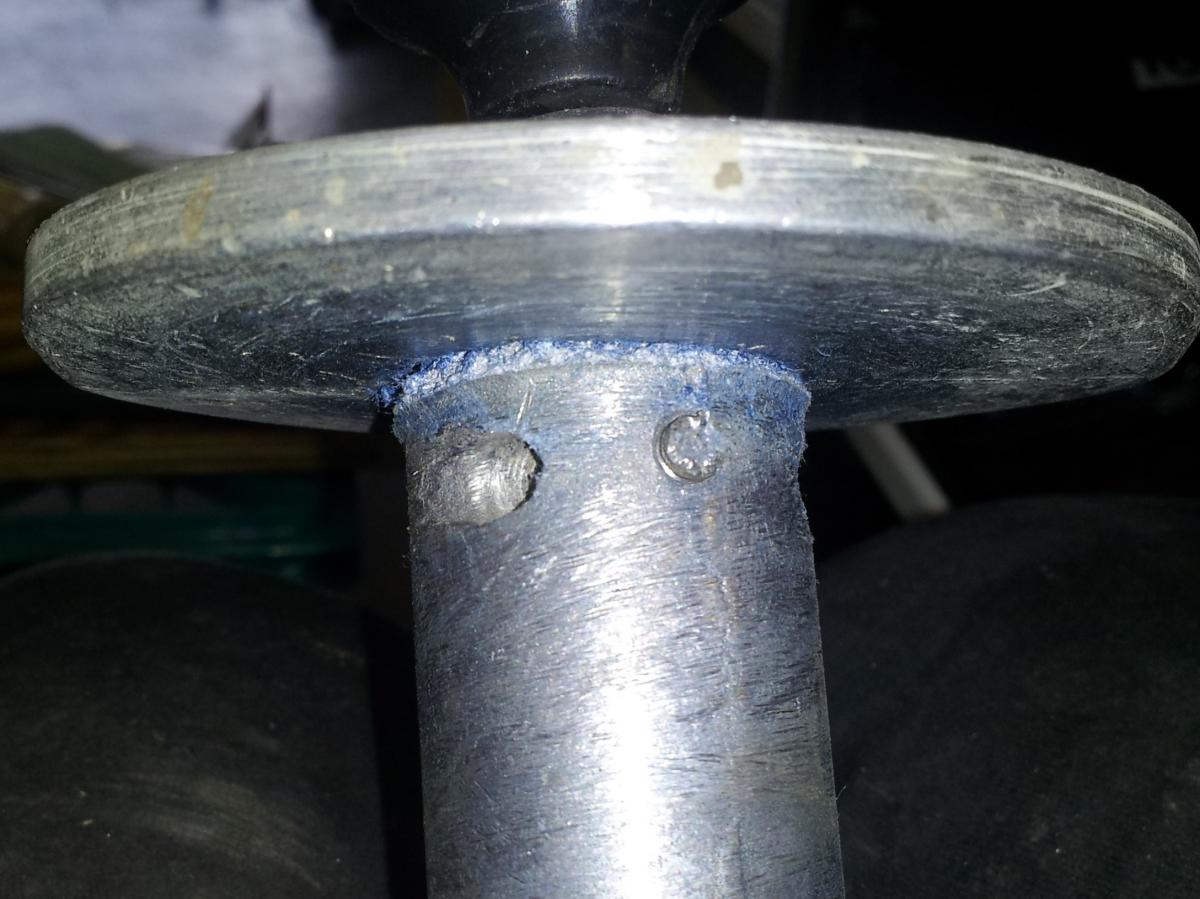
Miguelrmrz, I am a little concerned about the bolts you plan to use to fix your diff with. I worked with Lenny to come up the differential kit and the bolts used in it. The original bolts had 10 mm heads on 8mm bolts, but they were not hard enough and many of us had the same failure you did.
The very tough 12.9 grade bolts we came up with do not clear unless they are ground down, and I don't know of any bolts that would clear except for the original bolt which are not strong enough, IMHO. I took some more photos of where the bolts fit and how tight the tolerances are. I ground down one bolt to see what the minimum amount of grinding, maximum head height is and came up with the heads can not be more than .2740 " high. If I had the equipment, I would mill off a couple hundredth off the bearing holder assembly.
Take another look at the photos at https://drive.google.com/folderview?id=0ByQAhs0e-yF9bDZFdGtkemRkQVk&usp=sharing
-
and I added to Ricks post
-
love to, send away
The McMaster-Carr number that I was using was wrong, this one is correct, I have to reorder, here's some photos of what I took out of blown diff, notice that they are still in good shape, I stripped the socket out on some of them, so I need to replace them, so why not just do them all? I'll take photos of the process of grinding them down.
Some more photos coming go to https://drive.google.com/folderview?id=0ByQAhs0e-yF9bDZFdGtkemRkQVk&usp=sharing
-
Have you considered boxing it in with some thin sheet steel? I believe it to be worth the weight gain. +
-
At the risk of sounding nosey, what kind of bolts did you pick up? Would mind posting a photo,
.Are you planning on shimming the spider gears? That would be a new idea for me. Did you read the post that Lenny did about shimming the differential? At one time he was making complete shim kits with instructions, maybe someone has a copy.
-
link to my photos, got it 'sussed' finally
https://drive.google.com/folderview?id=0ByQAhs0e-yF9bDZFdGtkemRkQVk&usp=sharing
-
I up loaded a few photos.
Miguelrmrz, What are you're plans for your Differential?
-
order some 91290A442 from McMaster-Carr and disassemble and clean your differential while you wait for them to arrive.
Then you will need to machine them down so they clear the rest of the differential. I'll post a few photo of what I do when I get my parts. Do you have google, post your photos in google drive and provide the link, like I did in post # 7
-
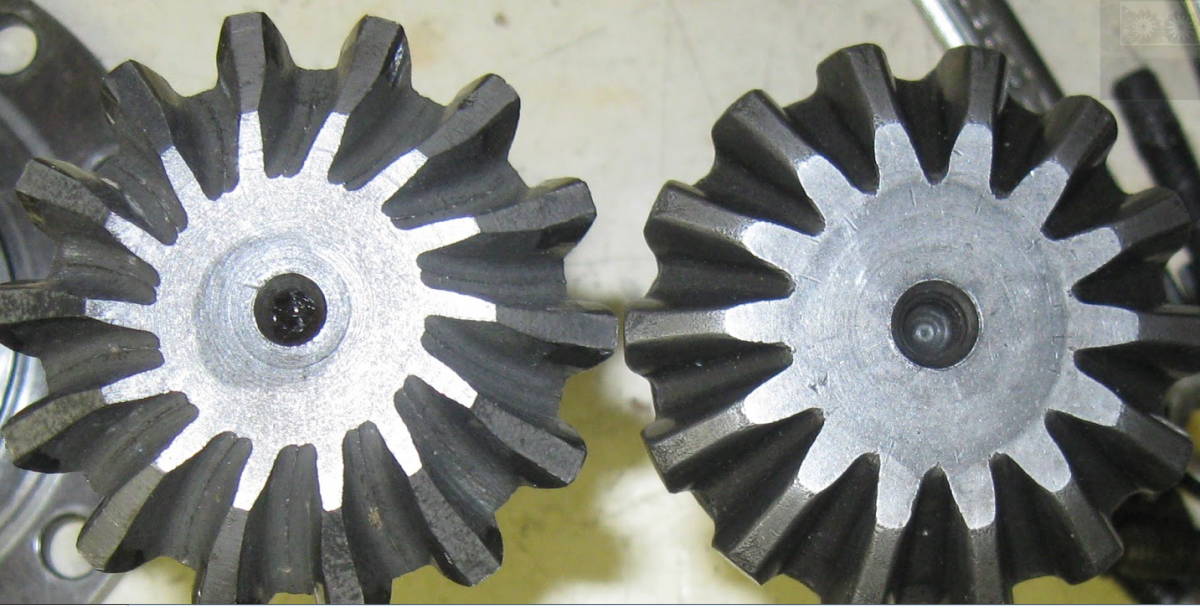
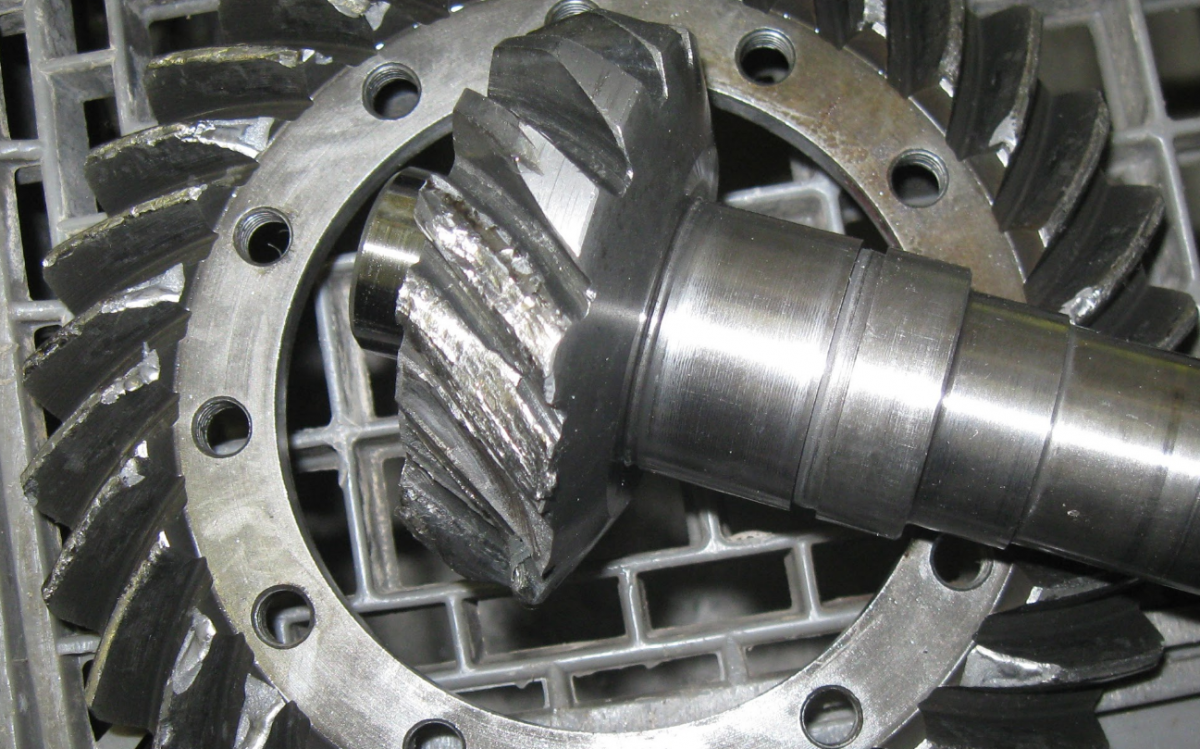
I'm close to 20,000 Kilometers & I believe this is my 4 major rear diff failure, first was sheared bolts, then 2nd & 3rd had to do with bearings and now broken pinion teeth and chewed up ring gear and it looks like the spider bell is cracked, plus the bearing aren't smooth any more. Take a look at the photos at
https://drive.google.com/drive/u/0/#folders/0ByQAhs0e-yF9bDZFdGtkemRkQVk, on the 4th & 5th photo, notice that one has curved teeth and the other has straight teeth, is there advantage to either one? I'm planning on using the straight cut unit and you can see the crack in the spider bell on photo 6.
I need to order some bolts to tie the spider and others to the ring gear,
packBlack-Oxide Class 12.9 Socket Head Cap Screw, Alloy Steel, M8 Thread, 40mm Length, 1.25mm Pitch, packs of 50They come from McMaster-Carr and are as tough as or tougher than anything else I've been able to find, You just have to grind the head down a little for clearance.
Let me know if you can't get to the photos.
 love to, send away

Trooper 1100cc NO SPARK NO PUMP NO FAN TILL WINCH IS ACTIVATED
in Joyner UTV SxS Forum
Posted
I've dealt with the trooper for several year and I'm pretty good with the electrics and I don't see how the winch has anything to do with the the fuel pump, fan or ignition. However, it may be that it provides an electrical path via a feed back to complete the circuit for the pump fan ignition when activated. does everything keep running after the winch is deactivated?
On my trooper, the VIN number is on the panel under the dash in front the passenger seat.
Profile, click on your icon silhouette and the in the upper right is the edit box to click on.
And welcome to the site,
Jeff, AKA Kinarfi