Quantcast
Jump to content

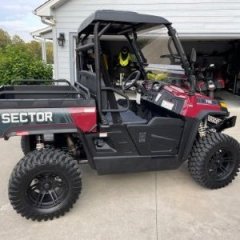
2022 Hisun Sector Engine oil strainer maintenance


Roadstar515

Recommended Posts

Shop battery chargers at ChromeBattery.com

Hey Curt, that makes total sense for it to be in that location. Why they use a strainer and not a magnetic drain plug, you got me. Glad to finally get the answer and be aware of what’s going to happen when I remove the plug. Still don’t understand the strainer reasoning but at least I know.

Thanks, Rick

Link to comment
Share on other sites

Join the conversation

You can post now and register later. If you have an account, sign in now to post with your account.
Note: Your post will require moderator approval before it will be visible.

Guest
Reply to this topic...

×   Pasted as rich text.   Paste as plain text instead

  Only 75 emoji are allowed.

×   Your link has been automatically embedded.   Display as a link instead

×   Your previous content has been restored.   Clear editor

×   You cannot paste images directly. Upload or insert images from URL.

  • Similar Topics

    • By Greg Kilgore
      I installed an electric coolant temp gauge and volt gauge today. The oil pressure gauge I ordered had a bad sending unit. So once the replacement arrives. I'll add that install to the post. The I used a 22mm temp radiator adapter.

      1/8 " NTP x 1/8 NTP adapter.

      And an electric temp gauge.

       
      Had to take a drill and drill bit to enlarge the 1/8 NTP adapter to allow the temp sending unit to pass thru. Another user on the forum enlarged the 1/8 NTP hole in the 22mm radiator to 1/4 NTP and used a 1/4 NTP x 1/8 NTP reducer. Either way would work. Both has it challenges. And both accomplished the same thing. To get the sending unit just barely in the coolant. If you just put the sending unit in. IMO it just blocks too much of the coolant flow.
      I didn't get a pic of how far the sending unit protrudes into the rad adapter. But it wasn't a lot. And also since it an electric gauge the sending unit needed to be grounded. But since there wasn't a place on the temp radiator adapter. I used a clamp to secure a ground/negative wires to the temp sending unit. The gauge wiring was simple. The gauge's wiring harness had a red, green, and black wire. Red goes to a positive. Black to a negative. Green to the sending unit. Since I had some 18 AGW speaker wire. I used that to run to the sending unit. Red to green, black to black. 
      Then another piece of the speaker wire from the gauge to power source. I tapped into the 12V power outlet on the dash. (Just as I did for the overhead fan.)
      Then used a 2" hole saw to cut into the plastic above what I'd call the radio door.


      The gauge goes to about 174° F then the radiator fan kicks on. Cools down to about 150° F and kicks off. Now the lowest the temp gauge will read is 104° when you first start the machine. That is the nature of the gauge. Even says so on the web page. So I'll just have to live with it.
      The voltage gauge
      .
      Was simple to install. Just a positive and negative wire to connect.  Tapped into the 12V power outlet on the dash.


    • By Greg Kilgore
      We all know summer is hot inside the cabs of our SXS. So I've rigged up a couple of fans to help cool down the cab.
       
      I didn't want to drill the fan's "support rails" into the ROPS (Roll Over Protection System), aka roll bars. So I used water clamps to hold them in place. 
       
      I just need to replace the wires I ran with bigger gauge. Then finish the wiring to switches, relays, and battery. But the hardest part. The actual mounting of the fans is complete. Also just in case anyone plans on doing this. I may have to only use 1 fan in the middle instead on 2. Due the the draw on the battery.
      The fans are 12", 12V 80W. So I'm figured they were 6.7 amps apiece. Used the WAVe formula to get unknown values Watts=Amps*Volts then solve for unknown. I know the watts and volts from sticker on fan. So just used above formula to get amps. So a 7 amp fuse should be OK and a 10 amp fuse will be good. 
      So pulling 14 amps from the battery all day may be too much for the charging system to keep up with. And I haven't even installed the radio yet. So I will have to test and let you know.
       
      See pics below.

    • By strike250
      I have the factory service manual available for the Buck 400. Just send me a message with your email and I'll get it to you. Although there is no charge for this, it would be great if  you would visit my website where you could donate any amount to help do things like this with others who need it. Again, there is no charge for this manual, and no obligation to donate. But if you did, I would thank you for sure. Have fun on the trails. www.warriorsoffroad.com
       
      Matt

    • By Robc
      Such a simple task and I can't do it.  The repair manual is of no use.
      I removed all the plastic fasteners  from the engine housing and the back end lifts up about 3/4" .  Something is holding the front near the cup holders.  I'm afraid to use much force for fear of breaking something.
       
      Help please!!
  • Gallery Images

×
×
  • Create New...