Quantcast
Jump to content


Mule 3000 Water Pump Removal Made Easy


Recommended Posts

Howdy, y'all.

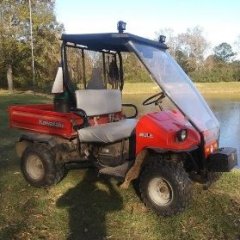
When I searched for tech support online, I found nothing posted pertaining to replacing the water pump on the Mule 3000, with the FD620D Kawasaki twin, so I went ahead and tackled it. Parts diagrams don't show the primary housing in the way, and nobody seems to mention that you have to tear down the primary drive to get one of the bolts out of the cover. In order to follow that procedure, one must purchase the clutch removal tool, at a cost of around $40 plus shipping.

To make your own tool, call around to your local bolt shops and ask for a 100mm length, M14x1.5 hardened bolt. Total cost should not exceed $10. After you've removed the clutch retaining bolt, insert a slightly smaller diameter steel punch that's 3 1/4-3 1/2 inches long. Lubricate the threads on the bolt and proceed with extreme caution, as the clutch is cast aluminum. In other words, don't pull it unless you absolutely have to.

But hey, I'm just replacing the water pump. Why should I have to do all this? Because the engine was designed and then applied. Little details like this escape engineering departments all the time. Irritated? You have every right to be.

Now you can give Kawasaki a gesture I'm sure they're pretty familiar with. After all, some of us don't wave with all of our fingers, at least not every time.

Remove the in frame breather duct by pulling the one bracket bolt in the floor, the clamp to the tube, and the clamp on the primary housing. Remove as an assembly. Remove the bolts around the primary cover and pull it out through the frame in front of the tire. Angle is key, it will slip right out. Don't bother with the exhaust or heat shield unless you like drilling broken hardware.

Remove one primary case mounting bolt, located at one o'clock, just above the clutch. I used a 4" angle grinder to take down the ridge in the immediate area, and finished it with a sharp chisel. You'll be drilling a half inch hole just above the rubber isolator, perhaps 1/32" to the left of the center of the bushing. I felt it out with my fingertips before drilling a 3/16" pilot hole. Use your bit to open up the hole in all directions, until you can fit your 1/4" 10mm socket through it, and remove the bolt from said poorly thought out location.

But wait, there's another bolt that won't come out now. It's in the very back, and only goes so far. Do I need to drill again?

No, just pop the pump out and the bolt will come with it. Mark it, bag it, or otherwise set it apart so it can go back in the same hole.

After you've cleaned the gasket surface and installed your new pump, you're left with an open hole in the primary case. Places like Harbor Freight Tools sell rubber plug assortments pretty cheap, and should you ever need to replace the pump again, it's as simple as removing the plug and the bolt. Otherwise, there are numerous varieties of mix-in-hand epoxy putties that can be formed into the hole and knocked out again later.

So the dealer wants you to bring it in and pay an exorbitant amount to go through what's likely the same process I've described above. Having worked as a flat rate tech in a dealership before, I know what kind of cheese gets by, and this is mild in comparison. This way, the tech can flag three hours for an hour and a half job at best. I'm sure some can turn this out in an hour, but you'll still pay face value by the book.

Some don't care, it's only money, and someone else's hands get dirty. For everyone else, there you are.

Link to comment
Share on other sites

  • 1 month later...

Join the conversation

You can post now and register later. If you have an account, sign in now to post with your account.
Note: Your post will require moderator approval before it will be visible.

Guest
Reply to this topic...

×   Pasted as rich text.   Paste as plain text instead

  Only 75 emoji are allowed.

×   Your link has been automatically embedded.   Display as a link instead

×   Your previous content has been restored.   Clear editor

×   You cannot paste images directly. Upload or insert images from URL.

  • Similar Topics

    • By Sisco
      Does any have a part number for the fuel pump sock for a 2016 challenger 700 efi. Does not show on any parts diagram but the old pump has one on it.
    • By Mnfish
      I have a 2016 Cub Cadet 750 Challenger Crew. My in tank fuel pump is inoperative. Can I put in an external inline electric fuel pump to replace the intank one? The inline ones are about $350. An inline electric one is about $25. Both are easy to replace just really expensive for the intank one. Any kind of inline external pump I should look at? What PSI is needed? Thanks for any help 
    • By runyan825
      I know the hisun parts are not very solid and they seem to be Rhino clones to some extent. I'm trying to find better quality replacement parts than the ones that are "OEM"....
       
      Sent from my SM-S928U using Tapatalk
       
       
    • By doncaron
      Hello 
      I have a 2022 Massimo t-boss 550. I’m looking for a fix for my timing problem. It keeps getting out of timing. Now I’m trying to find the proper parts for the linhai motor. I’m looking for tensioner chain and gear. If there’s anything else I can do to fix this issue please let me know. Unfortunately I can’t afford to get something better so I got to get it fixed. Thanks in advance. 
      Don
    • By Travis
      Many people have issues with the kawasaki FJ400 engine  fouling out spark plugs, after  working on a  few FJ engines and 600 series Mule's with this issue,  i can say the fix for this issue is using a slightly hotter spark plug... the factory recommends a BPR6ES NGK plug.... the Number in NGK plugs represents its heat range and somewhat odd, the lower the number the hotter the plug, at least as far as NGK is concerned. If you have  a Mule fouling spark plugs try installing a NGK BPR4ES spark plug.
      FROM NGK
      A hotter heat range spark plug has an insulator design with a longer heat flow path to the metal shell of the plug. As a result, more heat stays in the ceramic firing end and less is dissipated to the engine. A colder heat range spark plug has an insulator design with a shorter heat flow path to the metal shell of the plug. As a result, less heat stays in the ceramic firing end and more is dissipated to the engine. For a spark plug to function properly, it must have a tip temperature high enough to burn off carbon deposits (self-cleaning) and avoid fouling, while remaining low enough to avoid overheating the ceramic firing end and pre-ignition.
×
×
  • Create New...