


-
Similar Topics
-
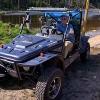
 By Prepper
I have been doing a little research on which engine oil is best for UTV engines. There seems to be some disagreement over using a good quality regular engine oil, and the necessity of using "M2" (or wet clutch suitable) oil. My understanding is the "wet clutch" suitable oil has less friction reduction properties (hence a more responsive clutch with less slippage). While less friction reduction properties would seem to be better for the wet clutch... it would not be best for the internal engine parts like camshaft bearings and other moving parts where friction is detrimental and would lead to premature failure. Some folks swear you need M2 oil, while others say they have been using regular motor oil for years and their clutch is just fine. Could they both be right ???
Any thoughts ?
-
 By The Road Hound
Hi,
New to the forum.
Came here looking for some experienced UTV users who can enlighten me about which brand should I pick for my very first UTV or SXS.
I'm between 3 brands and 3 models:
*Kawasaki MULE PRO-FXR 1000.
*Yamaha wolverine rmax2.
*Can am Commander XTP.
The use I'm willing to give it is mostly to go to the range with my wife, load steel targets and all our shooting gear, we shoot a lot, rifles, Shotguns and Handguns for practice, training and competition. (Range is about 10 miles from home)
But also I want something that I can take to the trails and have fun on dirt, mud, rocks, puddles or creeks.
Any objective information will be appreciated, specially which is more reliable and durable.
Thank you and happy 4th of July.
-
 By allinone
Recently purchased 2nd hand not going Crossfire GT400 (Australian branded name?) 2020 model. Has some issues what would be the best forum to pose questions.
Thanks
-
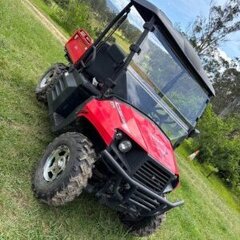
 By BMurph
Hello everyone! I am new here and have no experience with UTVs but I am quickly getting some. I have a shifting problem where I can shift through all gears without the engine running but as soon as I start the engine I can not select a gear. Yes, foot is on the brake and yes the pin is being pulled to go into reverse if I was to try going into reverse. The shift lever does not move. I adjusted the linkage to get more accurate shifting with the engine off so I know those are now correct. I opened the shift lever housing to inspect the teeth on the gear and found this picture below. Why is this oil so milky looking? I assume with oil like this I'll need to replace the wet clutch as well but am not positive. Does anyone have any input into how to flush this system and get things shifting correctly? Thanks in advance for all the help!

-
By BMurph
Hi everyone. I am new here to the forum and am excited to learn from all of you with more experience than me with UTVs. Our Axis750 we use on the hobby farm started to have some issues going into gear. Yes, foot is on the brake and completely stopped as required with these machines. I thought it was the linkage and adjusted it to where it is accurately shifting with the engine off and key in the on position. I start the engine and it won't shift gears (yes foot is on the brake). I thought maybe it was the shift lever teeth so I opened the assembly and this picture shows what I just found. I assume this means the wet clutch would need replaced too while draining and flushing the oil. What else should I consider or be looking at? Any idea what could cause this? I don't see visible leaks or cracks in the system anywhere. Thanks in advance for the help!
-


Recommended Posts
Join the conversation
You can post now and register later. If you have an account, sign in now to post with your account.
Note: Your post will require moderator approval before it will be visible.