-
Posts
2,186 -
Joined
-
Last visited
-
Days Won
37
Content Type
Profiles
Events
Forums
Gallery
Downloads
Community Map
Posts posted by Kinarfi
-
-
do you understand what happens to engage 4 wheel drive? have you had your front differential apart yet?
-
here's a link so you can download a manual
http://joyner-usa.com/manuals/
there are some other pieces of information in the pinned
Parts, Pieces, and Information for our Troopers & Joyners thread
-
do you have a manual?
-
-
search using the word transmission, I think I left some info and instructions in here some where, see if you can find it before I have to open up my stored files,
ignore travis, he sticks his nose in where it don't belong and as he said he doesn't own a Joyner and knows nothing about them, but that doesn't stop him from wasting our time reading his dribble.
Travis, shut the **** up!!!!
-
 1
1
-
-
2 hours ago, Jacksnife said:
I was not able to locate that one IGN1 fuse going to headlamp rocker switches. Having the winch working through me for a loop, but the lights fixed themselves before I followed winch wire to its rocker switch... so it is still unknown to me how it was possible. I'm guessing the wiring diagram is only a guideline and not a true manufacturing document (at least not for my model)
I had 12V at the ignition switch, but not at the contact switches. I also had no reverse lights, horn, and 4x4... and all fuses were good. I followed IGN1 from the ignition switch (yellow wire) about 20" to a connector where it turned blue. After the wire turned blue there is a splice going to the horn switch, then the rest of the cable bundle went to the back. I didn't go further because it started working. It must have been a bad connection at that connector where the wire color changed from yellow to blue.
Can you tell me where the wire turns from solid blue to blue/yellow stripe? There is no fuse going to the horn, and the splice looks factory to me. Maybe the horn fuse is actually the one going to the headlight rocker switches?
Sorry, it's been quite a while since I traced a wire and don't remember it, so, NO, can't say where wires change colors. and my 15 is different from youur 09
-
I pulled up a schematic to check this, but the power to drive all these devices is suspect and may be a blown fuse, capstan is you winch.
don't let your wife know about yourwench 1.a country lass or working girl:The milkmaid was a healthy wench.2.Usually Facetious. a girl or young woman.3.verb (used without object)Archaic. a strumpet.4.to associate, especially habitually, with promiscuous women.
 -
if it just idles to slow to keep running, dial the idle up a little. these thing have an electronic idle that fail and then you have to adjust the idle mechanically, it the little screw on the top right of intake. My electronic worked great for a long time on both my vehicles, but alas, it failed on both.
Jeff
-
On 8/3/2017 at 2:44 PM, Tobie1987 said:
Tires & rims look good, but it makes the Trooper look shorter, sort of, what's with the extra shock on the swing arm?
If you take a Dremel tool and cut all the way around glove compartment detent, then add some walls so the bottom is as far down as possible and a lid, it makes for a nice usable glove box. I'll get photo for you.
Jeff
PS read the pinned posts, Parts, Pieces, and Information for our Troopers & Joyners, it has the information
about the lug pattern, 4x115, and a lot more valuable stuff and it was mostly written by 2008 Trooper owners, including me.
-
I have one on my 2015, but only the factory built reader can read it, the early Troopers didn't have one, but if you need one and know how to hack into the system, you can get the information of the computer, the computer pin out is in Parts, Pieces, and Information for our Troopers & Joyners ........, it's pinned
My tire is a General Grabber AT2 27x8.50 R14 95Q 6PR OWL http://ssl.delti.com.../GRABBERAT2.jpg I like it because I do a lot of pavement and it works off road as well any thing else.
-
I would like to see a photo of what happened also and an explanation, description of what happened
-
OOPs I see you already did, suggest you move to the joyner forum
-
what happened, a big nasty rock?, or the brackets broke and it wore a hole in the bottom. I'm assuming the low point is where YOU have 2 fuel outlet ports and it's dented, real bad or very thin.
Talk to Brandon at JoynerUSA.com, the only place to get a new one that I know of, or pull it and take to some who does aluminum welding, have new, better mounting brackets put on while you're at it.
-
welcome, please fill out your info, who knows, maybe there's an avid trooper owner around the block from you.
Jeff
-
when you try to start, is the engine turn over and it won't light off or is it not engaging the starter? If not engaging starter, tap on the fuse box and see if that gets you going, I had to put some foam tape I had on the top of the bottom left relay to solve my problem, that is the relay the comes in when you step on the brake which is interlocked with the start ket.
Jeff
-
I have an air pump designed for a solder sucker that tested out as 10psi that I use to pressurize a Mason jar that I fill with brake fluid and then, using various means, pump the fluid through the system. I did this from master cylinder, then from the caliper and still really poor brake pedal, finally used some welding clamps and collapsed all the calipers to where the brakes were locked and started pumping fluid from the master cylinder reservoir to the calipers and while the fluid was flowing, also pumped the pedal several times, I did notice that when I pumped, I had air come out with the fluid, after that, I had good pedal, FINALLY!
Next, all the fluid that I recovered was filtered through coffee filters and reused in the system, or dripped or spilled, and now that I'm finished, saved for next time, along with the mason jar and tubing.
Jeff
PS. I do agree that method D from above would tend leave any air in the system because the fluid is going in at a high point with no buffer like the reservoir so the air would just swirl around in the pressure chamber
-
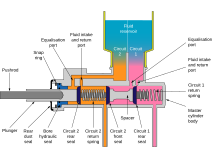
 I have to replace my master cylinder and I'm wondering how something so simple can fail. I've bled it forward and reverse and I just can't get it to pressure up, so i have a few questions:
1 When you adjust the brake pedal, is there supposed to be any pressure from the push rod on the plunger or a little free play, looks to me like you should have a little free play.
2 What's the best brake bleed method?
(A)The old tried and true, 2 people required, method of pump the brake pedal until you get pressure, then open the bleed valve and reclose and over and over and over.
(B) Put pressure on the master cylinder reservoir and then bleed at each wheel cylinder, making sure you keep fluid in the reservoir.
(C) Put a vacuum on the wheel cylinder bleed screw and suck fluid out of the master cylinder.
(D) Drain or partially drain the master cylinder and pump fluid in at the wheel cylinder.
Are there any other methods that should be included here?
I tried B C, and D and still no couldn't build pressure at the pedal. I disassembled it and reassembled it several time, and still, no pressure, all looks good, it just doesn't work, expect new master cylinder Monday afternoon.
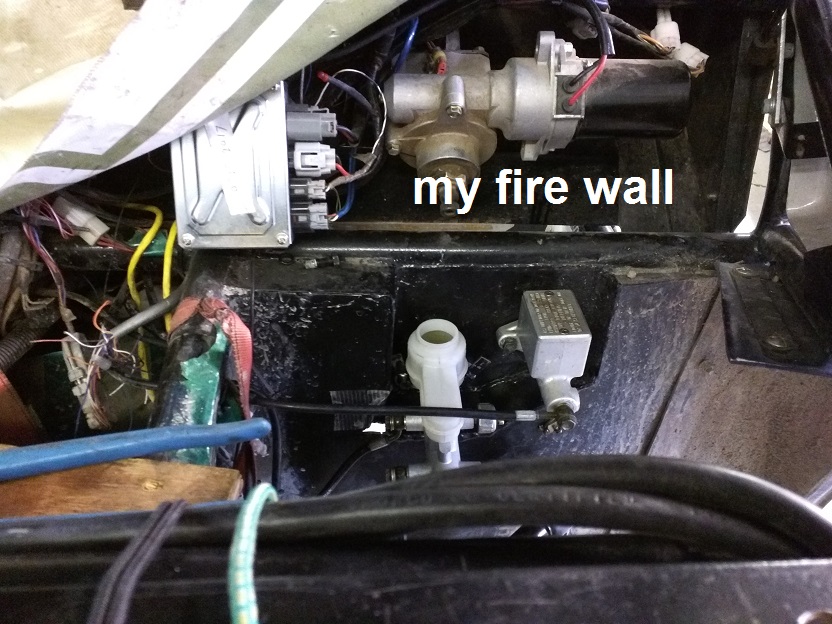
Need to check for cracks in the master cylinder, the way mine was mounted, the banjo nut was in contact with the fire wall. On my 2015, I have the clutch and brake master cylinder on the front of the fire wall and there is a cut out for them to mount on and it should probably be a bit longer for clearance of the banjo nut. - I'll add a photo tomorrow -
Do you want to see a really bad place to have no brakes, copy this partial GPX and drag and drop onto Google Earth - https://drive.google.com/drive/folders/0ByQAhs0e-yF9NTdma1FNM3p2OUE?usp=sharing
-
Chery Engine Parts Cross
by Rusty Nutz Racing » Wed Dec 16, 2009 9:24 pm
Maybe this will help all the Joyner owners out, after hours and hours of research I found that the 2007 and older Chery engines are a clone of the ford's Britian CVH (escort) motor such as the 1.1, 1.3, 1.6 and 2.0. The great thing is that even though it was a clone of the Britian Ford CVH motor, they used 90% of the same parts as Ford U.S. CVH motor. The trannys are a VW model gear boxes with Ford bell housing. Least that is what mine is. Like the 650, 800 & 1100 are from a 1.1 to 1.3L VW golf. I have the 2006 1600 Joyner and my tranny is from a 97 VW Jetta. Now I'm not saying everything will bolt right up on the 650, 800 and 1100's you'd have to check that out yourself. But I know a friend that has a 800 Roketa and replaced transmission parts with a 1.3L VW golf. Another friend with a 2007 Joyner 1100 used gears and several other parts from a 1.3L Golf tranny. I have a 97 Jetta tranny that matches perfect to my 1600. I'm currently running a VW Jetta starter on my 1600. I bought several ford escort parts as replacement parts that fit perfect.
Just do some research or pull photos of the VW 1.3L tranny and you can compare what it looks like to what you have. Do the same on the engines. Google photo of the 1.1 or 1.3 and see if they don't look real close to what you have.
I've seen this info before but not on this forum. thought it might be of interestJeff-
 2
2
-
-
trooper 1100 2010 ONLY DOWN STEEP GRADES, you weren't clear on this, but on my 08, the gas leaves the the tank at the rear, so when going down a long steep hill with less than a half tank, the outlet uncovers and the pump, filter and the rest of the system runs out of gas until you level out and then it has to purge the air in the system before it will run good again. To fix this, I added a surge tank the and pulled the fuel off the bottom and the return went to the top, the surge tank was kept full by a low pressure pump from the main tank.
-
Didn't sound like a good idea when I posted it,
Thanks,
Jeff
-
I'm sure most of the time, Troopers (&others)travel down the highway to riding on a trailer, has any one tried just hooking them up with a tongue and leaving the tire on the ground?
Probably a dumb idea for Troopers with the knobby tires, I'm probably one of the few with street tires on their Trooper.
-
I got mine at McMaster-Carr 4483T36
PTFE/Kevlar Insert, M16 x 2.0 x 40.mm shank, 21,966 lb static radial load capacity, 23°, $25.60 ea. or $204.80 for 8This is already in parts and pieces, but I had to do a search to find it, but I will add your reference also. It's not as pretty as just the joint, but on everyone of my joints, I slid a piece of polyurethane foam behind the joint, packed it with grease and then covered it the foam and then taped the foam down to the arm, not as pretty, but I would rather not change heims all the time.
Jeff
Ps I'll see if I can find my photos of the process tomorrow, good night

-
that's sounds correct to me, I often look to the tach for how fast I'm going, same on my 08 and 2015,
10mph per 1000 rpm
-
sharable link to my tranny photos
https://drive.google.com/open?id=0ByQAhs0e-yF9clZhZHVVT05nbXM
I'm uploading now


 I have to replace my master cylinder and I'm wondering how something so simple can fail. I've bled it forward and reverse and I just can't get it to pressure up, so i have a few questions:


Diff oil
in Joyner UTV SxS Forum
Posted
TY-RAPs work good for me after I open a CV up and they are a lot easier than some of the boot clamps that have to be crimped.