Quantcast
Jump to content

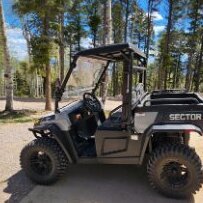
Low Milage Joyner T2


Recommended Posts

2008 Joyner T2

Maroon (?)

Black powder coated custom engine panel

Hush Thrush muffler

Brand New 27" Dirt Commander tires

K&N filter and pre-filter

Mobile 1 synthetic oil

Manual fuel pump switch

Body has couple wear marks from cover

One wheel has a small ding

346 miles (barely broke in)

$7600

Trailer not included.

Kurt

702 seven eight five 14 seventy 1

post-214-0-75888700-1339889168_thumb.jpg

Link to comment
Share on other sites

Shop battery chargers at ChromeBattery.com

Join the conversation

You can post now and register later. If you have an account, sign in now to post with your account.
Note: Your post will require moderator approval before it will be visible.

Guest
Reply to this topic...

×   Pasted as rich text.   Paste as plain text instead

  Only 75 emoji are allowed.

×   Your link has been automatically embedded.   Display as a link instead

×   Your previous content has been restored.   Clear editor

×   You cannot paste images directly. Upload or insert images from URL.

  • Similar Topics

    • By Weber
      Hello.  Can anyone provide location of fuel pump relay switch.  According to the tech at Massimo it is not in the fuse/relay switch box but mounted near the fuel pump, but I am not seeing it.  Pics would be appreciated also and thank you in advance.
    • By NewtoUTV
      We just purchased the Coleman UT400, I put 5 gallons of fuel in the tank and the fuel indicator still reads "empty".  After looking around the fuel tank, I found a tube that is only connected at one end, maybe this is the issue?  I have been looking for a more comprehensive manual that may show how this tube should be connected, no luck.  Looking for help on this issue/issues.  Thank you.

       
    • By Blaine
      Was wondering if anyone knows how to check a waterpump on a 2013 arctic cat prowler 1000 XTZ My cat overheated  and I was not working it that hard Have checked for antifreeze in oil in case it was a head gasket but its clean 
      Next step will be to check pump and thermostat I know how to check thermostat  but clueless on checking pump I did refill rad and the started machine with cap off and coolant level did not change
    • By Greg Kilgore
      I installed an electric coolant temp gauge and volt gauge today. The oil pressure gauge I ordered had a bad sending unit. So once the replacement arrives. I'll add that install to the post. The I used a 22mm temp radiator adapter.

      1/8 " NTP x 1/8 NTP adapter.

      And an electric temp gauge.

       
      Had to take a drill and drill bit to enlarge the 1/8 NTP adapter to allow the temp sending unit to pass thru. Another user on the forum enlarged the 1/8 NTP hole in the 22mm radiator to 1/4 NTP and used a 1/4 NTP x 1/8 NTP reducer. Either way would work. Both has it challenges. And both accomplished the same thing. To get the sending unit just barely in the coolant. If you just put the sending unit in. IMO it just blocks too much of the coolant flow.
      I didn't get a pic of how far the sending unit protrudes into the rad adapter. But it wasn't a lot. And also since it an electric gauge the sending unit needed to be grounded. But since there wasn't a place on the temp radiator adapter. I used a clamp to secure a ground/negative wires to the temp sending unit. The gauge wiring was simple. The gauge's wiring harness had a red, green, and black wire. Red goes to a positive. Black to a negative. Green to the sending unit. Since I had some 18 AGW speaker wire. I used that to run to the sending unit. Red to green, black to black. 
      Then another piece of the speaker wire from the gauge to power source. I tapped into the 12V power outlet on the dash. (Just as I did for the overhead fan.)
      Then used a 2" hole saw to cut into the plastic above what I'd call the radio door.


      The gauge goes to about 174° F then the radiator fan kicks on. Cools down to about 150° F and kicks off. Now the lowest the temp gauge will read is 104° when you first start the machine. That is the nature of the gauge. Even says so on the web page. So I'll just have to live with it.
      The voltage gauge
      .
      Was simple to install. Just a positive and negative wire to connect.  Tapped into the 12V power outlet on the dash.


  • Gallery Images

×
×
  • Create New...