Quantcast
Jump to content

New shock hoops


2scoops

Recommended Posts

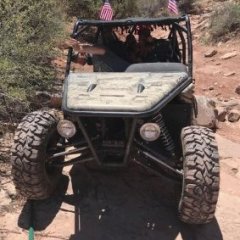
One of my goals in lowering my front diff was to hopefully not have to use limiting straps with my 8.5 inch shocks. Unfortunately, lowering my diff did not allow me to achieve this. So, I started on new shock hoops for the front. I cannibalized tubes from the rear dump bed that I removed. The angle was exactly what I needed, and I don't have an 1.5 inch die for my bender. One challenge I ran into was welding the tube--its super thin. I am not a great welder and even with my 110 vold welder it was hard not to burn through. I am only set up for flux core wire. If I was using Co2 it probably would have been much easier. I cut the tube that the upper shock mount bolts to, cutting straight down just inside the original shock mount bolt hole and removed that section of tube. The new shock hoop runs about 2 inches over the top of the tube I just mentioned. One end is welded to the top middle frame and the other is welded to the front bumper tube. then, I tied it back in to the cut section of tube and original shock bracket using 3/16 inch plate steel--it is not going anywhere. I will have to make some holes in the hood to accomodate the new hoops. They will probably stick out about 1 inch. If I don't booger it up, it should look really cool. Now, my shocks will extend right to my max limit--no limiting straps needed. At full compression the shock has about 1/2 inch left on the shaft.

My front suspension travel is now just over 12 inches. I can't get anymore with out different CV's. My up travel is limited by the ball joints. After being done, I would bet that my original suspension travel was no more than 8-9 inches stock. In stock form my T2 rested with maybe 1 inch of droop. Now, it is like 4-5 inches of droop at original ride height. Another added benifit is the shock is at a better angle than stock--more inline with the travel of the A-arms. I can't wait to take it to Moab!

post-867-0-70551400-1300065739_thumb.jpg

Link to comment
Share on other sites

One of my goals in lowering my front diff was to hopefully not have to use limiting straps with my 8.5 inch shocks. Unfortunately, lowering my diff did not allow me to achieve this. So, I started on new shock hoops for the front. I cannibalized tubes from the rear dump bed that I removed. The angle was exactly what I needed, and I don't have an 1.5 inch die for my bender. One challenge I ran into was welding the tube--its super thin. I am not a great welder and even with my 110 vold welder it was hard not to burn through. I am only set up for flux core wire. If I was using Co2 it probably would have been much easier. I cut the tube that the upper shock mount bolts to, cutting straight down just inside the original shock mount bolt hole and removed that section of tube. The new shock hoop runs about 2 inches over the top of the tube I just mentioned. One end is welded to the top middle frame and the other is welded to the front bumper tube. then, I tied it back in to the cut section of tube and original shock bracket using 3/16 inch plate steel--it is not going anywhere. I will have to make some holes in the hood to accomodate the new hoops. They will probably stick out about 1 inch. If I don't booger it up, it should look really cool. Now, my shocks will extend right to my max limit--no limiting straps needed. At full compression the shock has about 1/2 inch left on the shaft.

My front suspension travel is now just over 12 inches. I can't get anymore with out different CV's. My up travel is limited by the ball joints. After being done, I would bet that my original suspension travel was no more than 8-9 inches stock. In stock form my T2 rested with maybe 1 inch of droop. Now, it is like 4-5 inches of droop at original ride height. Another added benifit is the shock is at a better angle than stock--more inline with the travel of the A-arms. I can't wait to take it to Moab!

I was thinking about doing shock hoops on mine. This is interesting. I cant wait to see your finished product.

Link to comment
Share on other sites

Yeah looks pretty trick!

Thanks Rocmoc. I just got off the phone with Nick at Offroad Warehouse. Thanks for the tip! He suggested 150 over 250 in the front & 200 over 350 in the rear. He said that is what they have put on other Troopers.

Also, I gotta give a plug to Steve at Makintrax suspension. He offered to send me some used springs to test out until I found the correct rates. Steve knows what he is doing as well.

I wasn't intending the shock replacement to be this extensive, but I am trying to squeeze every centimeter out of the suspension. The back has GOT to be easier than the front!

There are more pics in the gallery if you haven't found them yet.

Link to comment
Share on other sites

Thanks Rocmoc. I just got off the phone with Nick at Offroad Warehouse. Thanks for the tip! He suggested 150 over 250 in the front & 200 over 350 in the rear. He said that is what they have put on other Troopers.

Also, I gotta give a plug to Steve at Makintrax suspension. He offered to send me some used springs to test out until I found the correct rates. Steve knows what he is doing as well.

I wasn't intending the shock replacement to be this extensive, but I am trying to squeeze every centimeter out of the suspension. The back has GOT to be easier than the front!

There are more pics in the gallery if you haven't found them yet.

I saw the other photos,really looks good.

Link to comment
Share on other sites

One of my goals in lowering my front diff was to hopefully not have to use limiting straps with my 8.5 inch shocks. Unfortunately, lowering my diff did not allow me to achieve this. So, I started on new shock hoops for the front. I cannibalized tubes from the rear dump bed that I removed. The angle was exactly what I needed, and I don't have an 1.5 inch die for my bender. One challenge I ran into was welding the tube--its super thin. I am not a great welder and even with my 110 vold welder it was hard not to burn through. I am only set up for flux core wire. If I was using Co2 it probably would have been much easier. I cut the tube that the upper shock mount bolts to, cutting straight down just inside the original shock mount bolt hole and removed that section of tube. The new shock hoop runs about 2 inches over the top of the tube I just mentioned. One end is welded to the top middle frame and the other is welded to the front bumper tube. then, I tied it back in to the cut section of tube and original shock bracket using 3/16 inch plate steel--it is not going anywhere. I will have to make some holes in the hood to accomodate the new hoops. They will probably stick out about 1 inch. If I don't booger it up, it should look really cool. Now, my shocks will extend right to my max limit--no limiting straps needed. At full compression the shock has about 1/2 inch left on the shaft.

My front suspension travel is now just over 12 inches. I can't get anymore with out different CV's. My up travel is limited by the ball joints. After being done, I would bet that my original suspension travel was no more than 8-9 inches stock. In stock form my T2 rested with maybe 1 inch of droop. Now, it is like 4-5 inches of droop at original ride height. Another added benifit is the shock is at a better angle than stock--more inline with the travel of the A-arms. I can't wait to take it to Moab!

your not kidding about how thin the walls of the tubes are.I think it was rocmoc who i first heard it from when he was doing his cage mod and i learned first hand when i fabed my doors.

Link to comment
Share on other sites

I saw the other photos,really looks good.

Thanks! You know I was thinking you could almost make what I am doing into a bolt on kit to mass market. My only concern is that Joyners are hand built and all have slightly different angles. Well, either way if it works out to be a sucess I will help anyone on this forum if they want to take it on. I will be able to take out 90% of the guess work. I have been making templates of all of the tabs I have been making with exception to the diff lowering. If I was to do that again I would probably tackle it a little differently. Plus, that is pretty straight forward.

Link to comment
Share on other sites

Thanks! You know I was thinking you could almost make what I am doing into a bolt on kit to mass market. My only concern is that Joyners are hand built and all have slightly different angles. Well, either way if it works out to be a sucess I will help anyone on this forum if they want to take it on. I will be able to take out 90% of the guess work. I have been making templates of all of the tabs I have been making with exception to the diff lowering. If I was to do that again I would probably tackle it a little differently. Plus, that is pretty straight forward.

Definitly would love some help with mine. I will be tackling this same project very soon. Just need to find shocks front and rear.

Link to comment
Share on other sites

What size shocks are you running on the front?

8.5 inch fox. I think the extended length is 23.35 inches. If you could find some shocks that are 21 inches extended you wouldn't have to build shock hoops. The factory shocks are 20 inches extended. I just really thought my droop would increase more than 1 inch at the shock mount bolt holes. At the wheels it translates into more. BUT, I think everyones rides are unique...you may be able to get more.

Anwer me this question,

When you look at your front CV's at ride height, are the ends perfectly inline (diff and wheel), or are they offset? Which direction?

Link to comment
Share on other sites

  • 3 weeks later...

Join the conversation

You can post now and register later. If you have an account, sign in now to post with your account.
Note: Your post will require moderator approval before it will be visible.

Guest
Reply to this topic...

×   Pasted as rich text.   Paste as plain text instead

  Only 75 emoji are allowed.

×   Your link has been automatically embedded.   Display as a link instead

×   Your previous content has been restored.   Clear editor

×   You cannot paste images directly. Upload or insert images from URL.

  • Similar Topics

    • By buckrub
      Hey guys! Newbie here. I'm an old man who's better with plowing a mule (4-legged kind) than these newfangled beasts. I, and a friend of mine, just bought new Coleman sxs and are having to finish the assembly. I've been reading on this site and I'm falling on the mercy of you experts. The only way I'm an expert is that an "ex" is a has been, and a spurt is a drip under pressure. LOL First off, the 2 buggies have no ignition switches. They seem to mount on the dash, not the opening in the steering wheel shaft cover, so we ordered new ones that are supposed to fit. They are 8 inches long, and have a 4-wired white plugin which is slightly rectangled when looking at the end of the plug. The trouble is there's nothing to plug into. There is a three-wire grey plug close enough to reach the four-wire plug, but of course, they are not compatible. 
      Secondly, the blinker, light, ect. unit on steering wheel just spins around when touched. I see no way in heaven or earth to secure it. I've looked at a diagram on the Powersports site, but can't detect how it mounted. Fellows I'd be so grateful for any help with this. Me and my mule will even plow your garden for free, for your help. LOL 
       
    • By Nathon S.
      I have a Bennche 700 EFI Bighorn. I’ve recently been unable to get it to start. After a little troubleshooting I realized my fuel pump was not pumping fuel. This weekend I emptied the gas and replaced it with new. I replaced the fuel pump, fuel filter and fuel injector. I also replaced the battery, spark plug and made sure all my fuses and relays were good. I have confirmed that the float on the fuel pump is not obstructed. The UTV is about 12 years old and has less than 100 hours on it. It has not run in over a year.  Not sure whats going on?!? After doing a little reading I'm leaning towards it being an issue with the ECU or perhaps a faulty wire in the wiring harness. Anyone have any ideas on where to start looking or what I could be dealing with? Any help is appreciated, thanks in advance!
    • By Steve Toney
      Hello, my name is Steve and just signing up.  Bought my first UTV yesterday.  It is a Massimo T-Boss 550.  
    • By SafeSledBryan
      Hey guys! My name is Bryan and i am the owner and creator of Safe Sled. Not some crazy corporate backed recovery product, but just some guy with an idea. 
       
      4 years ago, I suffered 11 strokes, and am now 50% paralyzed on the left side of my body. I am unable to work a normal job anymore. I was working on the sled 2 years before this all unraveled. My wife told me to keep working on it since i was pissing her off staying home and doing nothing.
      I still plan on improving and implementing different ideas as the product’s revenue continues to grow.
      if the sled is appealing to you, please check out my website, safesledoffroad.com
      Safe Sled Website
    • By CBS
      Greetings from Southern Illinois. My name is Bruce and I currently have a Hisun HS550 Performance Rural King. I have had nothing but problems with this unit replaced so many parts of it and of course, it stopped working and will not start again for about the 3rd or 4th time since 2018 it only has a little over 500 miles and has cost me a bunch of money and headache and the Rural King where I purchased it has a repair man who is certified to work on HISUN but he charged me a little over $600 to repair it once back a few years ago and when I got it home after it being in his shop for over 2 weeks the thing worked for a very short time but when I went to start it the next day it was the same thing and they wouldn't check it further without me paying for service, labor, and parts and I went around and around with them and since there aren't any dealer service centers for Hisun near me and even most of them can't get to it for weeks to months and it could be at their shops for months as they tell me they have problems getting the parts needed from Hisun to fix these giant paper weights. Oh, and you can't buy a scan tool (code reader) Delphi 190121 unless you are one of their dealers and I can't find any other scanner tool that works with it except the Tiny Scan Tool which I purchased and it will work if I could find the correct adaptor cable and connector to connect the Tiny Scan to the diagnostic port on the Hisun HS550 Performance Rural King. Yep, I pretty much have been screwed every which way that can happen with this machine. I am disabled, have cancer, and am on a fixed income so I need help if anyone knows what the connector is called (type or part name) that will plug into the diagnostic port to get my scanner to work it is a 6-pin connector and I hear it only has to have 3 wires connected to it.
      Thanks 
×
×
  • Create New...