Greg Kilgore
-
Posts
282 -
Joined
-
Last visited
-
Days Won
25
Content Type
Profiles
Events
Forums
Gallery
Downloads
Community Map
Everything posted by Greg Kilgore
-

How messed-up is this. Think head gasket is blown
Greg Kilgore replied to Greg Kilgore's topic in AXIS Off-Road UTV SxS Forum
I hate to hear that for you. The mobile techs are very busy. Not defending him or anything. But since Hisun has no service centers. They have to outsource getting their junk fixed. At least he is getting parts. I had a issue with the rear drive shaft. I requested a mobile tech. Got tired of waiting on the techs call back. I got the parts off Amazon and fixed it myself. When the tech finally did call. He just wanted the SN off the machine. Told him the SN. Then told him to just send parts and I'd fix it myself. He did send all parts I asked for. So I have a replacement parts / driveshaft if needed. Depends on where in WV you are. There's one shop around Princeton ( I think). But he is was booked with a backlog of about 4 months. That is a 4hr 1 way trip for me. That's the reason I just did the head myself. I'm 1.5 hours west and south of Charleston, WV in KY. Wish you the best of luck. Keep us updated. -
How messed-up is this. Think head gasket is blown
Greg Kilgore replied to Greg Kilgore's topic in AXIS Off-Road UTV SxS Forum
Tear down https://youtu.be/iduW-UK3mkM?si=ncYq-u6XIte6rCdk Inspection of cam https://youtu.be/WZsPsBeyWXc?si=bn6TJAWhut0gB4pL Back together https://youtu.be/7846kqPLSZU?si=F2vSO_0qhQlyO0QH Hisun video. Junk video. Reason i call it junk is i could not find the torque specs they talk about for the head anywhere. Even the "Techs" at the Texas HQ had different responses than this video. https://youtu.be/CNtlgnximsU?si=Mo1yoVWQAJ2IbmXs This guy from Limitless Powersports is a good guy. He gives his email address in these videos somewhere. Any way I emailed him and got a reply. (HISUN didn't reply to 2 emails. Called and was more confused when call ended) Kilgore -
How messed-up is this. Think head gasket is blown
Greg Kilgore replied to Greg Kilgore's topic in AXIS Off-Road UTV SxS Forum
Here is the diagrams I used and I watched a couple of YT videos. The ones from the Hisun/Axis were junk. I will list the ones I watched in another post. Any links have to be approved by the admin. So it may take a minute before that post is up. The numbers in the boxes with Nm after them is the torque specs. But I think I tighten the head bolts to 40Nm instead of the 38Nm listed. I reused all old fasteners.
-
How messed-up is this. Think head gasket is blown
Greg Kilgore replied to Greg Kilgore's topic in AXIS Off-Road UTV SxS Forum
Here are some pic of the timing marks That was the absolutely hardest part I put that bad boy together I'm guessing 100 times before I was satisfied. But in the end it paid off cause it was running after the 2nd turning over of engine. The top pic was 99% complete. There's 2 stamped metal covers or something like that. That wasn't installed when I took the pic. They cover the timing marks on the top gear. And I wanted to rotate the engine a few times. That way I knew timing marks were correct. I installed before buttoning it all back up.
-
How messed-up is this. Think head gasket is blown
Greg Kilgore replied to Greg Kilgore's topic in AXIS Off-Road UTV SxS Forum
FireZingr, Yours will be different but for the 500 see below. Well something about the engine I had. I couldn't get the $90 jug kit. I had to get the $350.00 ish kit from MotorCycleDoctor. But they shipped fast. All parts. Really recommend them. Wasn't a real hard job. Took me a day to tear down. A day to put back together. And 3 hrs to get timing chain back on and in time. One reason it took so long was I lost a "C" clip on the piston wrist pin. Thought it dropped inside the engine. Looked for that thing for about 4 hours. Turns out it was under driver's seat. Also on old piston about 1/3 rd of the piston ring lip was broken. Didn't drop inside engine, just broken. Took off a few more items than I needed to. But it was all good. Got everything thing back together. Gave it a real good burping and old change. Even changed the fuel injector cause it gave me issues before the head blew. Even replaced the spark plug. Reset the computer by the key switch on off cycling. Think it cranked twice and fired up. Hasn't given any issues with engine since. Have put about 800 miles on it since the repair. I did coat the head gasket with Indian Head and refused the big O ring off the old jug. Rest were all new. New jug, piston, wrist pin, gaskets, etc. Old piston. Old gasket. You can see the big O-Ring in this pic that I reused. It's on the outside of the cylinder ("sleeve?"). It's black and is under the gasket. If you look when the gasket meets the outside of the sleeve. You can see it if you look hard enough. New parts. Even came with new spark plug and crush gasket for exhaust. You can see the old O-Ring I reused under the new spark plug. back together.
-
My bad completely misread the post. I have no clue what the issue could be. Only think I can suggest is try rocking forward and backward while trying to shift. But definitely looks like something is in a bind.
-
On my 500 there is a cable from the break to shifter. You have to have the break pedal pressed to shift out of neutral. Maybe there is something wrong with that cable. Just a thought.
-
Using Non-JASO MA2 Oil
Greg Kilgore replied to HISUN Sector 750 EPS Failu's topic in UTV General Discussion
When a new clutch it is supposed to be soaked in the correct oil for 24 hours. So maybe changing to the correct oil and a few oil changes will prolong the life of the clutch. But I will probably need to be changed in the near future. When changing the oil. Disconnect the hose at the top of the radiator that goes into the oil cooler. Do not use an air compressor. Just use your lungs and blow the oil out of the cooler back into the engine. Then hook up the hose back to the tube and unhook from cooler. To blow the oil out of the tube. You'll get most of the bad oil out that way. If you do use an air compressor be careful and remember I told you not to use the air compressor. Good luck. -
HiSun Axis 500 gear shift fan gears corroded
Greg Kilgore replied to Brent's topic in AXIS Off-Road UTV SxS Forum
Removed to avoid confusion. -
HiSun Axis 500 gear shift fan gears corroded
Greg Kilgore replied to Brent's topic in AXIS Off-Road UTV SxS Forum
https://www.utvboard.com/topic/56171-2020-axis-500-only-getting-reverse-and-neutral/ -
HiSun Axis 500 gear shift fan gears corroded
Greg Kilgore replied to Brent's topic in AXIS Off-Road UTV SxS Forum
I found the post I was referring to. It on a 2020 Axis that only had reverse and neutral. The title is 2020-axis-500-only-getting-reverse-and-neutral I'll post a direct link under this reply. This system has to verify a link isn't posted with ill intent. And has to be verified. And I know you want a quick solution. So you can search for the above post title or wait for my link to be approved. It's up to you -
HiSun Axis 500 gear shift fan gears corroded
Greg Kilgore replied to Brent's topic in AXIS Off-Road UTV SxS Forum
There was another post on here. It was a shift problem that turned out to be the fan shifter issue like you are talking about. I don't think that poster put any grease on the fan fingers where they interlock with the gear. Look for that post. There is also a video that he references. It may be in the Axis or hisun or Coleman sub category. I can remember. But I think there is an oil passage there. Sorry I couldn't give any more help. If you can find that post.aybe you can reach out to that member and see how his solution is working for him. It was maybe a year ago when the post was made -
I had this problem after sitting for a while cause of a blown head gasket. I fixed the head. Then tackled the no start issue. Turned out to be bad connection at battery leads. Also in the battery compartment is the main fuse. Check all connections while your in there. Yes now got over 200 miles on the new head gasket and jug. Hope for the best. Let us know. We will figure this out
-
Coleman Outfitter 500 Oil Pressure Indicator????
Greg Kilgore replied to Alien10's topic in Coleman UTV SxS Forum
I installed a universal cabin heater. Didn't bleed air out of system at the top of gooseneck by the cylinder head. -
Coleman Outfitter 500 Oil Pressure Indicator????
Greg Kilgore replied to Alien10's topic in Coleman UTV SxS Forum
I have purchased the sending unit, low pressure gauge,T and fittings. To install the sending unit in the line on top of the oil cooler. Just haven't gotten around to it yet. I blew the head gasket and just waiting on the mood to hit to fix that. -
What is your filter? That should tell you.
-
Got a 2021 Axis 500. I'm needing the head bolt torque specs. Manual states 38nm. But saw a video Hisun put out on YT for a 550 stating 50nm + 45° turn of wrench. Didn't think they would be that much difference on a 500 and a 550. Seen another YT video on a 2013 500. He did 38nm. Really only want to do this job once and done. And done correct. Anybody got the answer? Going to start this rebuild in a few once this weather brakes. Flooding and then snow and cold here now. But spring is around the corner and the wife has to have this fixed or a Honda pioneer may be parked in driveway soon. She has to be able to ride.
-
Abbingdon, You can probably go to Alpha-sports and search the parts diagrams and compare the part numbers. You should also compare the part numbers for the front differential as well. Because just like a 4x4 automobile, when the utv is in 4 wheel drive, if all 4 tires aren't pulling the same. Something else will brake. FYI even different size tires on the front and back on a 4x4 automobile can cause damage to the 4x4's drive train.
-
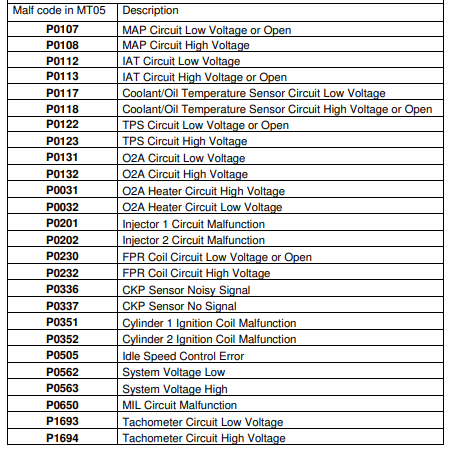
All those codes deal with spark in one way or another. To search for manuals click on the 3 bars in top right corner. That will take you to a webpage to search for a repair manual. You'll probably have to remove the fuel tank and the air blower to get access to the tdc inspection port. Directions are in the manual. Good luck
-
Best thing is to reset the ECU. With the key in off position. Turn key on then off 5 times within 30 seconds. Make sure the fuel pump kicks on each time. After the 5th on/off cycle. Leave off 1 minute then try to start the machine. That should clear the error codes and reset the ECU . Proper procedure to start is turn key to on. Then once the fuel pump shuts off. The proceed to the turn the key to the start position to engage starter. On this site there is a download section section where shop manuals can be searched for. If the ECU looks new it may have been replaced. It's also possible that it was a bad replacement. I read somewhere or watched a video stating that bad ECU for these machines were being sold on fleebay. Hope that is not the case.
-
Well, I'm petty or maybe just like to stir the pot. Let me explain. The Superintendent at the old company sent a group text not long before I left. I still talk to a lot of the splicers at the old company. So I was going to send them a text stating I got on with the new company. I looked through the old text messages on my phone and found a group text with two of the guys name on it. Well I clicked on the message and it was from the old superintendent to all of the splicers in the old company. Well I replied stating I got my Bucket truck, what kind, make , with picture of new company logo with me in the pic and a pic of the full truck, ECT. And sent it. And this new company is a competitor of the old company. LOL. Then about a minute later sent another message apologizing for sending the text stating I didn't see who all was included and I sent the text "accident" to everyone in that group. Got a reply from one of the guy with a LOL. Called him up and found out that week was his last. He turned in his 2 weeks notice a week back. And the big bosses had another splicer call to see what it would take to keep him there. Wouldn't even call himself. Then turned around and gave another guy a big raise. But would not offer the guy that turned in his notice .01 cent to stay. Told him the grass IS greener on the other side. Offered to put in a good word for him at this company. Said he has already got a new job lined up. So all good. FTFF
-
Check out this thread https://www.utvboard.com/topic/7811-adding-power-steering-to-an-r4-questions/ But I reminded you there may be 12V DC power issues. I don't know about the sector 550. But the Axis 500 doesn't generate a lot of extra voltage. There may be power concerns adding any type of Electric Power Steering, OEM or junkyard. The electric power requirements has to be considered. There may be options to increase the electric output with a bigger stator and regulator. But that will take away some of the HP power from the 550 engine due to bigger stator. I know it won't be a lot. But these little engines don't produce a lot of HP anyway. Good luck. And let us know how it goes.
-
Welcome, to the board. In in Eastern, KY also. Not any local authorized repair shop around here that I can find. Haven't tried any other place. Since it been down for a while. Charge the battery. Then check for spark. Check for any loose wires and connections. I changed the oem seats in my Axis 500, replaced with seats from a RZR from ebay. I made the seat base and they fit pretty good. I gave 1 of the seats to a guy up the road for spreading some dirt in the driveway. Gave one to my brother to replace a seat on his mower. Good luck, let us know how it goes.
-
CSM_Retired, Thank you for your service. Thank you for the comment. Was supposed to have started 1/7/25. At the last minute, this snow storm came in and changed the plan. Depending on what the weather does this weekend, Will determine where/when I start. As of now start date is 1/13/25. We got about 5-6 inches of snow with 1/4 inch of ice on top of that. So company did a safety stand down until weather improved. Essayon
-
Hey Joe, Don't know if you like Bluegrass music. If you do, got a band and song you should check out. Band is "Grandpa's Cough Medicine" song is "Brand New .22" Grandpa's Cough Medicine is not your traditional bluegrass band. But I really like them. Also Pinebox Boys. Later Greg