Greg Kilgore
-
Posts
282 -
Joined
-
Last visited
-
Days Won
25
Content Type
Profiles
Events
Forums
Gallery
Downloads
Community Map
Everything posted by Greg Kilgore
-

Heater used in 2024 Axis 750 (Firestorm?)
Greg Kilgore replied to Brent C's topic in New Members Area
Hate to hear about your son's condition. I hope all goes well for y'all. I got a $50 heater a year ago and just installed in my 2021 Axis 500. Here is the link on my install. www.utvboard.com/topic/51705-heater-installed-2021-axis-500/ If you do yourself, you will probably have to burp the coolant line on top of the engine to get all the air out of the coolant system after the install. There is a bleed screw on top of the "goose neck" that comes out of the engine. I had to do mine about 5 times to get all the air out. That's once a day over 5 days. Each day before the wife and I went for a ride. Good luck. Let us know how it goes and welcome to the forum. -
I'd still try the on/off cycle thing first. If that doesn't work the full throttle thing is an option as long as the rev limiter works. You could try to put machine in reverse and see how fast it go backwards. My axis 500 will only do about 8 mph due to the rev limiter works on my Axis 500. If you're doesn't go above 10 or so, I'd guess 99% that the rev limiter works and your machine won't blow up. But again I can't be 100% sure. So do AT YOUR OWN RISK. Check with others. Check on the motor cycle doctor website. There may be a contact number to call and ask an actual mechanic about it. He may charge for a phone consult. I don't know. But even if he does, it will be cheaper than replacing or rebuilding an engine. Then post so others may be in the same situation. Good luck.
-
2020 Axis 500 - only getting reverse and neutral
Greg Kilgore replied to JimG's topic in AXIS Off-Road UTV SxS Forum
Anyway I'll quit posting and wait for a reply. Later, Kilgore. -
2020 Axis 500 - only getting reverse and neutral
Greg Kilgore replied to JimG's topic in AXIS Off-Road UTV SxS Forum
Also to find manuals and so on. At the very top of this site click on the 3 bars on the top right side. In the menu that appears, click on downloads. On the downloads screen, in the selector box there it says "category " select "Hisun".(or what manufacturer) Once the screen changes, select the manual(s) you wish. -
2020 Axis 500 - only getting reverse and neutral
Greg Kilgore replied to JimG's topic in AXIS Off-Road UTV SxS Forum
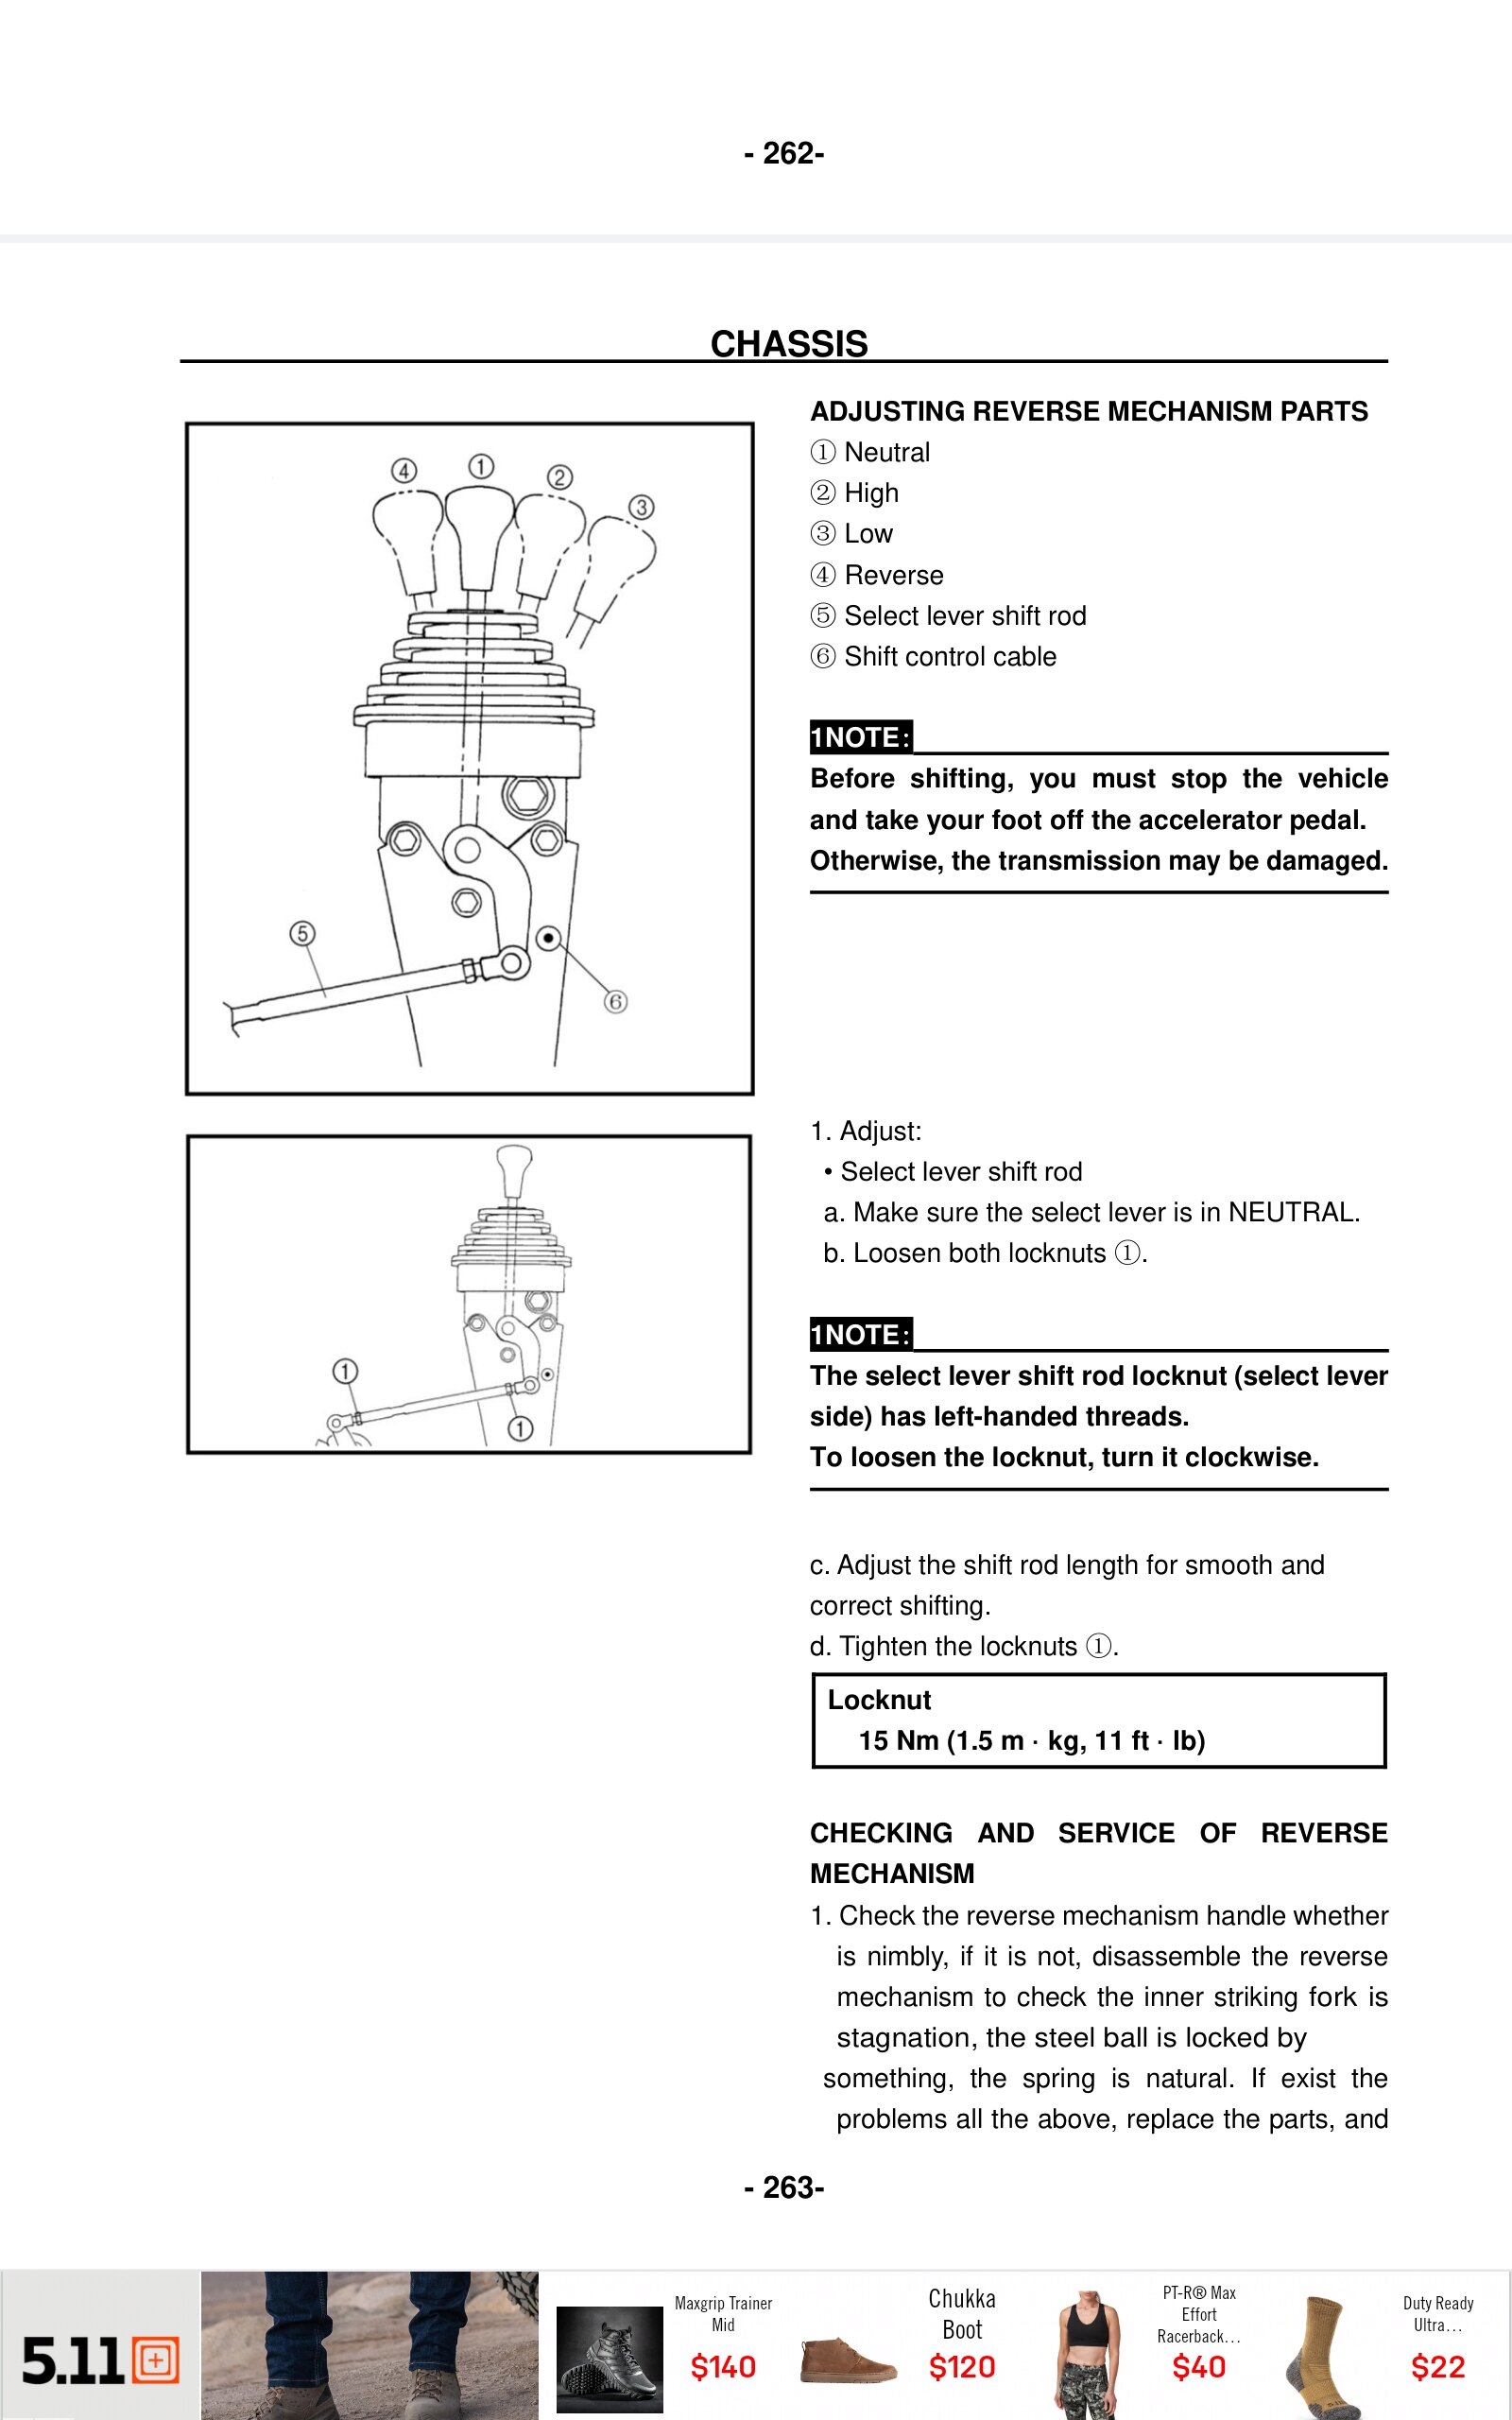
From what I could tell from the video. The guy just adjusted the shift rod, gear selector, and the indicator light to be lit for whatever gear the transmission was actually it. And not adjusting the actual transmission for the shifter. If that makes any sense. In other words he had the transmission shifted into high, then moved the shifter itself into high before loosening the shift rod to adjust the high lamp indicator to be lit. In doing so, he may have actually changed the position of the transmission into low or neutral. If so, the transmission could have been in low, for example and the shifter and indicator light could have indicated high. Make sense? I'd still remove the shift rod, then make sure the transmission shift easily into low, high, neutral, and reverse. You may need to rock the machine forward and/or backward just a little. And make sure there is not a lot of slop/slack in between the positions. Then move the transmission into reverse (or low), then move the gear shift handle into reverse (or low), then eyeball and adjust the shift rod to fit into the location. Then adjust the rod length to make sure the correct directional indicator lamp is lit. Then move the selector into the other positions and adjust the rod as needed. I haven't looked at mine and the diagram doesn't say. But I'd bet the shift indicator selector switch is located somewhere near the shift selector handle. Does any of this makes sense? I'm not a mechanic, so take the advice as someone that is just trying to help. Remember listen to me at your own risk. Good luck and let us know how it goes. -
2020 Axis 500 - only getting reverse and neutral
Greg Kilgore replied to JimG's topic in AXIS Off-Road UTV SxS Forum
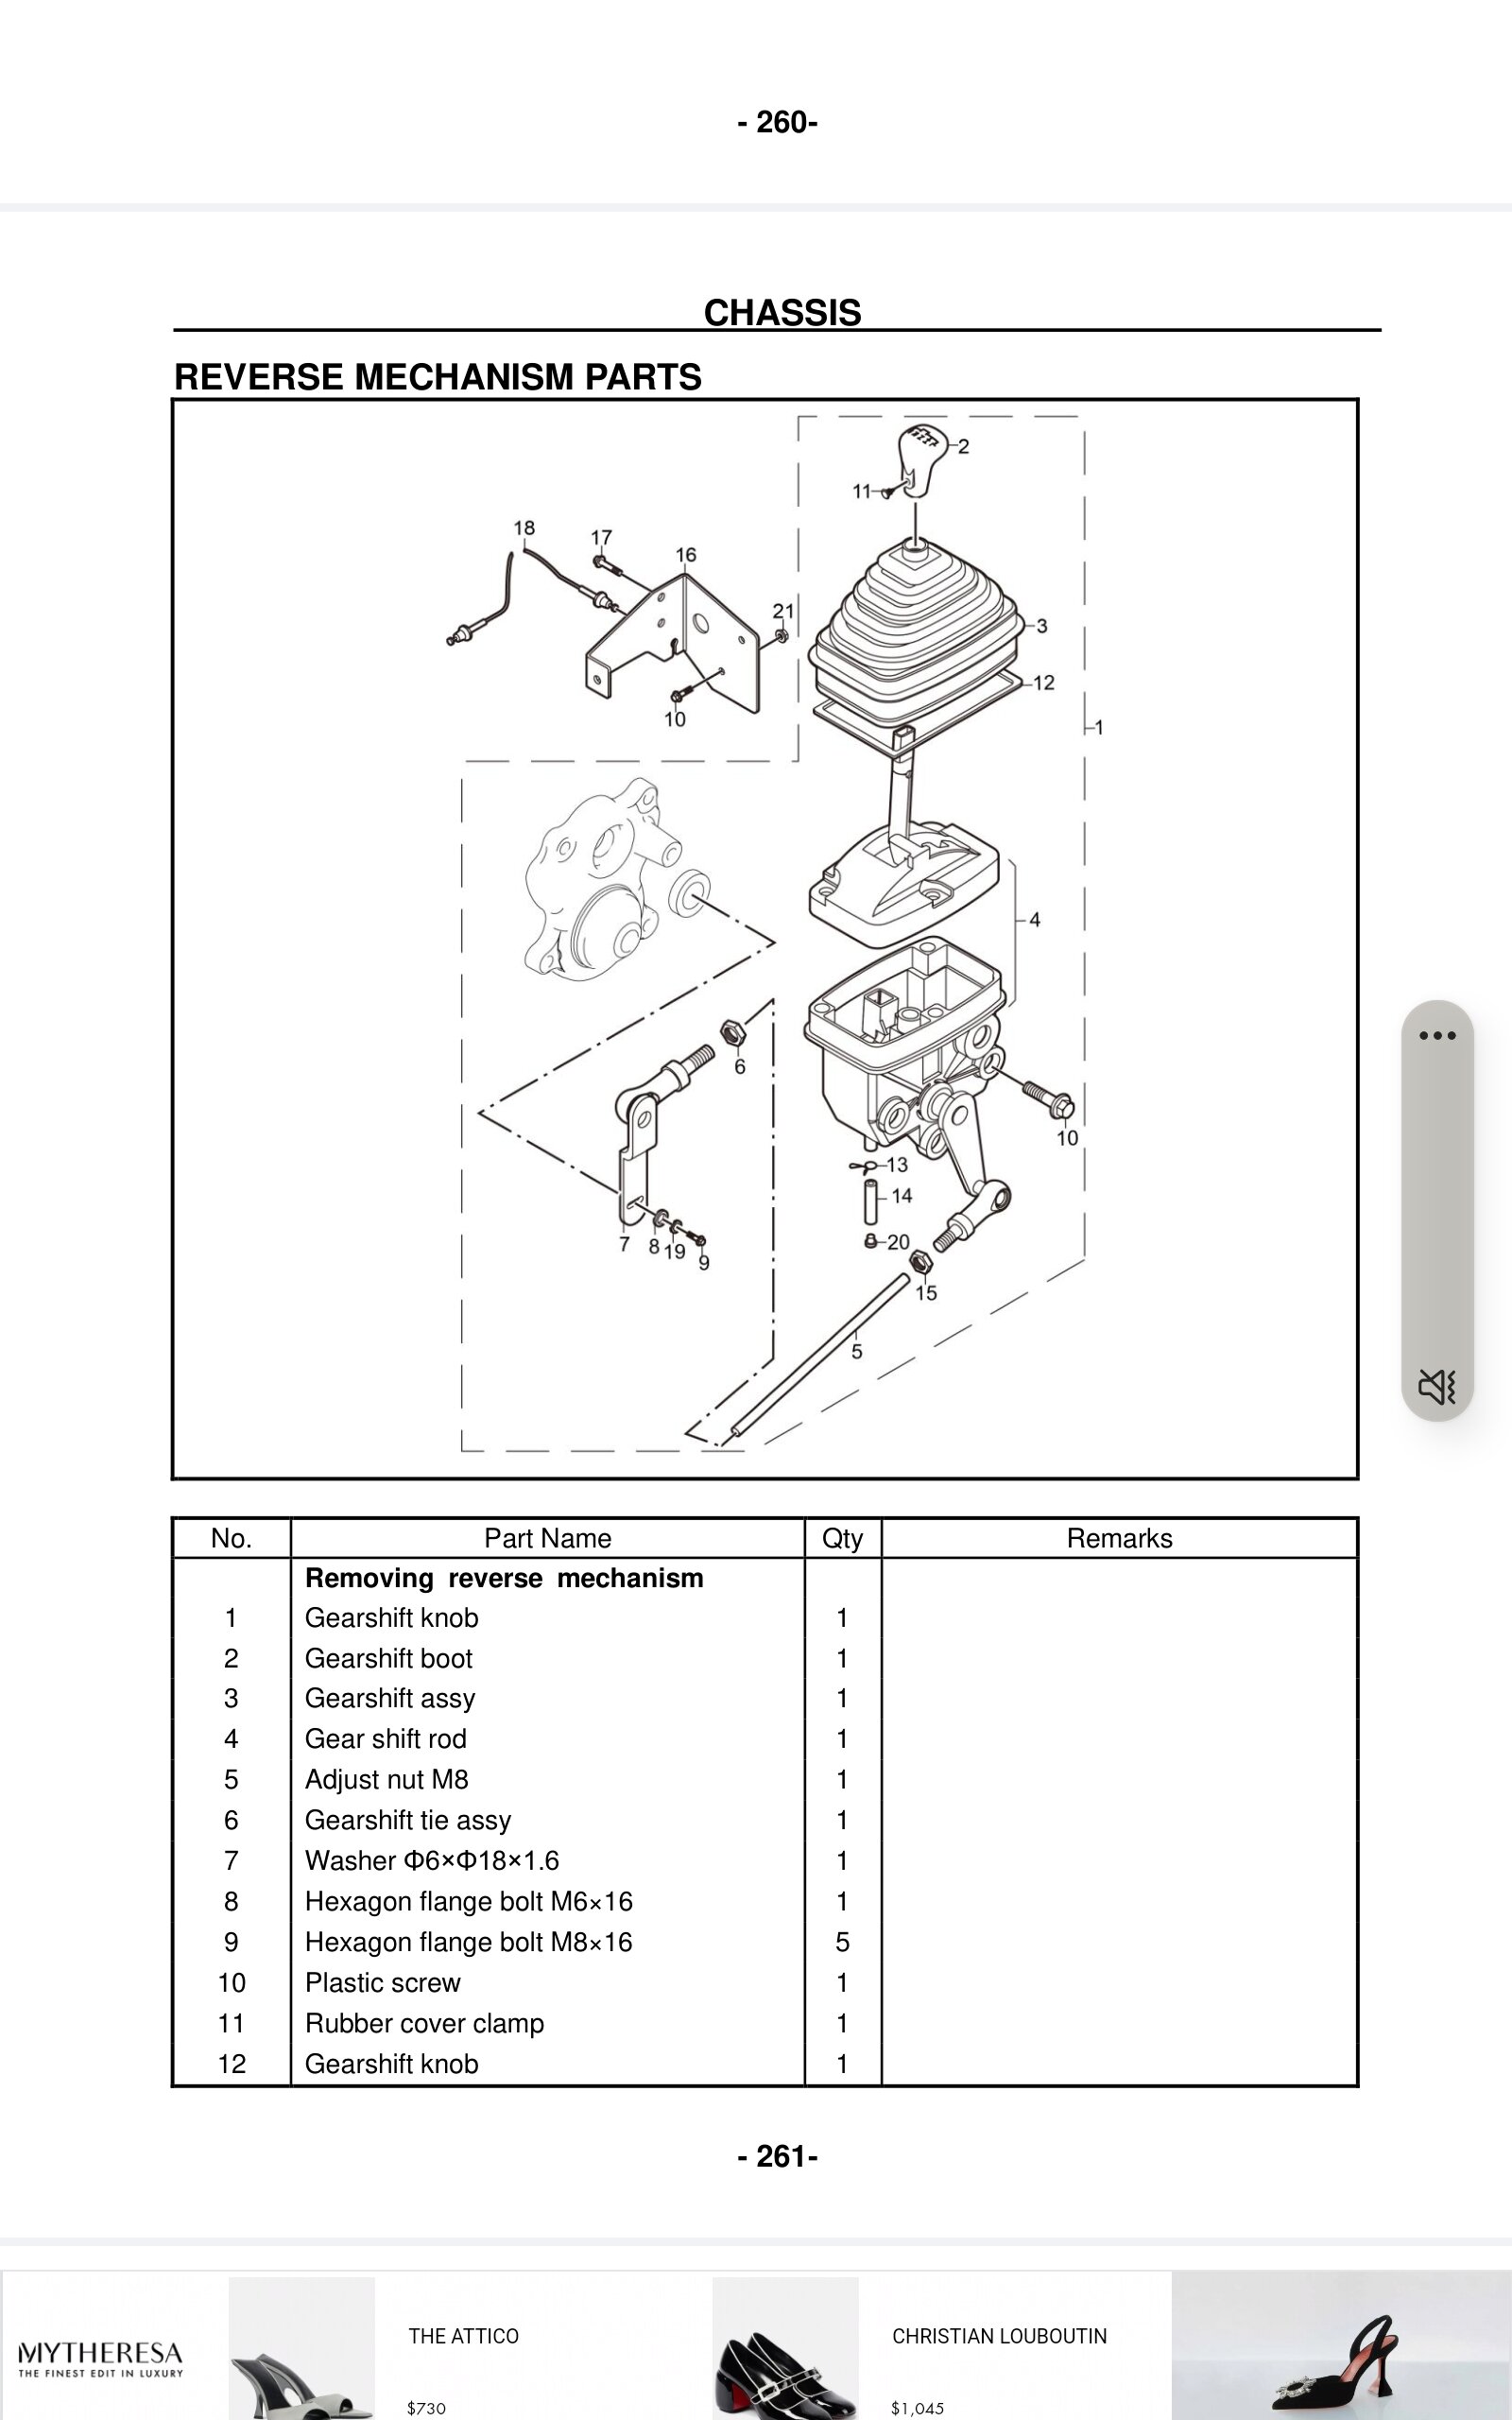
There is an actual service manual for these machines on this site. Can't remember who posted, the name, or download link. But search the manual library and you can find it. Here are some diagrams. 0 (The items numbers are off according to the description on 261 and 262) I didn't view the posted video. If it was me, after following the directions above to adjust the linkage and still was having issues. I'd completely disconnect the adjustment rod. (Item 5 on page 261.) Then check item 7 and item 9 on page 261 to make sure item 7 is engaged cause it looks like item 7 has a oblong slot that fits around the shift lever 1 assembly circuled in red in red in bottom picture (cover removed). That actually shifts transmission. Item 9 is the nut that holds item 7 in place. Then see if the transmission will shift into a forward gear by moving item 7 by hand instead of the shift handle. If so, then reattach the shift rod and adjust accordingly. When I shift my 500 into low, I have to apply just a little throttle to make the transition. I probably need to adjust my shift rod as well. Hope this helps some or at least points you in the right direction to resolve your issue. I'll watch the link and repost if I think of something else. I'm not a mechanic, so take the advice as someone that is just trying to help. Remember listen to me at your own risk. Good luck and let us know how it goes.
-
2020 Axis 500 - only getting reverse and neutral
Greg Kilgore replied to JimG's topic in AXIS Off-Road UTV SxS Forum
Have you checked the cable adjustment. When shifter is in neutral, is the neutral light lit on dash. And is the trans actually in neutral. Same question for reverse? How far does the shifter move when trying to go from neutral to forward. I'm sure you are pressing the brake when trying to shift into a forward gear. -
I've seen those advertise on the net. Seen a guy on YT that installed one. He said they work. But like you, I would like to hear from others before I installed. They are kinda expensive. There's a writeup here on how to get into the ECU to read codes and get the engine parameters (parts and software required). From my understanding the ECU also has flash memory that some parameters can be changed and saved. I haven't tried it. If you do let us all know how it goes. Good luck.
-
Just because your machine is a coleman it is made by Hisun. Just like the Massimo, (my) Axis, and others. The computer reset is the same. Hisun uses the delphi MT05 ECU. There is 2 ways. I like option 2. And should always wait for fuel pump to build up pressure and kick off before attempting to start engine Option 1 (From MotorCycleDoctor . Com) . Start machine. Leave it in park. Warm engine for at least 2 minuits. Hold throttle wide open for 5 seconds. The rev limiter will prevent it from blowing up the engine. Turn off engine for at least 15 seconds. Then start machine and allow the computer to re-learn the computer. Option 2. Start with the machine off. Turn keyswitch to on. Make sure the fuel pumps kicks on. Then turn the key back off. Do the on off thing 5 times within 30 seconds. Make sure the fuel pump kicks on each time. Once the 5th time off, leave off 30 seconds. Then start and allow computer to re-learn. ECU-Reset-5.pdf
-
I removed the oil drain plug from the bottom of engine. Then took the rubber hose off the metal hose that runs to the top of oil cooler in front of radiator. Then took a cheap 12V air compressor. The $10 kind that from the dollar general that plugs into 12V car cigarette lighter port. And the adapter that is used to air up a beach ball. To push out the old oil from the cooler. Once the oil is gone you can hear the gurgles from the drain hole. Don't really have to worry about any kind of air bubbles in the cooler. The oil pump will take care of that when running. Just reattach everything and fill to oil level, run engine checking for leaks, turn off and let sit for 5 minutes or so, check oil level again and add as needed. Suppose to check oil before every start anyway. And any air in cooler can escape into the crankcase.
-
Allen10, I think he ment it was dark out and couldn't tell if steam was coming from the exhaust or not. That's the way I read it anyway. Homeowner A Since it was bought 2nd or third hand and the oil was that nasty. You may want to completely remove all the liquid in the fuel tank. Just to make sure nothing stupid is in there. If this machine was a display model, where the public, (kids), could put anything anywhere might not be a bad idea. Could change the fuel filter, fuel injector ($20ish on Amazon), spark plug (I got the same as what was listed on OEM plug for my axis 500), and reset the computer. Then see how it acts. And hopefully all is good.
-
Could also do compression check. Once compression gauge is up. See if it leaks down and how long it takes to lose 10, or 20 psi. Write down the max and the drop over 10, 30, and 60 minutes. Report back. If just dirty oil, will need another oil change soon. Cause the lines and oil cooler in front of radiator still was full of that nasty oil. Not mentioned, but usually overheating is what causes head gasket issues. Best of luck.
-
Heater installed 2021 Axis 500
Greg Kilgore replied to Greg Kilgore's topic in AXIS Off-Road UTV SxS Forum
Amen brother! -
Heater installed 2021 Axis 500
Greg Kilgore replied to Greg Kilgore's topic in AXIS Off-Road UTV SxS Forum
Well, wife and I went for a ride the other day. She got a little chilly. I stopped and threw the valves so the heater core was open and the bypass was off. About 5 minutes later. The temp idiot light came on but the gauge showed it wasn't over heating. So I quickly pulled over. Turned off heater core and turned the bypass back on. Less than a minute the temp light went off. Tried again and same thing. So I left the heater core off and bypass on and came on to the house. Then today was checking a few things out. And remembered what Joe Breaux said about the bleed screw at the top of cylinder head. Sure enough there was air there. After burping the thing a few times while running with bypass off and heater core on. It idled fine not over heating. Putting out good heat for about an hour or so. Turned off for 30ish minutes. Started back up. Within 5 minutes the temp idiot back on. A few revs and it went off. So I'm guessing there's more air around the gooseneck for the head. Guess I'm going the have to let it run, then burp, then off, let cool, burp, run to operating temp, burp, cool, repeat. Until I get no air. -
Agree with this. Rebuilt from local, reputable shop is good for local economy and you get better workmanship 99.99% of the time. 10 or more years ago, was needing a replacement alternator for car. After getting 3 or 4 from auto parts store that didn't last 1-2 months. Thankfully they had 6 month warranty. The last one I got, I took straight to the rebuild shop. Cost an additional $50 but lasted until I sold the car 2 years later.
-
Absolutely. Just a little here and a little there. And work the problem (if) when they appear.
-
2021 Axis 500 4 month Review, now with 14 month update
Greg Kilgore replied to mac66's topic in AXIS Off-Road UTV SxS Forum
Glad to hear your machine is doing good for you. Enjoy and just keep the dirty side down. -
EH65 spitting fuel from breather hose into air filter.
Greg Kilgore replied to Jim Kessell's topic in UTV General Discussion
Just like an old car or truck PCV valve. PCV = Positive Crankcase Ventilation Basically any gasses that blow-by the piston rings into the crank case need a place to go. So the PCV valve (one-way check valve) let the gasses out but doesn't allow any in. Usually a hose runs from PCV valve to breather and sent back into combustion chamber. Since the gasses are in the crankcase some oil may be pulled up as well. Or it could be something else. Just a thought. Home this helps and good luck with the repair. Kilgore. -
Lower Radiator Hose ID - UTV 400
Greg Kilgore replied to PossumTruck's topic in Coleman UTV SxS Forum
Probably too late. But I just installed a cab heater on my Axis 500 that uses hot coolant and a heater core. Just like a car/truck does. The radiator hoses are 7/8" and the barbed PEX 1" fittings fit pretty good. -
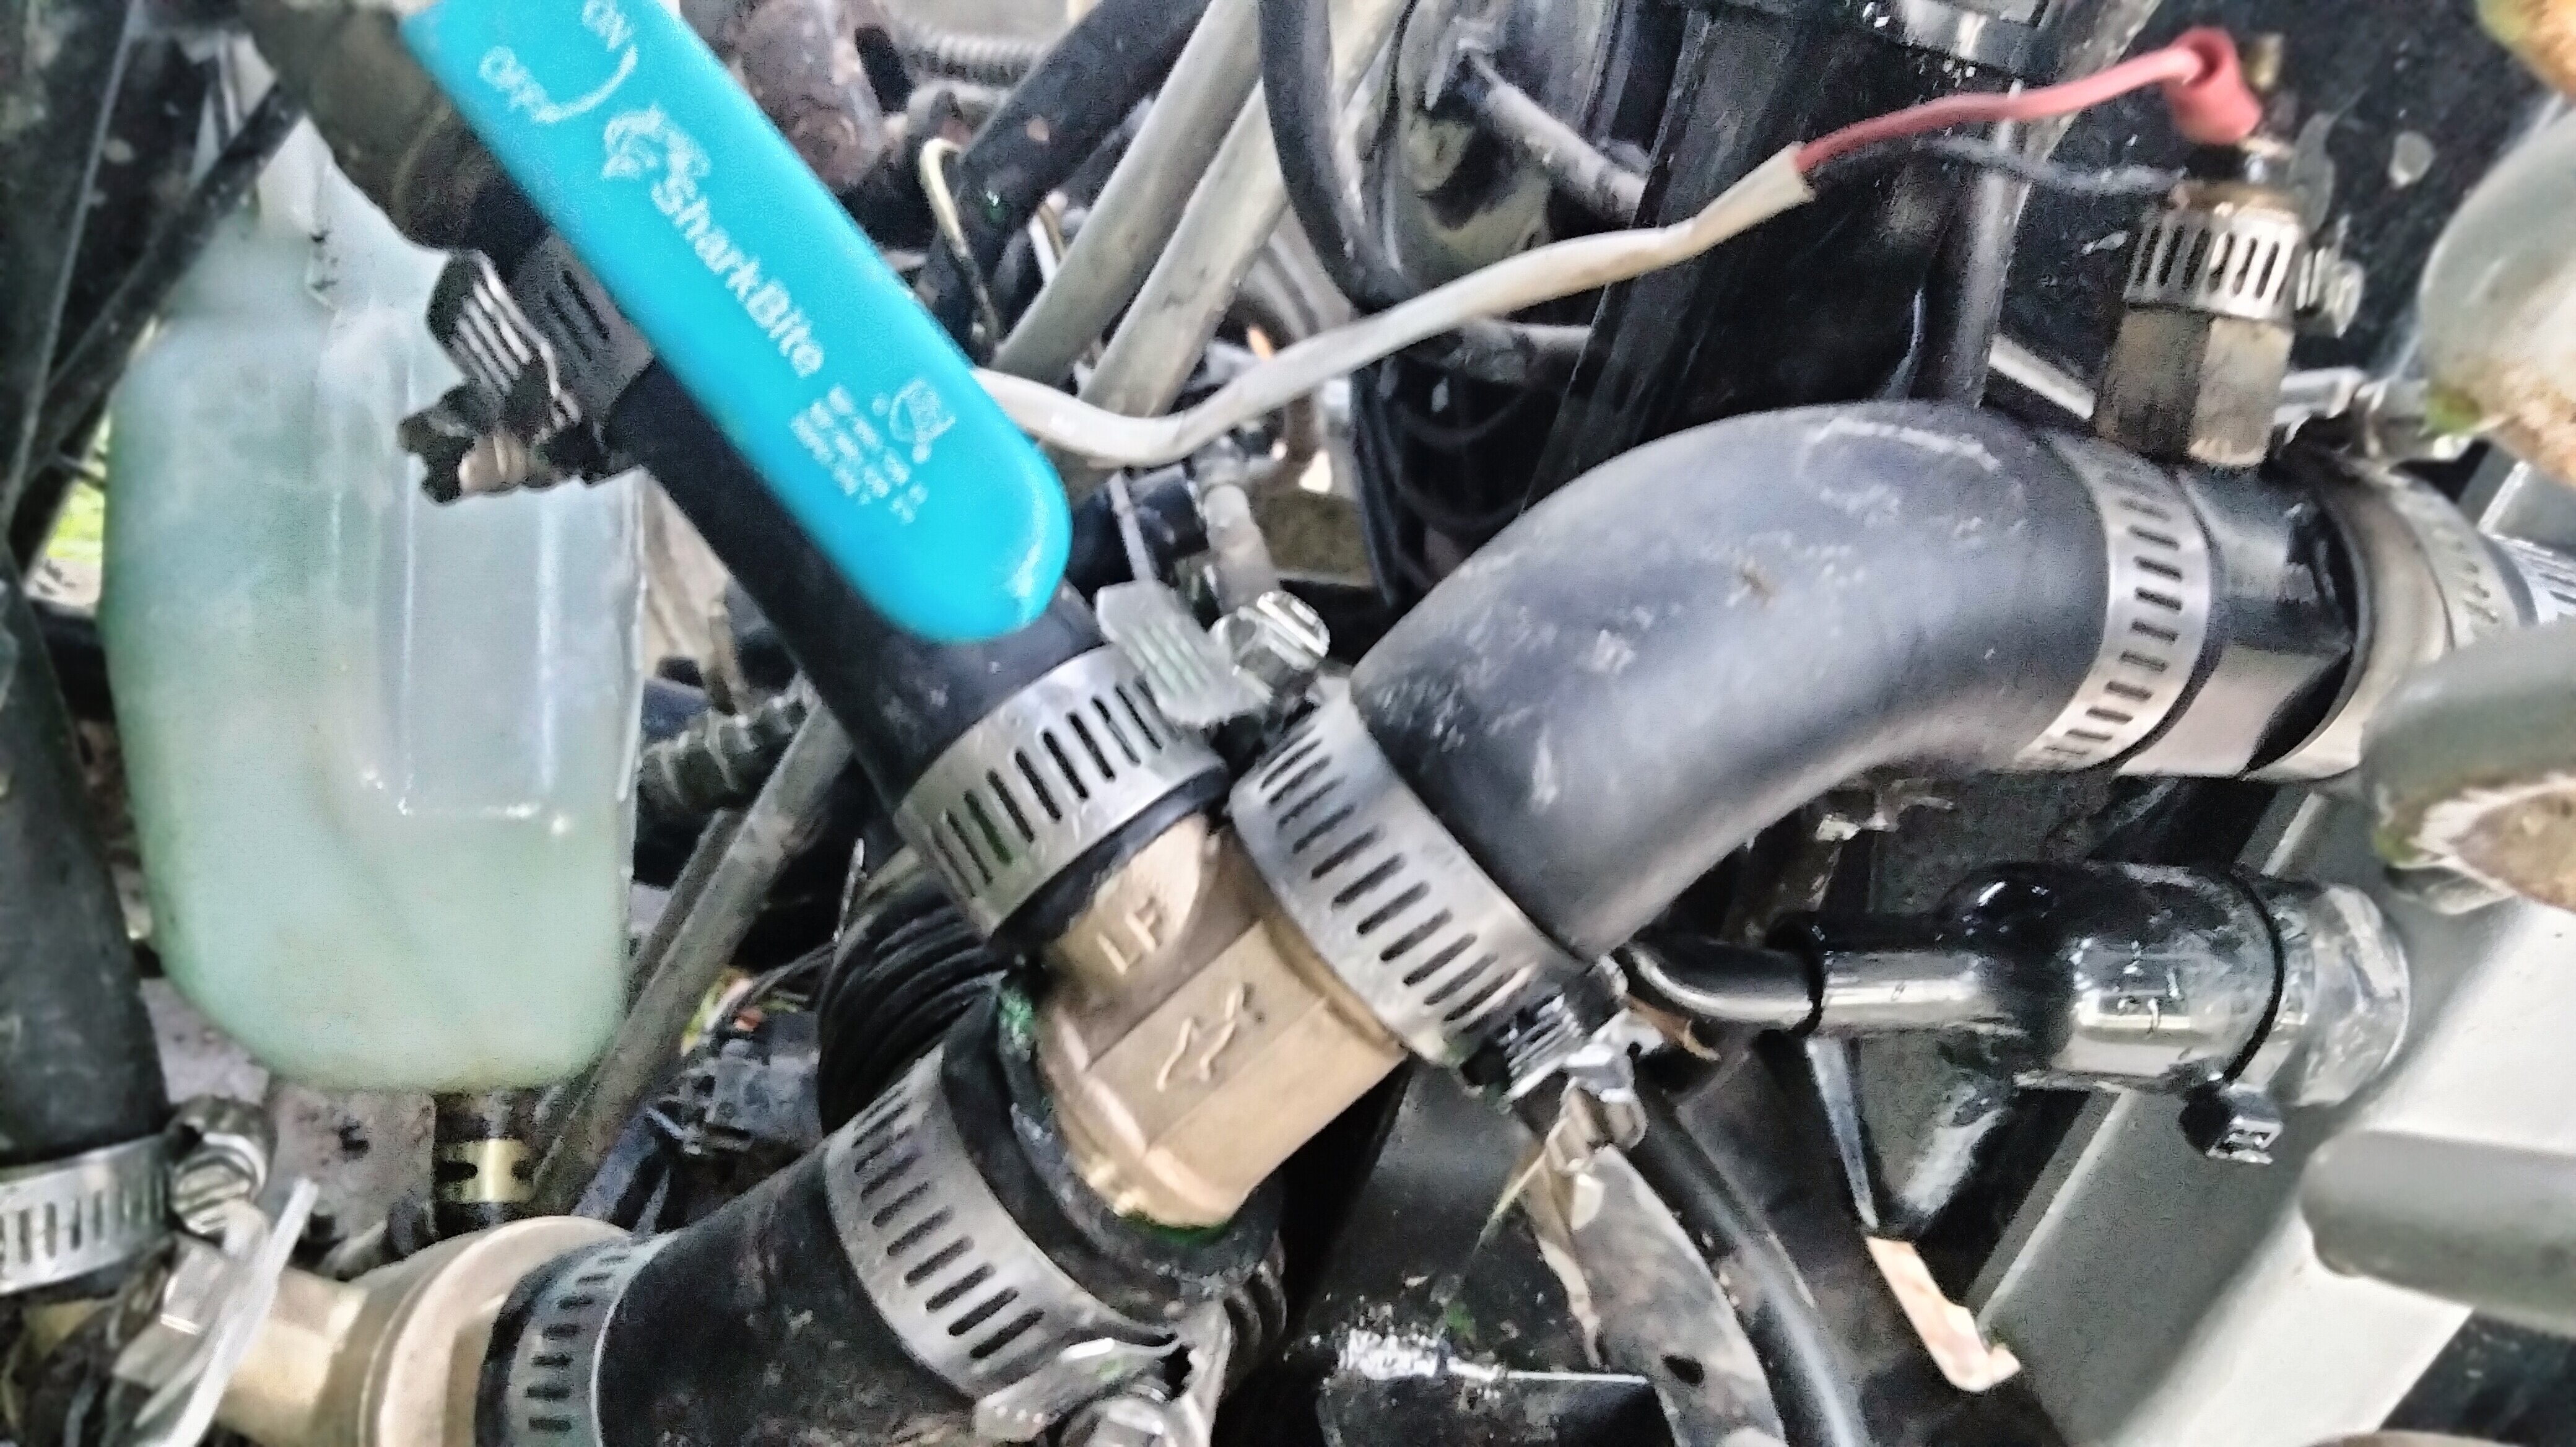
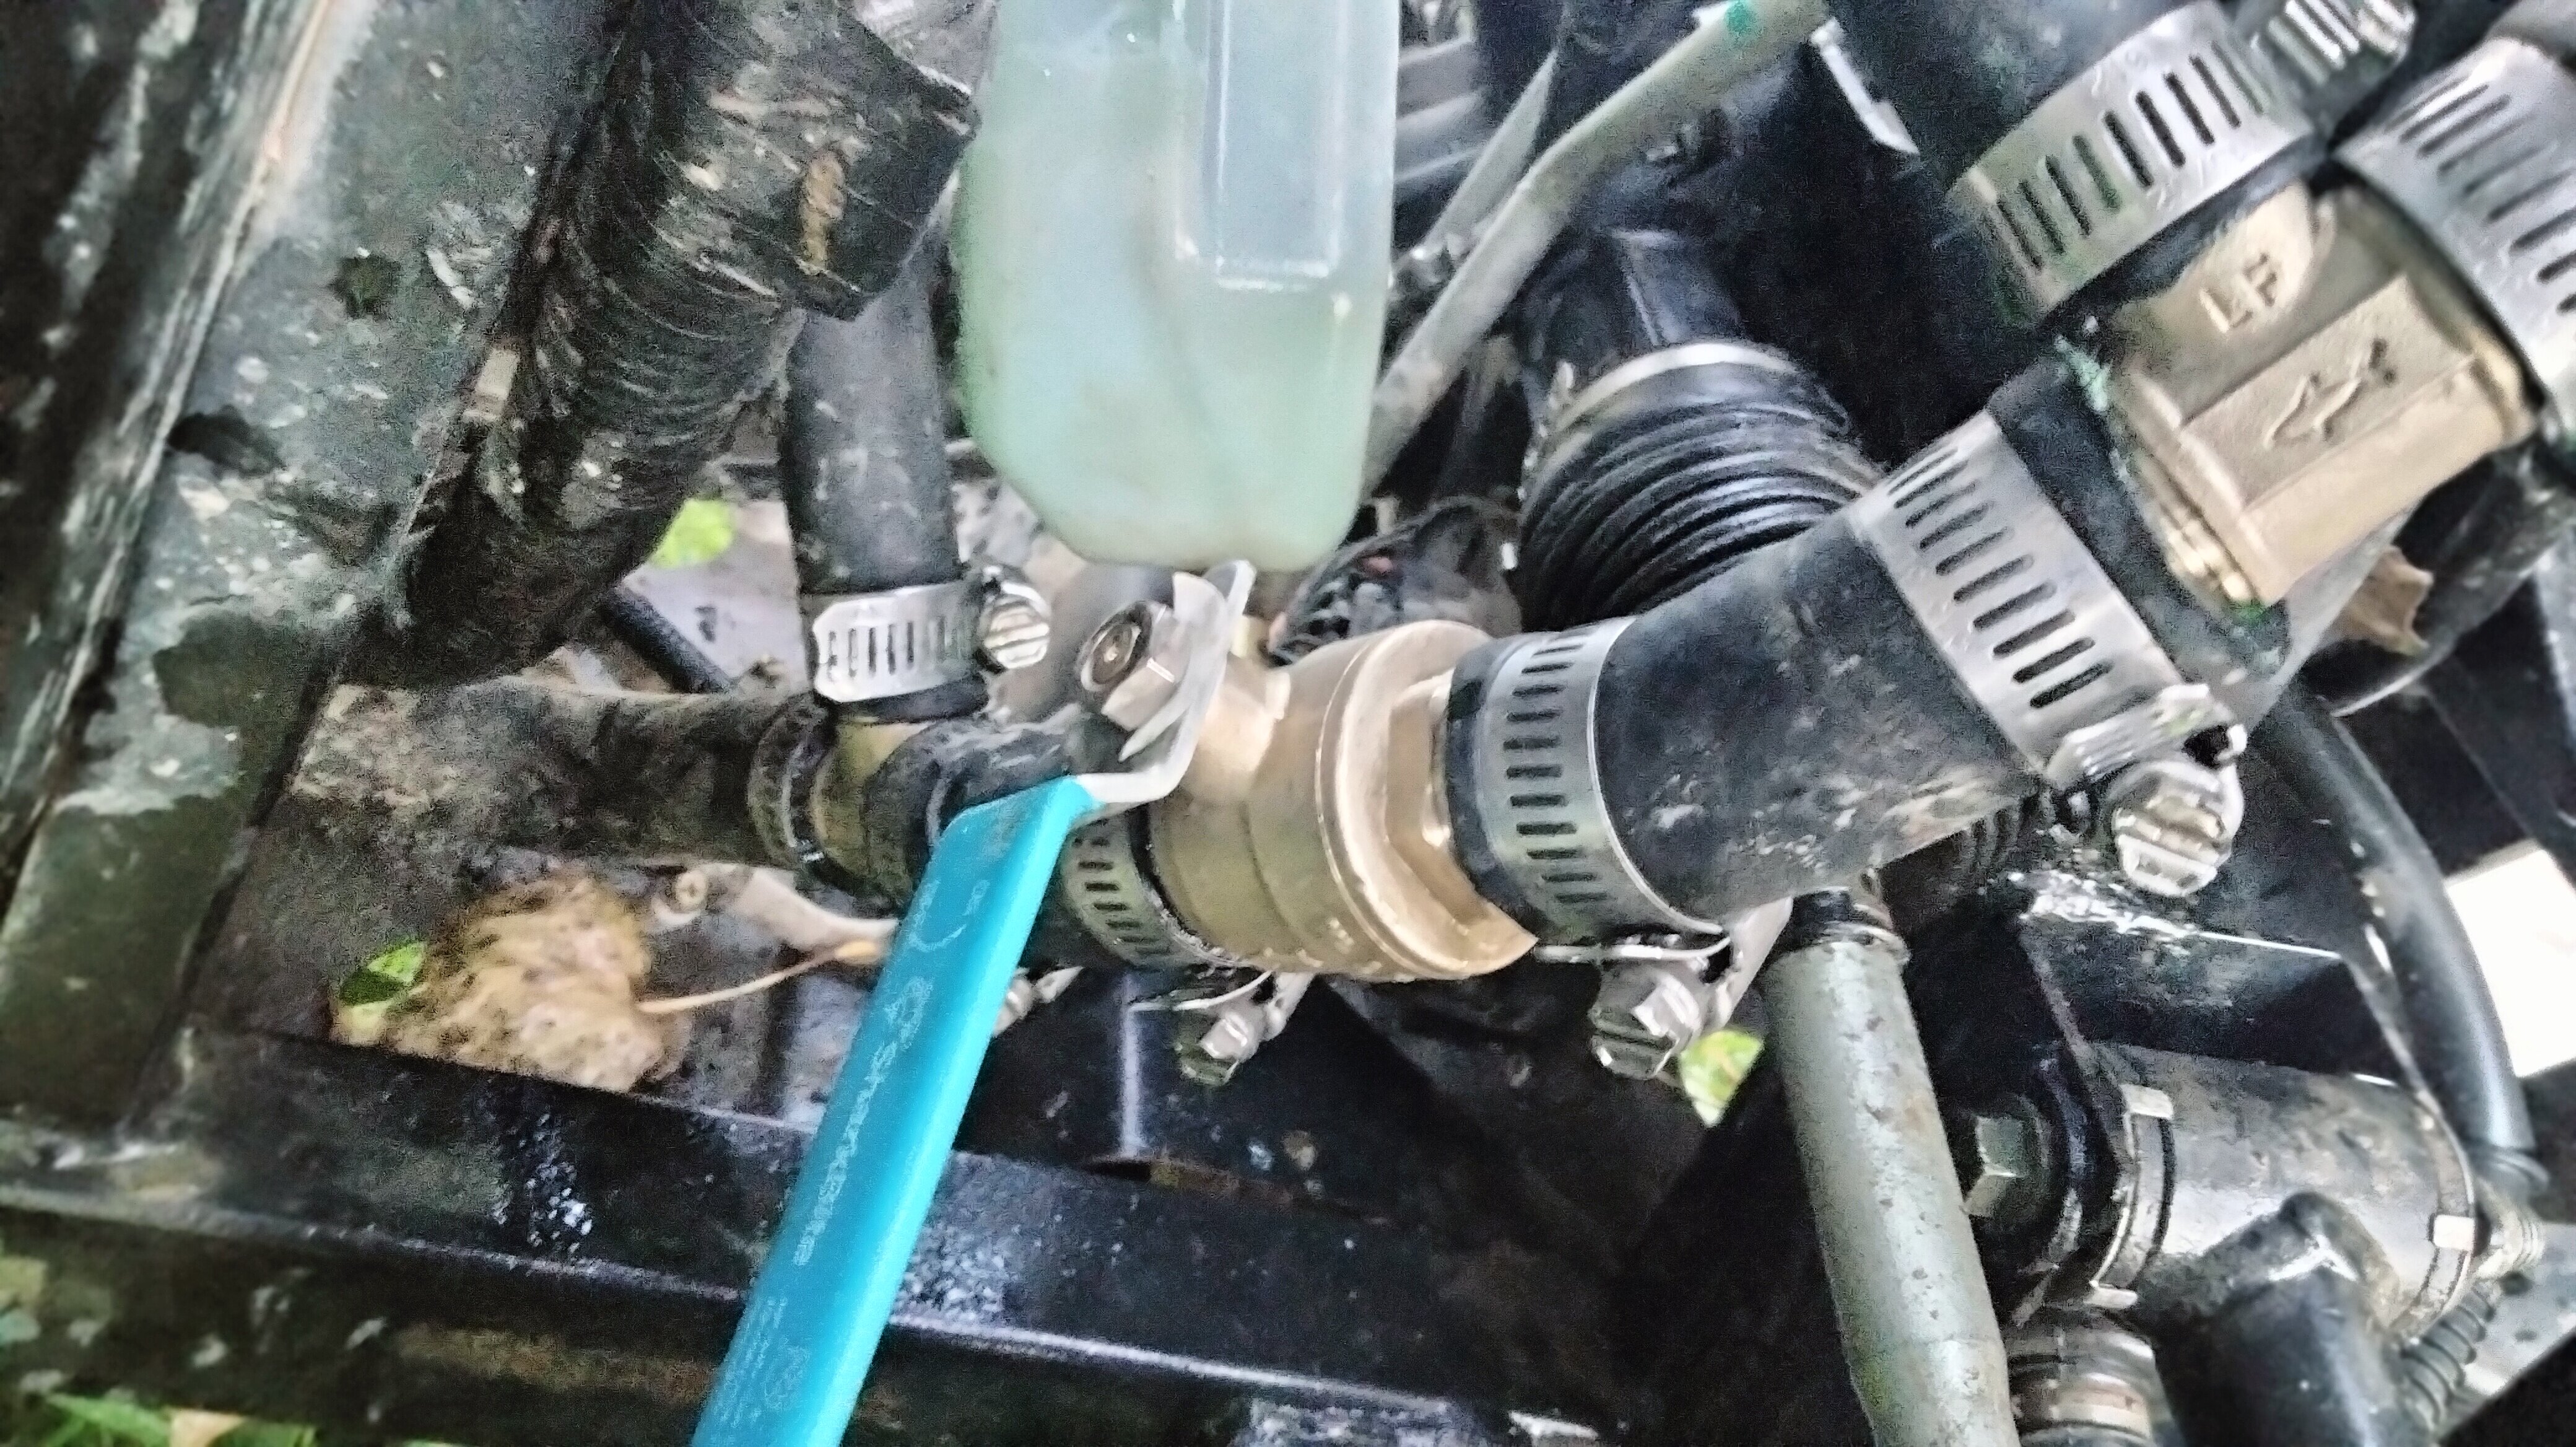
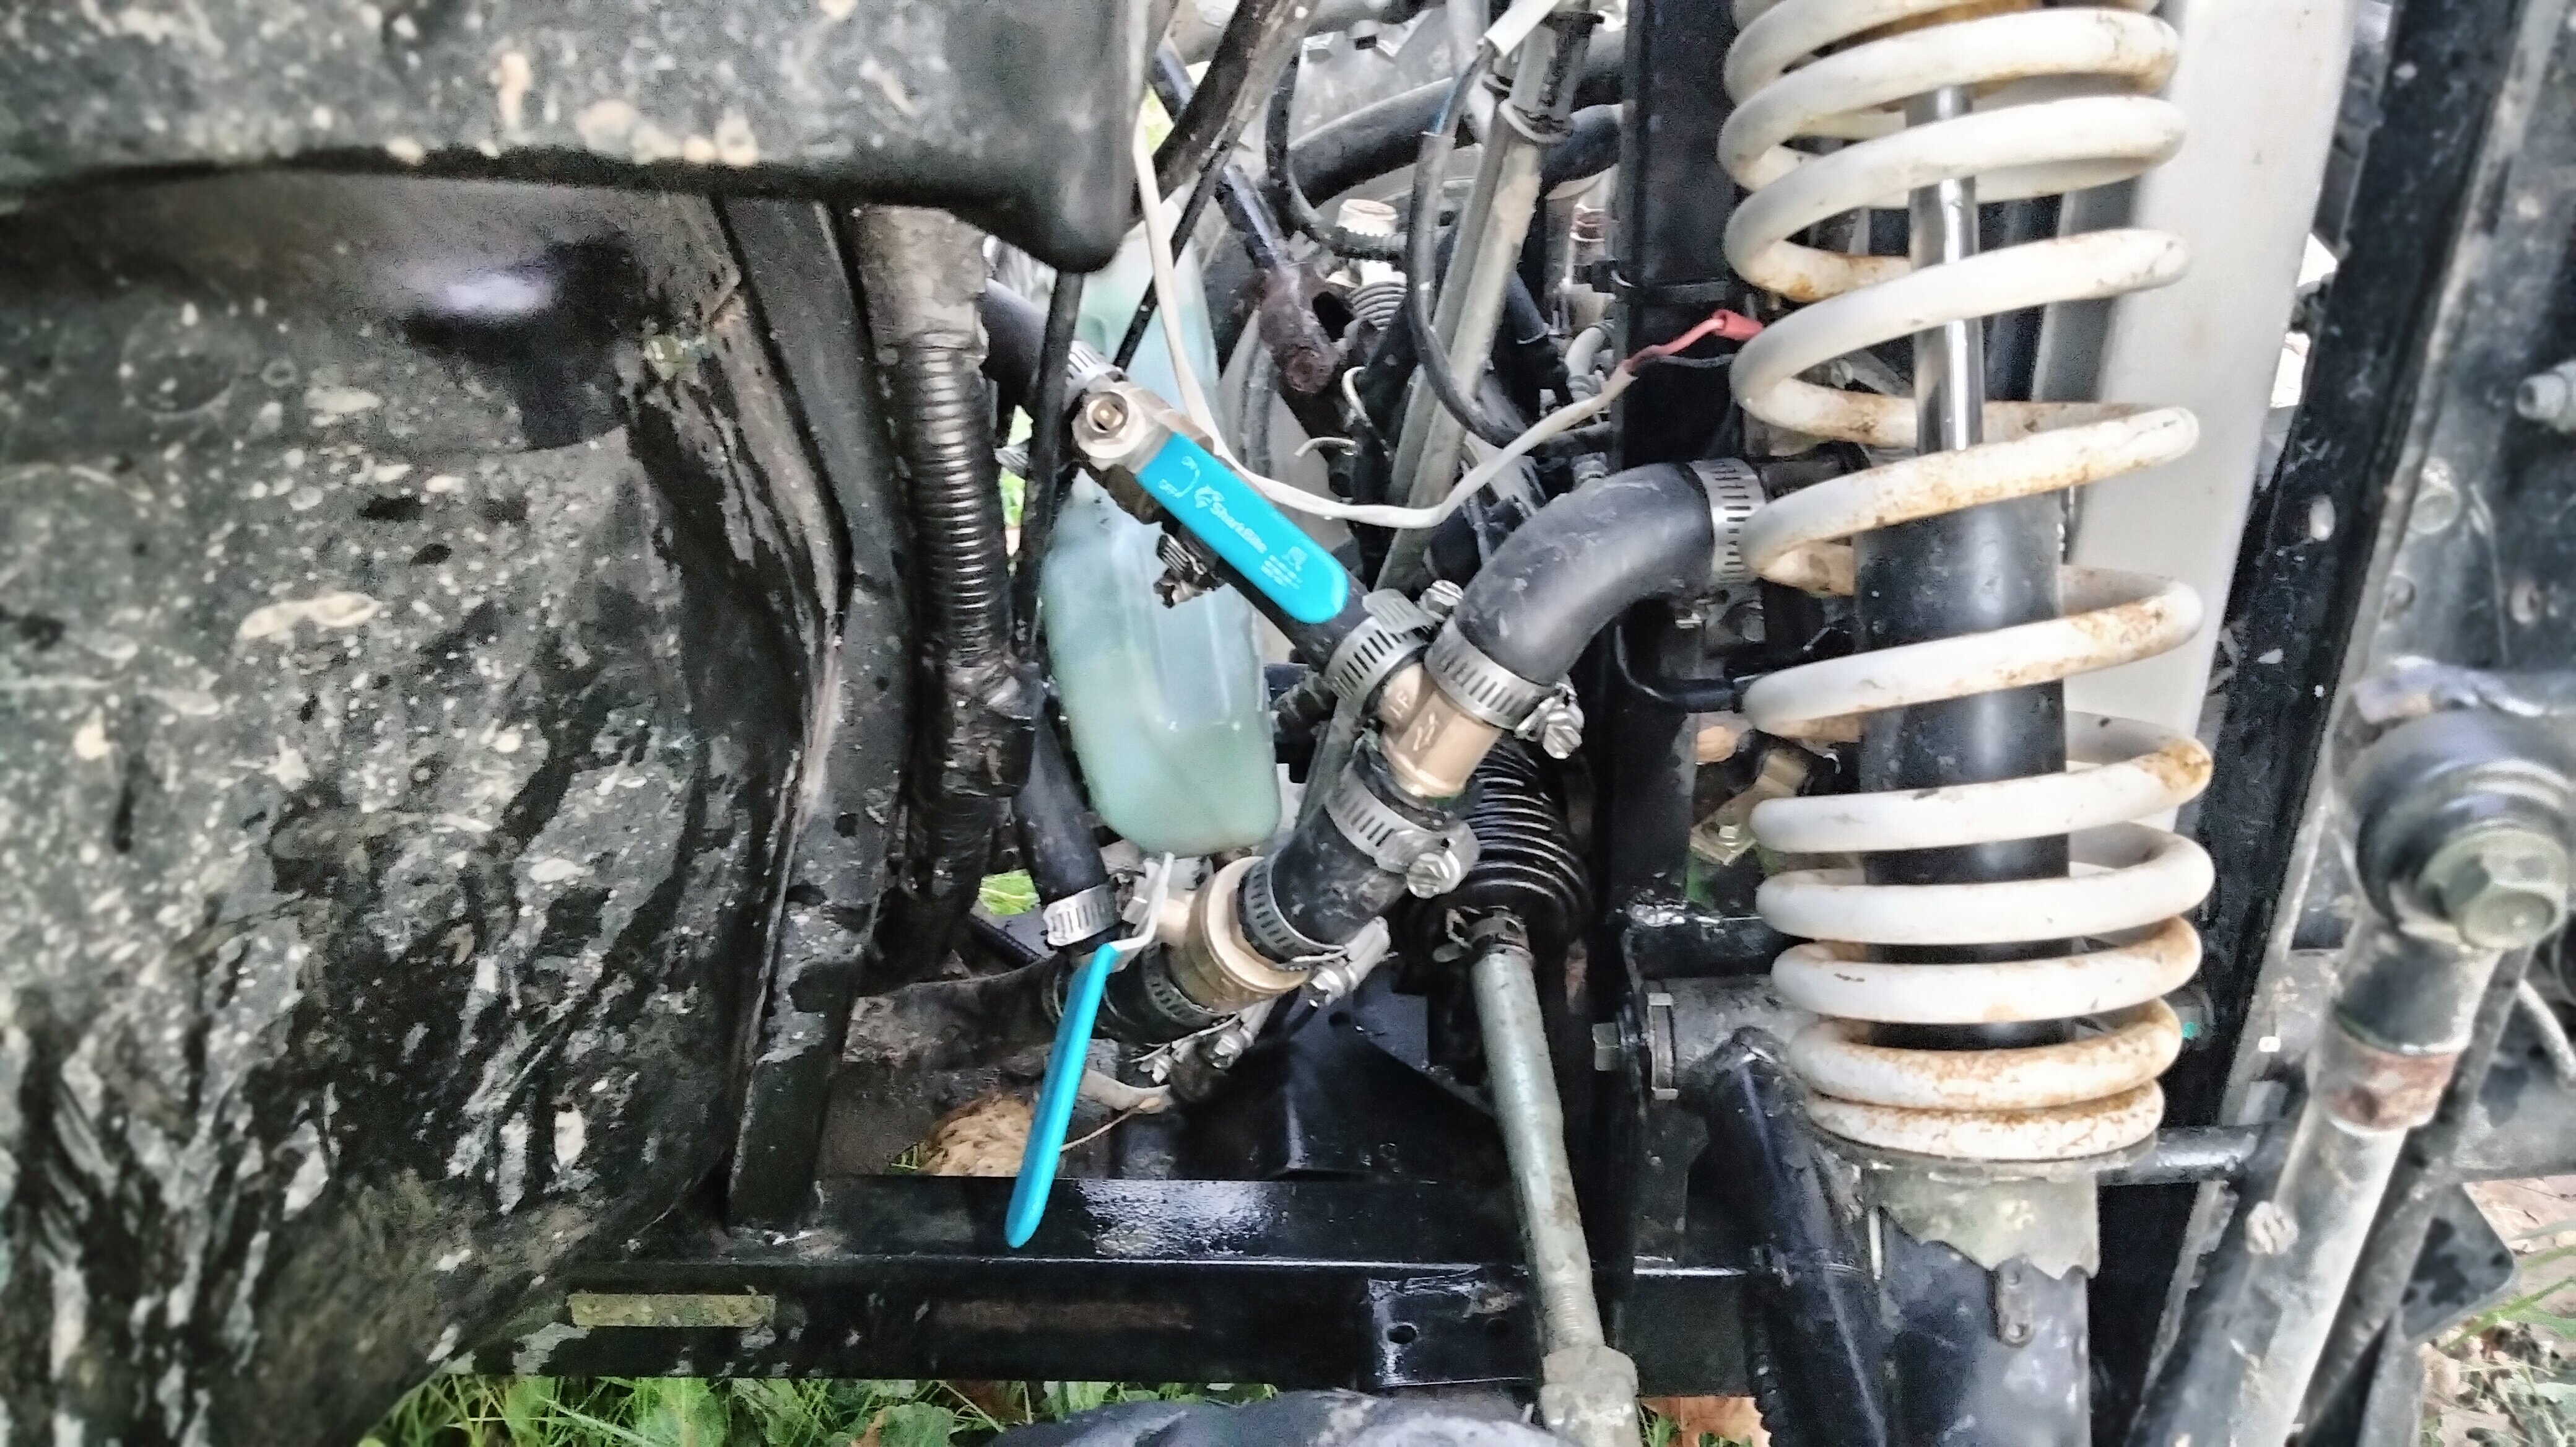
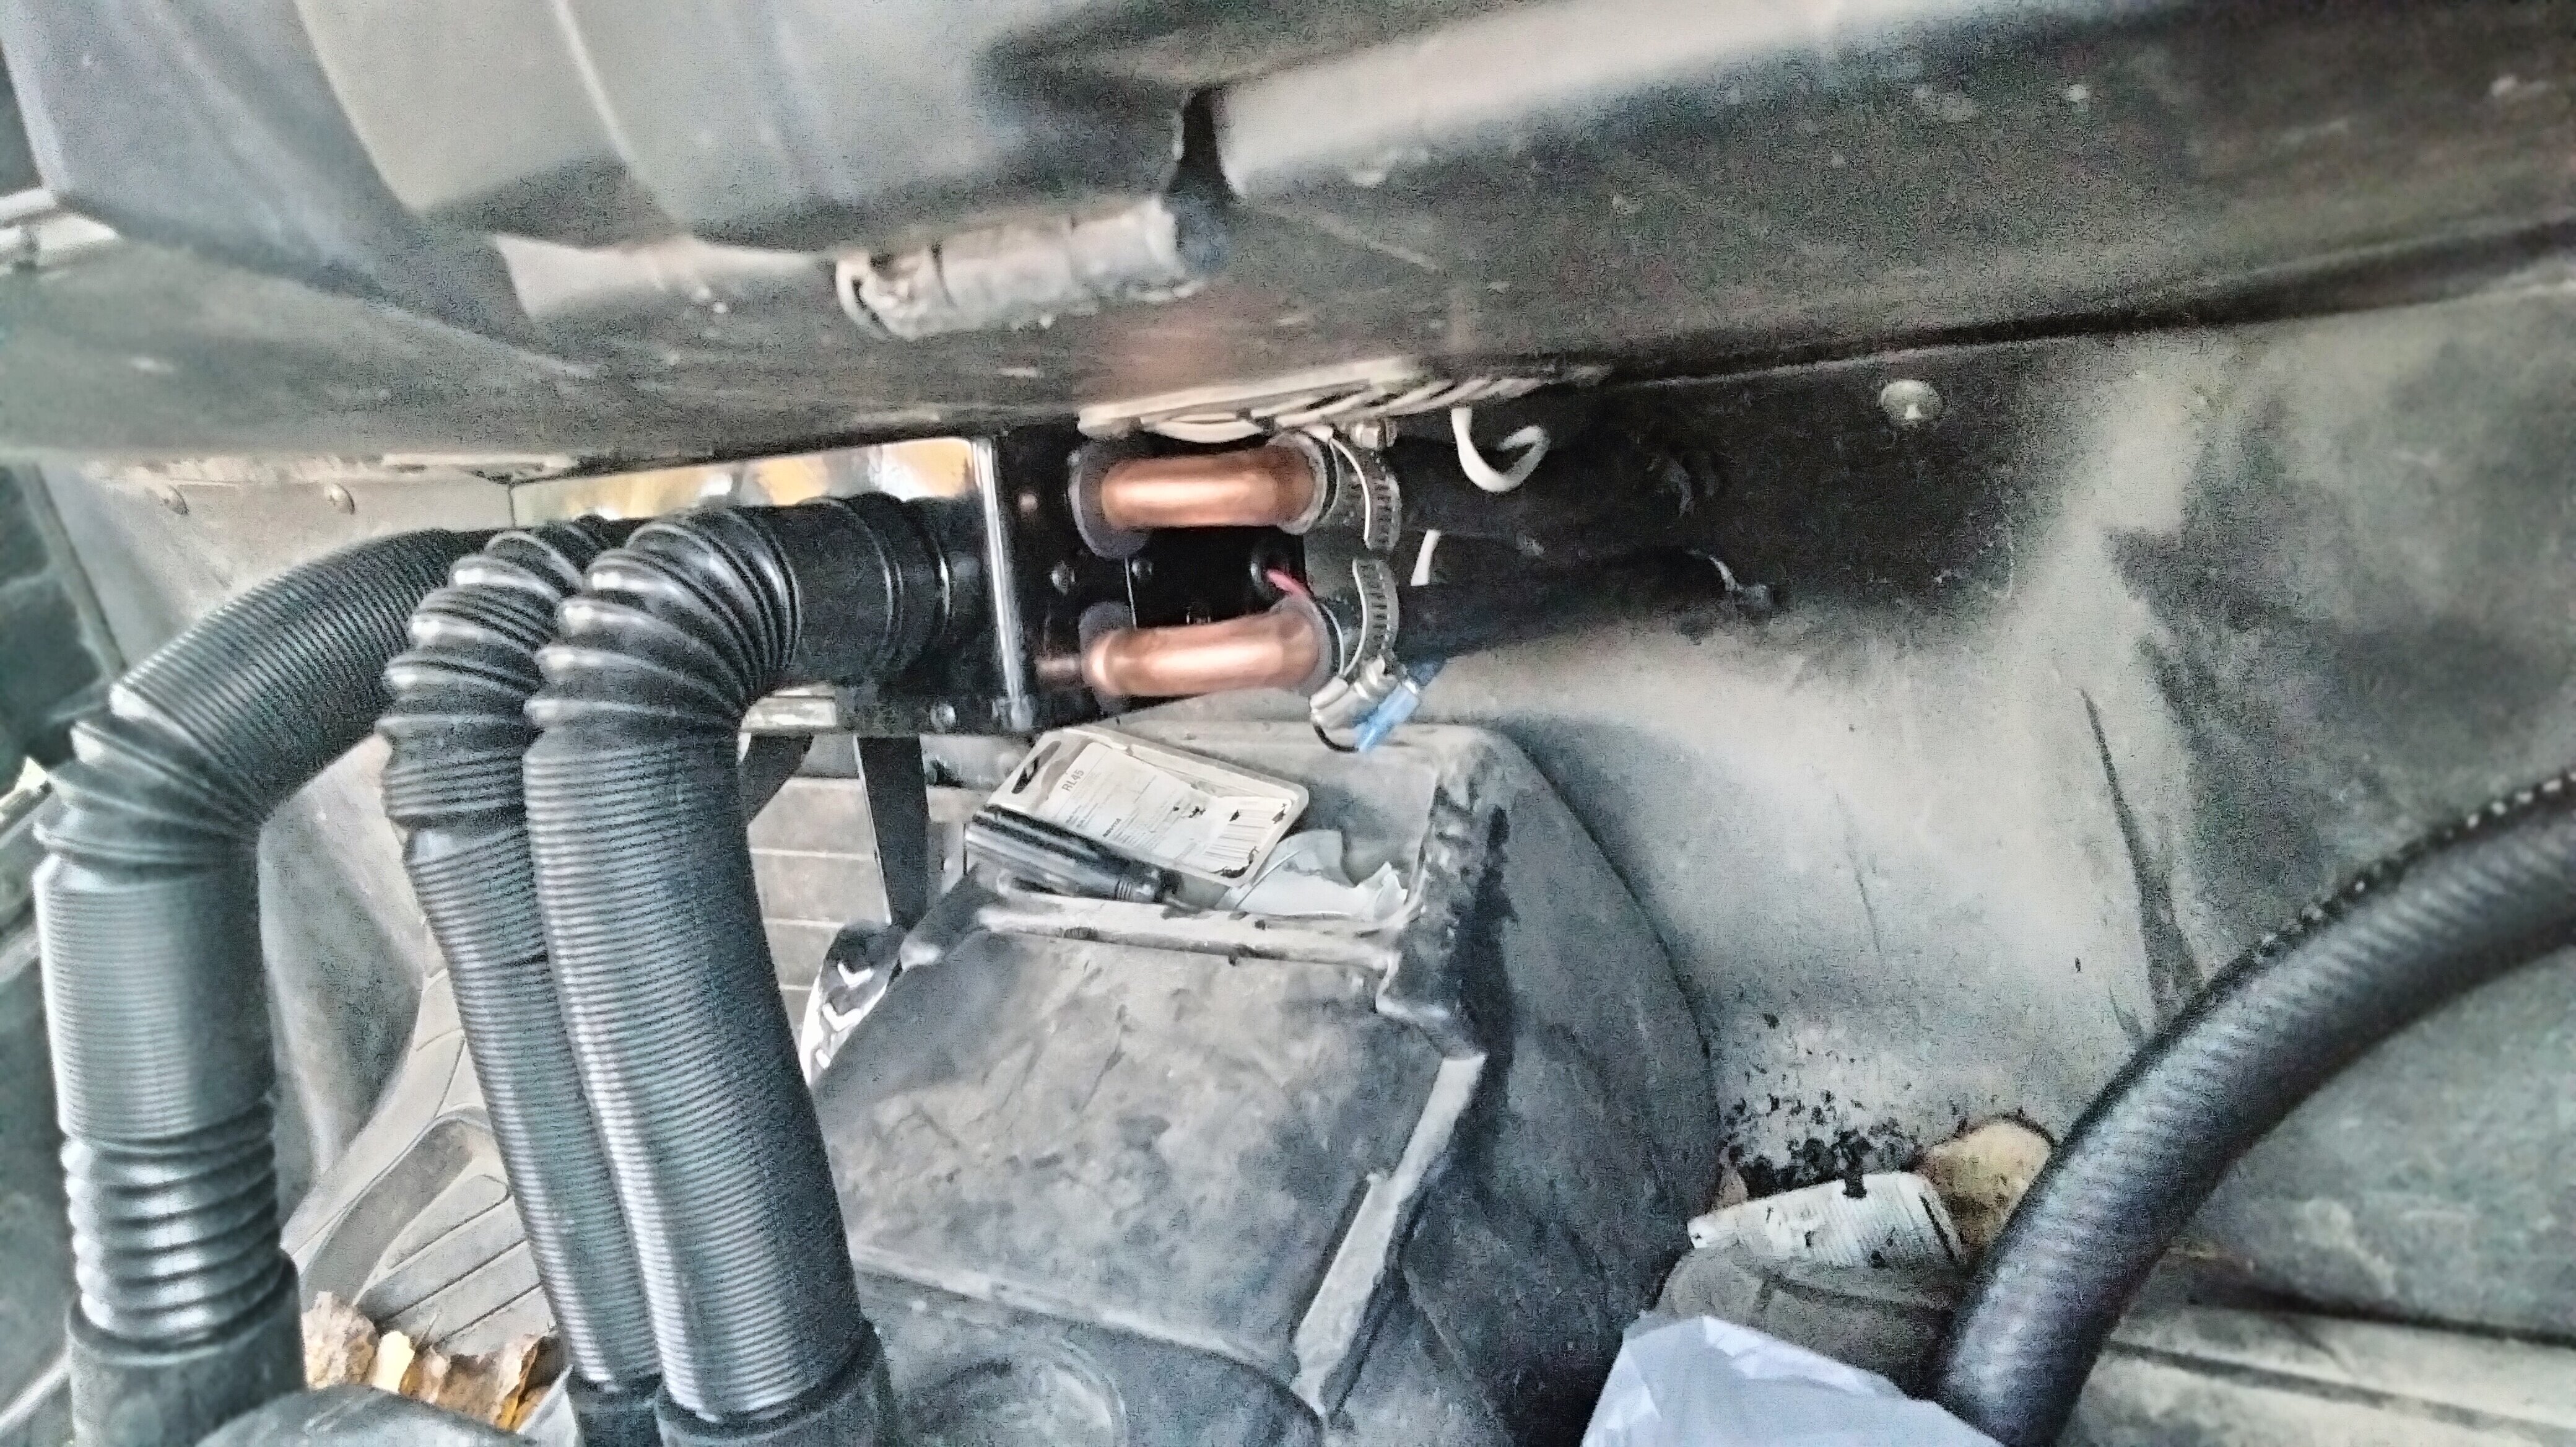
Last year bought a small universal coolant style cab heater. Well I installed it today. Thanks to another member, RangeRider45, and his install That told in his post the size fitting he used. I got the same fittings plus a few others. And all went kinda smooth. Took a few minutes to get air purged from coolant system. Should have parked on hill with front up in the air. But would have had a hard time working on it. I had a variable power switch connected to an overhead cab fan. Never really used the fan that much. And I have to remove the fan to put on my cab enclosure anyway. So I repurposed the switch to supply power for the heater. The heater has 2 12-volt DC computer fans that are rated for 1.8 amps each. So it's not going to be a big drain on the weak charging system. And with the switch I've got great control over the speed of the fans. If anyone is interested the radiator hoses are 7/8 inch. I reworked the temperature sending unit (moved it closer to radiator) to make room for all the extra plumbing I did to get the heater to work the way I wanted. Plumbing parts list. 10-15 worm water clamps. 3/4 to 1 1/4 inch size. 2 1" x 3/4" x 1" PEX Tee 1 3/4" PEX ball valve 1 1" PEX ball valve 5/8" heater hose. I got 6' and probably have 4' left over. I used the radiator house I cut out to use as splices between the PEX fittings. The PEX fittings are not true to their dimensions that are stated on the package. So they fit the 5/8" and 7/8" very nicely. They way I have it plumbed is from radiation out side. A tee, then the 1" ball valve, then a Tee. Coming off the Tees are the hoses going to the heater core. There is a 3/4" ball valve on one of the Tees. The ball valves are used to bypass the heater core in the summer. Or direct the hot coolant through the heater core in winter. The temperature sending unit tells me how hot the coolant is. And if anything is getting too hot. The dash also has an idiot light that comes on if the head gets too hot. But doesn't do anything if the radiator gets too hot. There is a temp sensor on the radiator that controls the electrical fan. But if the coolant isn't circulating. That switch never sends a signal to turn on the fan. But enough talking/rambling. Everyone wants to see pics. The only thing I need to change is the orientation of the handle on the 1" ball valve. I have 2" or more clearance between the handle and the tire when cut hard right. But I still don't like it. And instead of taking the valve out and rotating 180°. I'm just going to take the nut off and rotate the handle 180°. Think I need to make a locking mechanism to lock the handles in place so they don't vibrate closed when the machine is moving. The temperature sending unit and housing. Size 22 mm. Aluminum from Amazon. Upper Tee the lower Tee is identical. Can also see the handle of the 3/4" ball valve on the 5/8" hose going to the heater. The 1" ball valve. Goes between the 2 Tees Wide view of the plumbing. The heater installed in the sxs. The 3 black hoses are just hanging there. Zip ties to the heater but not attached to any thing. Will probably just direct 2 toward the wife's feet. And 1 toward mine. Or what ever is need as the heat is needed on rides. The black hose in passenger floorboard is some 1" hose that is not needed. Don't know what I'll do with it. I think if I was going to do it again. I'd put some Indian Head gasket dressing or silicone on the 1" side of the PEX fittings. And I may still do that. But I really hate the ideal of introducing air back in the coolant system. Any questions just ask. It may take a while to answer. But I'll try. Ya be good and stay warm over the next few months Kilgore.
-
The nasty fluid during 1st bleeding only. And was OEM fluid. Machine was manufactured Dec 2021 purchased in June 2022. About 2500 miles at the time I bleed the system. Got about 3500 miles now. Probably was contaminated from get go. Thanks for suggesting that and the complete flush. Hadn't thought about that or flushing the system. But will now. I'll keep y'all updated.
-
The admin need to remove that stuff. Or charge ad space. Hell they're enough ads here already. What's another 100 going to do. There was something about a OF ad or link or something. But no url. And I did report that.
-
2022 Axis 500 clutch noises on deceleration
Greg Kilgore replied to Josh5696's topic in AXIS Off-Road UTV SxS Forum
Haven't had any issues on my 500. Got about 3500 miles on it in 2 years. I haven't replaced anything dealing with the CVT belt, clutch, bearing or anything on the Axis. I have replaced all items mentioned on a CFMoto UForce machine. No big deal. Just have to drain oil and refill. So if you do decide to change the bearing. Might as well get the stuff to do oil change as well. The bearing, from what I can find out, is supposed to help hold the machine back or stop when letting off the gas. I've heard the machine can be operated without the bearing. It will just not hold itself back when going down hill or letting off the gas. Don't take this as gospel, but that's what I found out. And if the bearing is installed backwards it can make a fuss as well. Possible it was installed backwards from the factory. Don't know. Let's us know how this turns out and what you do. Have a good one. -
This started back in the summer. While on a ride with the wife. Applied the foot brake and the pedal went to the floor. Thought the brake pads were gone. Ordered new pads. Removed the wheels to install new pads and they were in good shape. So I bled all 4 brakes cylinders. Got thin dirty fluid out. Almost like dirty water. No air. Got a good pedal. Then about a month later, same thing, brake pedal back on the floor. Could pump the pedal and get a little pedal back. Bled again and finally got a good pedal. The fluid was nasty like before. No air. And the fluid was topped off in the reservoir before I started the bleeding process. Now same thing. Pedal going back to the floor. Reservoir still full. I'm thinking the master cylinder is bypassing. So have a new on on the way and will report back. What do you guys think. Could it be something else. I used one of those hand operated vacuum pumps to pull the fluid out of the reservoir when I was bleeding before. First time I've used one. And after a small amount of fluid filled the catch bottle. Seemed like the vacuum pump quit working. Had to close the bleed screw. Pump the brake one time. The start the vacuum thing again. Again just wondering what you guys think. Using DOT 3 and DOT 4 brake fluid. Whatever I can get at a reasonable price at parts store.
-
Please help me solve this
Greg Kilgore replied to JOSEPH LAMAR's topic in AXIS Off-Road UTV SxS Forum
Need an update on the issue. Others mention the seat belt switch. I'm just guessing you bought this new and it just started doing this. So I guessing you know about the seat belt safety. BUT if the wires for the seatbelt safety switch has issues, a short or open in the wires. Even if you have the seat belt connected the ECU would "think" that it wasn't because the safety switch wasn't reporting it was. You may want to trace the wires for the seatbelt safety switch and make sure they aren't shorted or broke into, aka open.