

Alien10
-
Posts
145 -
Joined
-
Last visited
-
Days Won
12
Content Type
Profiles
Events
Forums
Gallery
Downloads
Community Map
Everything posted by Alien10
-
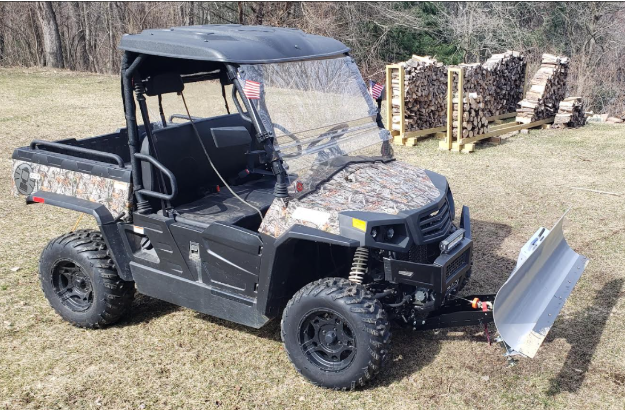
Thanks CMS, not sure I will go this route but will watch the local auctions for "boat parts" & see if a good deal can be had. If so, I think I'd give it a try. This is the KFI kit and appears fairly simple in concept. (1st pic). I can easily fab a bracket and mounts for a hydraulic cylinder. I'd use an electric actuator but the light aluminum tube used on most of those concerns me that repeated pressures from the blade in heavy snow would doom them to early failure. Also many use plastic drive gears. One other option might be a self contained 12v pump/cylinder unit but those are kind of pricey too at $300 to $400. (2nd pic below). For now it looks like planning a plow pattern favoring mostly one position with maybe one angle change change just to clean up.

-
I was also thinking of all the used and abandoned boats here in Michigan ports and storage yards. Most of the speed boats have elecro-hydraulic trim tabs. Had a 18' Sea Ray years ago with those. The trim tabs have to withstand a lot of force at speed. I wonder if one of those might be a solution. Plenty of strength and holding power yet short enough to fit in the push frame easily. Of course a small hydro tank and pump would need to be mounted somewhere in the machine with lines to the cylinder.
-
My new KFI 60" snow blade sits waiting for winter. Bought it early spring so didn't use it but tested it for function, seems to be just fine except getting out to change blade angle is pulling the set pin, pushing the blade then dropping the pin into the appropriate locking hole. OK under sunny skies and 80F temps, but in a blizzard, may not be the best thing. Looked at the 12v angling kits which are nice but between $700 and $1,000. As much or more than I paid for the blade and install kit. I can weld (poor to fair) and do some fabrication so can come up with a mounting for a linear actuator but most available are really light duty. Anyone have any experience with a DIY like this and what actuator you used?
-
2020 Axis 500 - only getting reverse and neutral
Alien10 replied to JimG's topic in AXIS Off-Road UTV SxS Forum
Yeah that lower gear #1 seems to be out farther than the upper "fan" gear. From the pic it would appear that #1's attaching bolt is spring loaded to force gear #1 into alignment with the upper fan gear. Is there any room behind #1 gear to slide back into alignment with the upper fan gear? If not, check to see if gear #1 will line up with the upper fan gear if you flip it around. I'd be a little careful with torque on that nut, it doesn't look very big. If you can tighten it enough to get the gears aligned, you might try a drop of thread locker on its threads to keep it in place during use. Good luck. -
Coleman Outfitter 500 Oil Pressure Indicator????
Alien10 replied to Alien10's topic in Coleman UTV SxS Forum
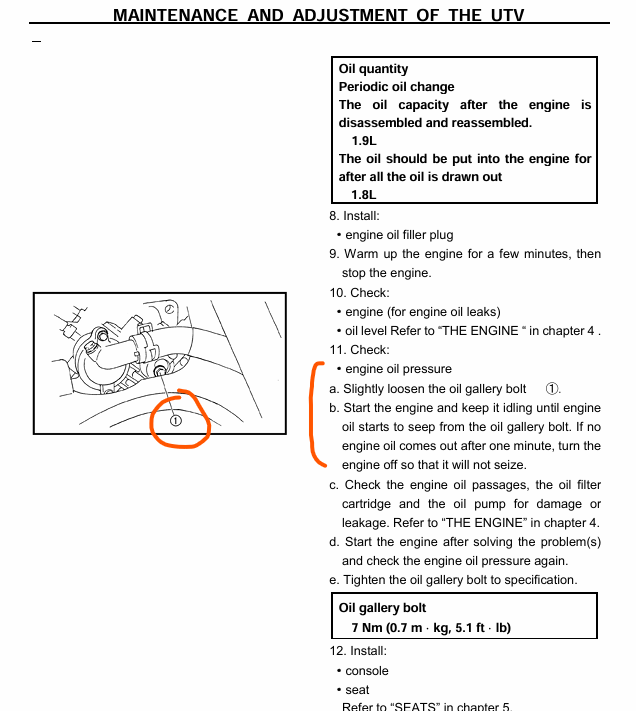
Yes, I agree, I bought mine in January 2022 at a local Tractor Supply, and it has about 80 hours on it now. So far, so good. Been pretty reliable but I only use it for property maintenance so no wide open trail type abuse. Although I have some large hills here that require 4WD to navigate. Got a KFI 60" plow for it this spring so it will take on those duties this winter. I may try to install a manual oil pressure gauge this fall just to be sure pressure is built. I just don't know if the ECM is fed by one of the sensors on the engine. I guess I could get in there with a light and a mirror to see if there are any block mounted sensors that might be oil pressure related. The only thing I could find in the tech manual is how to test for the required 9.2 lbs of oil pressure at 1,500 rpms. All that procedure tells us is to watch for oil leaking from the loosened oil gallery bolt. How to and where to hook up a pressure gauge is no where to be found. The whole manual is as if written by 12 engineers with a severe language barrier between them all.
-
Coleman Outfitter 500 Oil Pressure Indicator????
Alien10 replied to Alien10's topic in Coleman UTV SxS Forum
After review of not the owner's manual but of the Hisun engine tech manual searching the text for "oil pressure" I found only one reference for testing oil pressure on this engine. It says to loosen a bolt that is the oil passage bolt, start the engine and wait to see if oil drips out of the loose bolt. Pretty high tech eh?😒 I wonder if this would be a place to connect a manual oil pressure line to a gauge? -
Coleman Outfitter 500 Oil Pressure Indicator????
Alien10 replied to Alien10's topic in Coleman UTV SxS Forum
Typo: I have a Coleman Outfitter 550 not 500 as posted earlier. As a second question, has anyone added an oil pressure gauge to this machine? -
For some reason (I don't know where), I got the impression that the yellow check engine light on my 2021 Coleman (Hisun) Outfitter 500 ALSO served as a low oil pressure indicator. I was thumbing though the almost useless user's manual, and found nothing about any low oil pressure indicator. It lights upon key on power up as normal. After engine start, it remains on for about 3 to 5 seconds before going out, consistent with the engine building oil pressure. At least that is what I am thinking. Does anyone know for sure if this yellow check engine light also serves as a low oil pressure indicator??? Thanks.
-
AXIS 500 WILL NOT START. HELP!
Alien10 replied to Frank Mac67's topic in AXIS Off-Road UTV SxS Forum
Just to confirm: It ran OK when stopped for gas. When turn key to start, no noises, no clicks, no nothing. Q1: Does the dash light up as normal with the key in the "on" position? Q2: If you use a wire to jump 12v to the starter solenoid, will the starter turn then? (Careful, be sure it doesn't take off on you if it starts). Sounds like there is a safety interlock issue if it is not a blown fuse which you can easily check first. With the fuel pump running as expected and I'll assume the dash lights up, but you get no response of any kind when turning key to start, I'd suspect some sensor is not in the "go mode". Most of these UTVs require the the gear shift and trans to be in neutral position to allow the starter to turn. Is the gear position indicator on the dash showing "N" or neutral? Is the gear shift position sensor switch loose or inoperative? That would certainly account for the symptoms you described. -
Information on 2024 Hison 550x Stryker with a No start Issue
Alien10 replied to KWinTX's topic in UTV General Discussion
You also might consider talking to the selling dealer to push for a full replacement of your unit with a new one since it is an on going issue from new and the first dealer attempt to fix didn't fix it. If they resist, ask for the owner of the dealership and ask him/her how they are going to make you a happy customer. That might make your next dealer visit the last one for a while. Good luck on it. -
Since my UTV is a slow moving property maintenance work horse and I'm constantly in and out of it, I just buckle the belt up behind me & tuck it in behind seat bottom. I wouldn't travel quickly or on any roads or on any "tippy" places without the belt on though, too much risk of getting tossed out and maybe crushed that way.
-
Information on 2024 Hison 550x Stryker with a No start Issue
Alien10 replied to KWinTX's topic in UTV General Discussion
The whirring noise is the fuel pump building up pressure. It should stop about 3 to 5 seconds after turning the key to "on" position, (but not to start). With all other electricals all functioning, it doesn't sound like a battery issue. No clicking, no reaction to "start" sounds like there is not 12v coming off the key switch to the starter solenoid. From what you described, I'd be betting that the transmission neutral safety switch being defective or out of adjustment. Thus not allowing 12v through the key switch to the starter solenoid. With it in neutral (so you can roll it forward and backward and everyone out of the way) jump 12v to the starter solenoid, it should kick the starter over. Don't let it start the engine, pull a plug wire for safety. IF that works OK, then suspect the neutral or other safety switch. If you connect a test light to the starter solenoid's 12v tab that comes from the key switch, you can start wiggling and pulling things on the shifter mechanism to see if you get a quick flash of the test lamp. Otherwise, get in there with a voltage/continuity tester to see where your 12v is failing to reach the starter solenoid. My 2021 Hisun (Coleman branded) 550 has no brake safety but yours might, its a later model . I do know that if the shifter is even slightly out of the "N" position or if the "N" light on the dash isn't on, you will get nothing when turning the key to start, but everything else electrical will work. Sounding familiar? Good luck, let us know how you are coming along. -
Harvey, Just curious, you mentioned the clutch parts separated. No way to rebuild it better?
-
Hey UTV Board stie Admins: The board needs to award Ben1098 the UTV Board "Medal of Honor". !! 👍👍👍
-
Just a thought here...how is compression? Too tight exhaust can burn a seat and leave you with poor compression.
-
Here is what it looks like:
-
Update: Got the KFI blade, push tube and the Hisun 550 mounting bracket all mounted up. One thing I'm struggling with is the fairly low frame bracket position on the Hisun prevents the blade's front edge wear plate from reaching the driveway surface with the skid shoes properly mounted per the instructions and diagrams. The rubber cushions they show as being first on the skid shoe's post keep the blade edge a 1/2" off the surface. I like to have it just "kiss" the surface as I use it on a long, paved circular driveway. For out on the dirt road, I can lift it an inch or two off the surface to avoid plowing up gravel. I may make my own thinner rubber cushions for the skid plates to let the plow down that half inch to meet the surface. I've set the attack angle forward to help raise the skid plate relationship to the front blade edge but it looks like I'll have to go to the farthest available forward tilt to even out the skid plate to front edge relationship. Lastly, with a forward tilt on the blade, the trip spring eye bolts are 2 to 3 inches too short to engage the mounting holes in the top of the blade. I had to buy 5/16" x 6" eye bolts to replace the 3-1/5" eye bolts in the KFI kit. Next project for over the summer might be a 12 volt linear actuator for angling the blade from inside the cab. Doesn't look like a DIY manual angler is possible. Overall, the KFI kit seems like a sturdy, basically serviceable unit. Of course spring is springing here and not much snow on the prediction horizon now. Will be ready for November/December when they come.
-
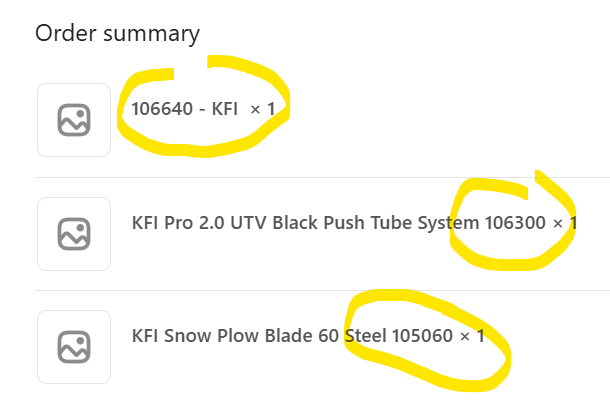
KFI blade purchase: Bought the KFI 60" blade, push tube, and the Hisun/Coleman Outfitter mounting brackets from Lion Parts Power Sports in Champaign NY. They did a good job on the sale and shipment. Very helpful via email and chat, and all went as expected. Delivery was by Fed-X, on time, and in good shape. Came from Sparks Nevada to Michigan. In case anyone is considering a KFI blade for their Coleman Outfitter 550, here are the Hisun Coleman Outfitter 550 KFI 60" snow plow part numbers as provided by the seller, Lion Parts Power Sports.
-
The KFI 60" blade, push tube and mounting brackets arrive in good shape last night. They were the correct parts for the Hisun (Coleman Outfitter) 550 I have. Installed the mounting bracket to the frame this morning and thought I's share the experience. All parts were really heavy duty and powder coated. Instructions were fairly clear and the photos and drawings were decent, although it wouldn't be difficult to figure the assembly out without the drawings & pics. First, my front bumper is the type that mounts to the front of the frame cross member and bolts to the front and up through the bottom into threaded holes in the frame. My KFI/Hisun bumper model, mounting bracket is supposed to fit over the top of that Hisun bumper mount bracket and use the same threaded frame holes. (other Hisuns may use through frame bolts and nuts). The biggest issue is that the front bumper is also the winch mount and so is quite heavy once unbolted. It wants to fall down and hang by the upper bumper support brackets. OK, so a floor jack used with a light touch came in handy to raise it back into position. However, Hisun's bumper mounting bracket holes are just barely large enough to let the bolts start in the threaded holes, if it is perfectly positioned! Now add to that another 3/8" thick KFI bracket and lining up all the holes to start fine threaded bolt is a exercise in frustration!! Now add to that, the fact that the KFI bracket's square hole is just off about 1/16th of an inch meaning that even in the best position, it wasn't going to allow the bolts to start in their holes. Down comes the entire project. My solution was to use a rat tailed file to enlarge the KFI bracket's square hole by 1/16th" where it needed the extra clearance. I also had to enlarge the Hisun's bumper bracket holes about the same amount using a drill and dressing it with a file. (Careful, the bit will grab and try to twist your wrist off of your arm). Note 1: Before refitting the brackets, remove the plastic skid plate/mud deflector right behind the frame's front cross member. AND replace it before mounting KFI bracket using only the two rear bolts. The front is captured underneath the KFI bracket and can't go anywhere. Note2: The washers for the 4 mounting bolts need to be the big ones in the hardware pack to accommodate the square holes used in this mounting situation. There are 3 possible mounts in the Hisun 550 models, so study the instructions carefully and your Hisun's bumper mounting set up to select the right one. KFI supplies all the parts needed for any of the 3 styles of bumper mounts. Note3: Trying to line up and start the bolts in the bottom holes first was a mistake! Using the floor jack under the winch fairlead, and with a very light touch, and some muscling of the bumper assembly right to left, brought the bumper back up to roughly the correct position. So that the front bolt holes and the bumper mount's holes lined up. Test this alignment with one of the bolts to be sure you can start it in its threads before proceeding. Then by hand, raised the KFI plate up so it too was aligned with at least one of the front bolt holes. Carefully wiggling the parts so as not to lose their orientation, to get one of the front bolts started and screw it in but leave plenty of wiggle room. Do the same for the other front bolt leaving both loose but well started in their threads so there is plenty of wiggle to get the bottom two bolts started. I found once the front two bolts were started, the jack could be removed to allow for better access and position to wiggle the bumper assembly to get the bottom bolts aligned and started. Once all 4 are threaded in, tighten up everything very securely. Don't forget the washers and lock washers, all supplied in the kit. Next up, is brought the machine from the barn to the house garage where the push tube and blade are awaiting assembly and installation. Will update when done, meantime a warm up break and some lunch. Hope this is helpful to someone down the road.
-
Coleman (or Hisun) Parts and Service experiences.
Alien10 replied to Alien10's topic in Coleman UTV SxS Forum
Joe, I'm in Michigan and using their "find a dealer" the only facilities I could find are either in Canada or in Ohio. Made me curious on whether anyone has found any near their locations. Have a good week. -
Maybe members can post where they have obtained parts and service for their Hisun produced UTVs and ATVs, including the Coleman lines. Maybe post the model you have, what you bought, and how the products were quality wise. Also if you had any shop service done, where (city & state) and how it worked out for you.
-
My Hisun 550 (Coleman Outfitter stickers) does much better running in low gear. I can get up to about 30mph without going deaf from engine noise and even that is 10mph more than I'd use around my property. Like Randy said, and I agree, you'll have better full engagement in low and likely less wear as well. I seldom use High anymore.
-
Welcome to the site!! And a huge thank you for your service!! That is a beautiful machine! From the pics it hardly looks used! Congrats and enjoy it!!
- 1 reply
-
- 1
-

-
Well yesterday I went and ordered a KFI 60" blade and mount for my Hisun 550 with the Coleman Outfitter stickers. Now that winter is just winding down, maybe I can get one more push out of it if it arrives in the next week. Thought I'd try to save my JD Garden Tractor for fall leaf clean ups which it is great at.
-
I seldom have a reason to go over 20 to 25 mph but I think it is capable if I wanted to. I think the 550 tops out around 40 to 45 in high, but I haven't really tried that. Most of my property is on hillsides so I only use low range, it has plenty of speed for the 1/8 mile trip down our dirt road to my barn. It does get a little loud even at 20-25 mph, but not alarmingly so. Its just the engine revs. It should be smooth. Can you tell if this is exhaust noise or is it noise from something internal to the engine or trans. Maybe remove the dump bed and have a buddy listen out the back window to see if he can spot where that alarming noise is coming from. Also note at which RPMs the noise increases more that you'd expect for the given RPMs. Do you have any other issues with engine, like hard starting, or backfiring? Or how about transmission or belt slippage? Also is it the same loudness when in high range? Be sure engine and trans mounts are all secure. Check to be sure nothing on the body is touching the engine and maybe magnifying the noise at higher RPMs.