Quantcast
Jump to content

2012 Kawasaki Mule 4000 Hood release latch cable replaced


Recommended Posts

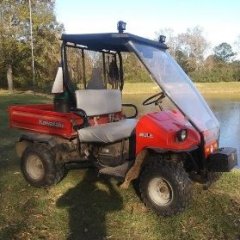
I have a 2012 Kawasaki 4000 Mule and the hood release cable is frozen and will not move. I want to replace the cable and have removed the fenders, hood, cargo box to access the cable. I finally had to remove the plastic dash far enough away so I could get a wrench on the nut holding the cable release knob in place. That's a lot of fun. I cannot remove the pin holding the cable to the release bar mechanism. Is that a force fit pin or what. There are no keepers holding it in place. Any suggestions on how to get the cable out? I can see why the previous owner never fixed it as you have to remove the whole front to get to the cable. I've tried penetrating fluids to make the cable work with no success. Your help is appreciated. Gerry C.

Link to comment
Share on other sites

Travis, I'll give that a try in the morning and I'll take a picture too. I tried tapping on the pin with a punch and hammer and it didn't want to budge. I'll check to see if they've peened it over to keep it from coming out. Interesting that the parts diagrams don't list the pin separately, perhaps it comes with the replacement  cable.  I take it you've been inside one of these before. Kawasaki sure has a way of making it hard on anyone working on one of these.  The rear ignition-coil is another choice item to replace. You need to be a dwarf with a deformed arm. Thanks for your help, Gerry C

Link to comment
Share on other sites

  • Alex changed the title to 2012 Kawasaki Mule 4000 Hood release latch cable replaced

I have the complete manuals from Kawasaki for the Mule and have read all applicable topics and they really say nothing about how to remove the cable nor the pin. They just tell you how to adjust the cable length and that you need to remove basically the whole front end just to get to it. There's a welded box section up near the dash that the cable has to go through and there's a nut on the backside which holds the cable knob end in place. Good luck getting to that nut, I did and it's loose now but pulling the cable through depends on getting the pin out. It should look like a straight forward task but it is not as easy as it looks.  Trust me, I read everything I can get my hands on and I've been around heavy machinery all my life  so being a mechanic is second nature. I've just never gotten involved with motorcycles ot ATV/UTV's so I'm still learning.. Even the parts schematic drawings don't help nor does it even show the pin. It must come with the replacement cable.. I'm going back after it this morning but I will be greatful for any suggestions short of setting the thing on fire.  Gerry C.

  • Like 1
Link to comment
Share on other sites

I just found your post giving the site for the manuals and the exploded parts diagram.The #554 snap pin that's shown in the diagram is connected to the differential shift cable. That's a regular hairpin type retainer that they use throughout the machine. The is no such number as a #50410 that I could find. There is, however, number 54010 for the hood cable which doesn't show what happens at the end of the cable where the pin should be. You may have just reversed the numbers. The manual just tells you how to open the hood. All good suggestions but have been there. If there was a Kawasaki dealer nearby I'd ask them but the closest is far from me but I make a trip anyway if I can't figure this out. Like I said before, please keep giving me ideas. If I've already tried them, I will try them again as I may have missed something.. When I finally finish this repair I'll write up a report as I'm sure there are others who have had or will have the same problem.  Gerry C

  • Like 1
Link to comment
Share on other sites

5 hours ago, Gerald Clarendon Sr said:

I just found your post giving the site for the manuals and the exploded parts diagram.The #554 snap pin that's shown in the diagram is connected to the differential shift cable. That's a regular hairpin type retainer that they use throughout the machine. The is no such number as a #50410 that I could find. There is, however, number 54010 for the hood cable which doesn't show what happens at the end of the cable where the pin should be. You may have just reversed the numbers. The manual just tells you how to open the hood. All good suggestions but have been there. If there was a Kawasaki dealer nearby I'd ask them but the closest is far from me but I make a trip anyway if I can't figure this out. Like I said before, please keep giving me ideas. If I've already tried them, I will try them again as I may have missed something.. When I finally finish this repair I'll write up a report as I'm sure there are others who have had or will have the same problem.  Gerry C

 My bad, i guess i looked at the wrong numbers.

 It is very odd that it doesn't show the clip in the diagram. I even looked at the diagram with the hood  and it didn't show the pin.

Link to comment
Share on other sites

It just dawned on me that the welded on clip on the release bar that holds the pin has a slot cut in it and perhaps if I stick a bar/screwdriver in the slot and pry on it to open some it may release the pin enough to allow the pin to slide out and when reinstalling a new cable just insert the pin and crimp the slot closed enough to hold the pin from falling out. I'm going to give that a try and also go ahead and order a new cable and see if a pin comes with it. It's got to be something simple. Kawasaki couldn't have made it impossible but then I don't think like Japanese engineer.  I do hold a mechanical engineering degree from a good college but maybe the engineering world has changed in the past 57 years and I'm just out of date. I would have provided a more straight forward assembly. I'll let you know how I make out.  Gerry C

Link to comment
Share on other sites

Might doesn't make right but it beats whatever's in 2nd place. I think my folks did spend their money on my education wisely. It taught me to think. My idea of spreading open the bracket that holds the pin was correct. Why the parts diagram doesn't show the connecting pin separately is because it is part of the cable and not a separate part. For those of you who had the same problem as I trying to replace the hood release cable, the bracket which is a welded part of the release latch mechanism is like a square "U" with a hole drilled through it to accept the pin. On one side of the bracket is a slot about a 1/4 inch wide from the outside edge to the hole. Take a large screw driver or or wedge and twist the slot until it opens up just enough to release the pin and the cable. Now you can pull the cable, knob and all out through the hole in the dash. This, assuming you've managed to release the nut holding the whole thing tight against the bracket that the cable goes through. That bracket also has a slot cut through it and as you pull the cable through you may be able to slide the cable out through the slot or maybe even bend it enough to get the cable out. It's a thick bracket so you may not be able to bend it. Haven't gotten that far as yet. Will work on that tomorrow. I'll let you know how that works out and the steps necessary to replace it. After that, if anyone is interested, I'll go through another nightmare and that is replacing the ignition -coil in the rear or #2 spot on the Mule. That's a bunch of fun too. Gerry C

  • Like 1
Link to comment
Share on other sites

If you own a 4000 or 4010 Mule, and perhaps others that are of the 2cylinder type, there is an ignition -coil for each cylinder. When one of them dies, and they must because there seem to be a lot of them sold through the internet and that coil is used on several makes of engines, then your DFI light will not go out after the engine is started which indicates that you have a problem. If it's the coil then you are running on one cylinder and the power you now have is enough to get you back home, the limp home mode.  The # 1 coil is the one in front and isn't bad to get to but the #2 coil is the one in the rear and next to impossible to get to. If you read the manual it tells you how many things you must take apart to get to it Trust me, You have a lot to disassemble, Tire, shock absorber, torque converter housing , clutch, starter motor, and then the coil. I figured out how to eliminate that but you need patience , a lot of swear words, a lot of luck, and a special 8 mm wrench..  Pray yours doesn't die and if so you may want to take it to a dealer and let them fix it.  Gerry C

  • Like 1
Link to comment
Share on other sites

Travis, some of the Kawasaki engines are really great and long lived. I have their 2 cylinder engine on a Ferris Zero turn mower, water cooled version. 26 HP don't remember the displacement but it's 13 years old now with 2105 hours on it. So far no problems and I should not say that because now it will explode. Anyway, changing oil and filter every 50 to 75 hours over its life I'm sure has contributed to its longevity. Putting in new spark plugs every year or 2 helps with the starting. I should check the valve adjustment too but will try to remember to get to that this winter.  GC

  • Like 1
Link to comment
Share on other sites

Join the conversation

You can post now and register later. If you have an account, sign in now to post with your account.
Note: Your post will require moderator approval before it will be visible.

Guest
Reply to this topic...

×   Pasted as rich text.   Paste as plain text instead

  Only 75 emoji are allowed.

×   Your link has been automatically embedded.   Display as a link instead

×   Your previous content has been restored.   Clear editor

×   You cannot paste images directly. Upload or insert images from URL.

  • Similar Topics

    • By ETHIEL
      Spark plug keeps fouling. after 10-15 minutes of running any ideas what to look fore 
    • By FloridaMan
      I have a 2012 Massimo MSU 500 that died. I found that it didn't have spark and the fuel pump wouldn't run. Checked all fuses and none were blown.
      Went through and replaced the ignition coil, HT lead and spark plug. Still no spark.
      Thought it could be the fuse/relay box because I didnt' know much about the machine at that point so I replaced it. No spark.
      Then I replaced the ECM just because I was running out of ideas. No spark.
      I removed the 9 pin connector and hardwired it making sure that they were no wires got swapped. Still no spark.
      Then I replaced the wiring hardness. In doing so, I replaced the 9 pin connector with new ones. I made sure all wires were matched up between the engine harness side and the other harness assembly. Still no spark.
      I have no other ideas what to do. My fuel pump doesn't kick on and I have no spark. I have 12V on the fuel pump, ignition coil and fuel injector, but no ground from the ECM control.  I unplugged the fuel injector and waited for a diagnostic code but nothing ever came in. It makes me think that the ECM isn't powering up. I've checked for 12V on pins 18 (purple wire) and 15 (white and black wire). I also checked for ground on pin 2 (black wire). All are good.
      I am out of options here and I have no idea what else it could be. I have all connections redone and are coated with dielectric grease. I've checked all easy things like fuses and making sure I have 12V in the right placed. I would appreciate any help.
    • By Moos
      I replaced the fuel pump, ended up with a couple bad ones. This last one now worked fine for about 150 miles, now only works when its cool outside. (30-40). As soon as we hit 55 degrees, It will not run. Barely starts, runs rough, will not move. Any ideas? Another bad pump? Something else going on? Any help would be appreciated. Thanks.
    • By johnpeter
      2012 Polaris RZR Robby Gordon Edition On Ebay
      https://www.ebay.com/itm/126322886880?

    • By NewtoUTV
      I have alot of issues with this machine that I'm trying to figure out and fix.  Today when I was fixing the shifter I see this cable connection that is not connected to anything.  I looked and can't find where it might need to be.  Any ideas would be greatfull.

×
×
  • Create New...