Quantcast
Jump to content


Rust fix idea...


Travis
Go to solution Solved by kenfain,

Recommended Posts

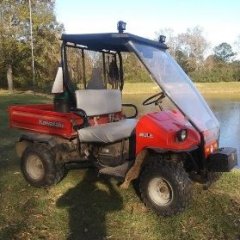
I'm getting a small area of rust starting behind each front wheel, (where the cow pies get slung). I'm pleased with the job POR15 did in the bed, so i will just repeat the process in that area. however, i'm not sure how POR15 will hold up to cow crap getting slung on it.. and my reasoning  is Cow poo is somewhat acidic, and when left too long with out cleaning off, starts to lift paint, so i don't know how that will affect POR15. what i'm thinking of doing getting steel sheeting with aluminum finish, or a stainless steel sheet  and bend it and fit it to the inside of the wheel well to form somewhat of a "splash/splatter" guard  to protect the actual frame and sheet metal from further corrosion as well as were I ....there are several places where i could tack weld it to the frame underneath...


  • Like 1
Link to comment
Share on other sites

Don't use the over the counter junk. It's not any better than paint. Gotta use the good stuff for anything that'll last. Unfortunately, you can't spray that stuff with a regular spray gun. So you need to have the gun too, if you're planning on doing it yourself.

I'd bet that some of it can probably be rolled on though. 

  • Like 1
Link to comment
Share on other sites

i did find this from POR15  (https://por15.com/products/top-coat)as well, it's a top coat made to go over the actual rust preventer/sealer that's supposed to have a tougher skin/finish to it than regular POR15 to protect it....

it seems any GOOD bedliner that i could roll on, comes in at least gallon and is about $70-$100... i really can't justify doing that right now. i guess really i just need something that dries hard and is durable to  help protect the POR15.

Link to comment
Share on other sites

7 hours ago, Travis said:

i did find this from POR15  (https://por15.com/products/top-coat)as well, it's a top coat made to go over the actual rust preventer/sealer that's supposed to have a tougher skin/finish to it than regular POR15 to protect it....

it seems any GOOD bedliner that i could roll on, comes in at least gallon and is about $70-$100... i really can't justify doing that right now. i guess really i just need something that dries hard and is durable to  help protect the POR15.

you might try a rattle can of spray UNDERCOATING .   its only about $3 , and its pretty tough 

  • Like 1
Link to comment
Share on other sites

On 12/31/2021 at 7:07 PM, kenfain said:

Don't use the over the counter junk. It's not any better than paint. Gotta use the good stuff for anything that'll last. Unfortunately, you can't spray that stuff with a regular spray gun. So you need to have the gun too, if you're planning on doing it yourself.

I'd bet that some of it can probably be rolled on though. 

Well looks like i don't have to worry about getting bedliner now, my neighbor up the road has a little over   a 1/2 gallon of Herculiner left over from some Truck projects a few months ago , after watching several YT videos it looks like good tough stuff. Looks like it's designed  to roll on.

Like this,

https://www.amazon.com/Herculiner-HCL1B8-Brush-Bed-Liner/dp/B0002TDUW4/ref=sr_1_1_sspa?keywords=herculiner&qid=1641304510&sr=8-1-spons&psc=1&spLa=ZW5jcnlwdGVkUXVhbGlmaWVyPUEyVTVDNTIwUTNXM0Y3JmVuY3J5cHRlZElkPUFaUDZYUFFFRUZHNlcmZW5jcnlwdGVkQWRJZD1BMDY5OTI0NDM0SlVSQVFISzlaUzcmd2lkZ2V0TmFtZT1zcF9hdGYmYWN0aW9uPWNsaWNrUmVkaXJlY3QmZG9Ob3RMb2dDbGljaz10cnVl


Link to comment
Share on other sites

Got the POR15 on. its drying now. I started this morning around 9, applying the metal prep and cleaner. the metal prep(I applied and let it soak for about 2 hours) did a good job of taking off the flaky rust and getting it to solid metal, with some help from my wire brush of course..

i will wait at least 24 hours before applying the bedliner to let the POR15 do its thing and cure fully.

Link to comment
Share on other sites

  • 8 months later...

Join the conversation

You can post now and register later. If you have an account, sign in now to post with your account.

Guest
Reply to this topic...

×   Pasted as rich text.   Paste as plain text instead

  Only 75 emoji are allowed.

×   Your link has been automatically embedded.   Display as a link instead

×   Your previous content has been restored.   Clear editor

×   You cannot paste images directly. Upload or insert images from URL.

  • Similar Topics

    • By Jerrys500
      I wouldn't say that after a year of owning this thing, that I would go out and buy one again. Certainly one that was used and abused, but at the time I needed something and this was in my price range. I could tell that it would need some work. I however didn't know the half of it. This was my second UTV. The first one was and older American Sportsworks Carbide 7150 that was a total piece of junk. I got it for next to nothing and was a project piece. I got it running and rode it for a bit but it was way not what i needed and it finally burned up and was set aside. Anyways, so I bought this one from a farmer. I'm not positive of the exact model but it originally came from Tractor Supply. per the stickers on the bed and its a camo color. Upon first inspection when I got it home, it was a mess.
      1. Had a water leak - The leak was in two hoses one of which was a short one that came from the rear of the engine and I literally ended up cutting it off. Well getting another one on there took hours and was simply horrible.
      2. Had an oil leak - This is my concern today as I was never able to figure out for sure what it was going to take to fix it. More on that in a min once you have a full account of where i've been in this thing.
      3. Had a bad clutch - Replacing the entirety of the clutch system wasn't all that bad except its a tight space to work in to do this repair. was a pain to figure out the angle that I needed to get the cover off and then back on again but figured it out the second day and got it done.
      4. Had bad Universal Joints - this was a nightmare because they originally put 18mm ujoints in the thing which I was not aware of so when my parts came in of course I had the 20mm that they started putting in, from what I can understand, was the very next year. Finding the 18mm ones was all but impossible so I bit the bullet and did the full conversion to the 20's.
      5. Had bad Tie Rods.  - Tie rods were not a problem. However while in there I noticed that it was a little low on brake fluid. The fluid that was in there looked fresh. Sure enough there was a line leak there so i had to get new lines for it. I almost just ordered the master cylinder at that time but had seen the  fluid coming from the other end and thought yeah it should  be ok. That was a stupid decision. Yet another parts order to get one. Once delivered it was not a prob just replace, fill, bleed and good to go.
      6. This was about the time the panic set in. I needed to check the other oils and the final gear oil was mostly empty and what was in there I'm still not was sure was gear lube. Luckily after clearing it out and refilling it, there didn't seem to be any issues with the final gear. So far that is.
      7. So at this point I figured that it was ready for my first trek with it to the  gold claim and off  we went. This was a 14 day venture in the middle of nowhere over 300 miles from home. I had tested it over the course of 5 days and except for the oil leak it looked like all was good with the exception of blowing a little smoke. Day two in the sticks it decided to just die on us out of the blue. I checked the spark and it wasn't there anymore. The plug wire had come apart. I made one that worked until I could get a replacement. It still wouldn't start but I was getting spark. ended having to remove the fuel pump and clean it up. I then had to pull the fuel injector. I don't know why it ran when it did. It took over 4 hours of running brake parts cleaner and air through it before I could get any fuel to go through it. Luckily after that most of a day delay, I'm glad to report that it did its job rather nicely for the remainder of the trip.
      8. After that ordeal and in the neighborhood of about $800 or so for parts and oils and all it looked a little brighter. I did still have not only the oil leak to fix, it started blowing more and more smoke. I keep the oil up but it uses quite a bit. if used in a whole day I'm adding at least a half quart. Its made three trips now in this described state. The only new things are that it has gotten very difficult to shift which is likely that pair of shifting gears, the blowing of smoke that is almost for sure a sign that I have to rebuild the top end including the top end kit and do the valves at the same time. Now the oil leak. 
      So this leak I don't quite know the part names but it is coming out from around the shaft coming from the front of the engine. My diagram does not seem to show that there is a bearing in there but I would think there has to be. So I can't order a part that doesn't seem to exist. Now the part I still can't figure out is am I going to have to pull the motor and split the case to do this repair or with the four bolts in the housing will this pop out into my hand and be a simple replacement? Of course after removing that shaft which of its own was no fun because of the requirement of almost having to remove the entire differential to get it out.
      Sorry for the lengthy story but I think that it shows some of the pain of these things. I grew up riding dirt bikes, motorcycles, and three and four wheelers and I can say that none of them were ever as difficult to fix stuff as this Massimo is. Heck have done motorcycles from the frame up with modifications and it wasn't this difficult. Let me  qualify that statement, I'm speaking of Kawasaki, Honda, and Suzuki motorcycles only once did ever work on a Harley and thinking about it that was horrific as well.
       
      Thanks for any words of wisdom besides junk this crap for a 17k to 30k upgrade. Only cause I'm 5'9 and my wife of 40 plus years is 6'1 and told me that i can't have the Kawasaki Teryx 1000 that I drool over. Getting old has really curbed her desire to deal with my toys over these four decades....
      Thanks for listening I look forward to and replies... Jerry
       
    • By NHTracker
      I have a 2020 Tracker 800SX LE that I bought new in 2020.  Yesterday I noticed two cracks in the bed on the inside corners at the tailgate end.  They go all the way through.   I use it around the property moving firewood, dirt and stuff.  Never put stress on the sides of the bed.  Has anyone else had this problem?  Is there a fix?  Help!!!


    • By diamondjfarm
      I got an old 2003 Arctic Cat 375 Auto, and just bought a 2008 AC 650 side by side. Got a new starter, solenoid, and battery for the 650. Gonna change the crankcase oil and filter while I'm at it.
      Anything I oughta watch out for from them that's done the starter/solenoid on this model?
      Don't have a manual yet for the 650. Any recommendations for oil weight/grade?
      Thanks.
    • Fast Free Shipping on All Orders Over $50
    • By Alien10
      A while back I was looking at an auction UTV plow and the mounting of it.  Looked like it had an "H" bar with two pins that hooked into brackets on the front frame of the UTV.   I have a bunch of 1/4" x2" angle iron, and some 2"x1/2" flat stock in the barn.   I was thinking of welding up a bolt on implement mount that would provide 2 holes about 14" apart, that pins could be used to hook up an "H" frame for a plow or even a straight bar across with pins to hold it in place.   The angle iron "A" would utilize the existing bumper mounting bolts front and bottom, and have the two channels "B" with holes for individual pins or one large bar across. Those channels would be welded to the ends of the angle iron. 
      Anyone ever try this for a front mount?   It would be close to  this one that is for sale on the net.  It is supposed to fit a KFI plow mount.  

       
×
×
  • Create New...