strike250
-
Posts
208 -
Joined
-
Last visited
-
Days Won
27
Content Type
Profiles
Events
Forums
Gallery
Downloads
Community Map
Everything posted by strike250
-
Also, remove the spark plug and try turning over the engine by hand and see how easy it turns over. make sure its not making contact with anything when turning it over with a socket wrench. If the timing is correct, and the valves are adjusted properly, then you must have a electrical issue with power going to the starter. I again am assuming you have check the starter, battery, cables and connections. You can reach me with a private message like the one I sent you. Matt
-
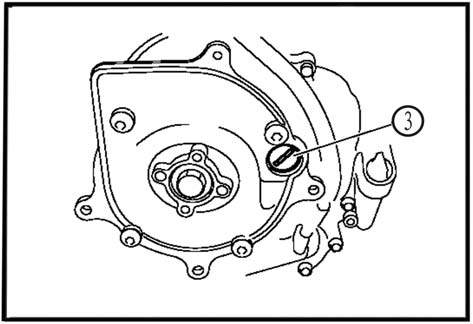
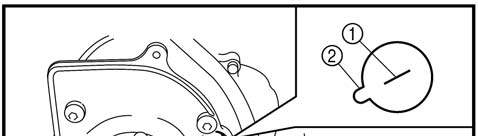
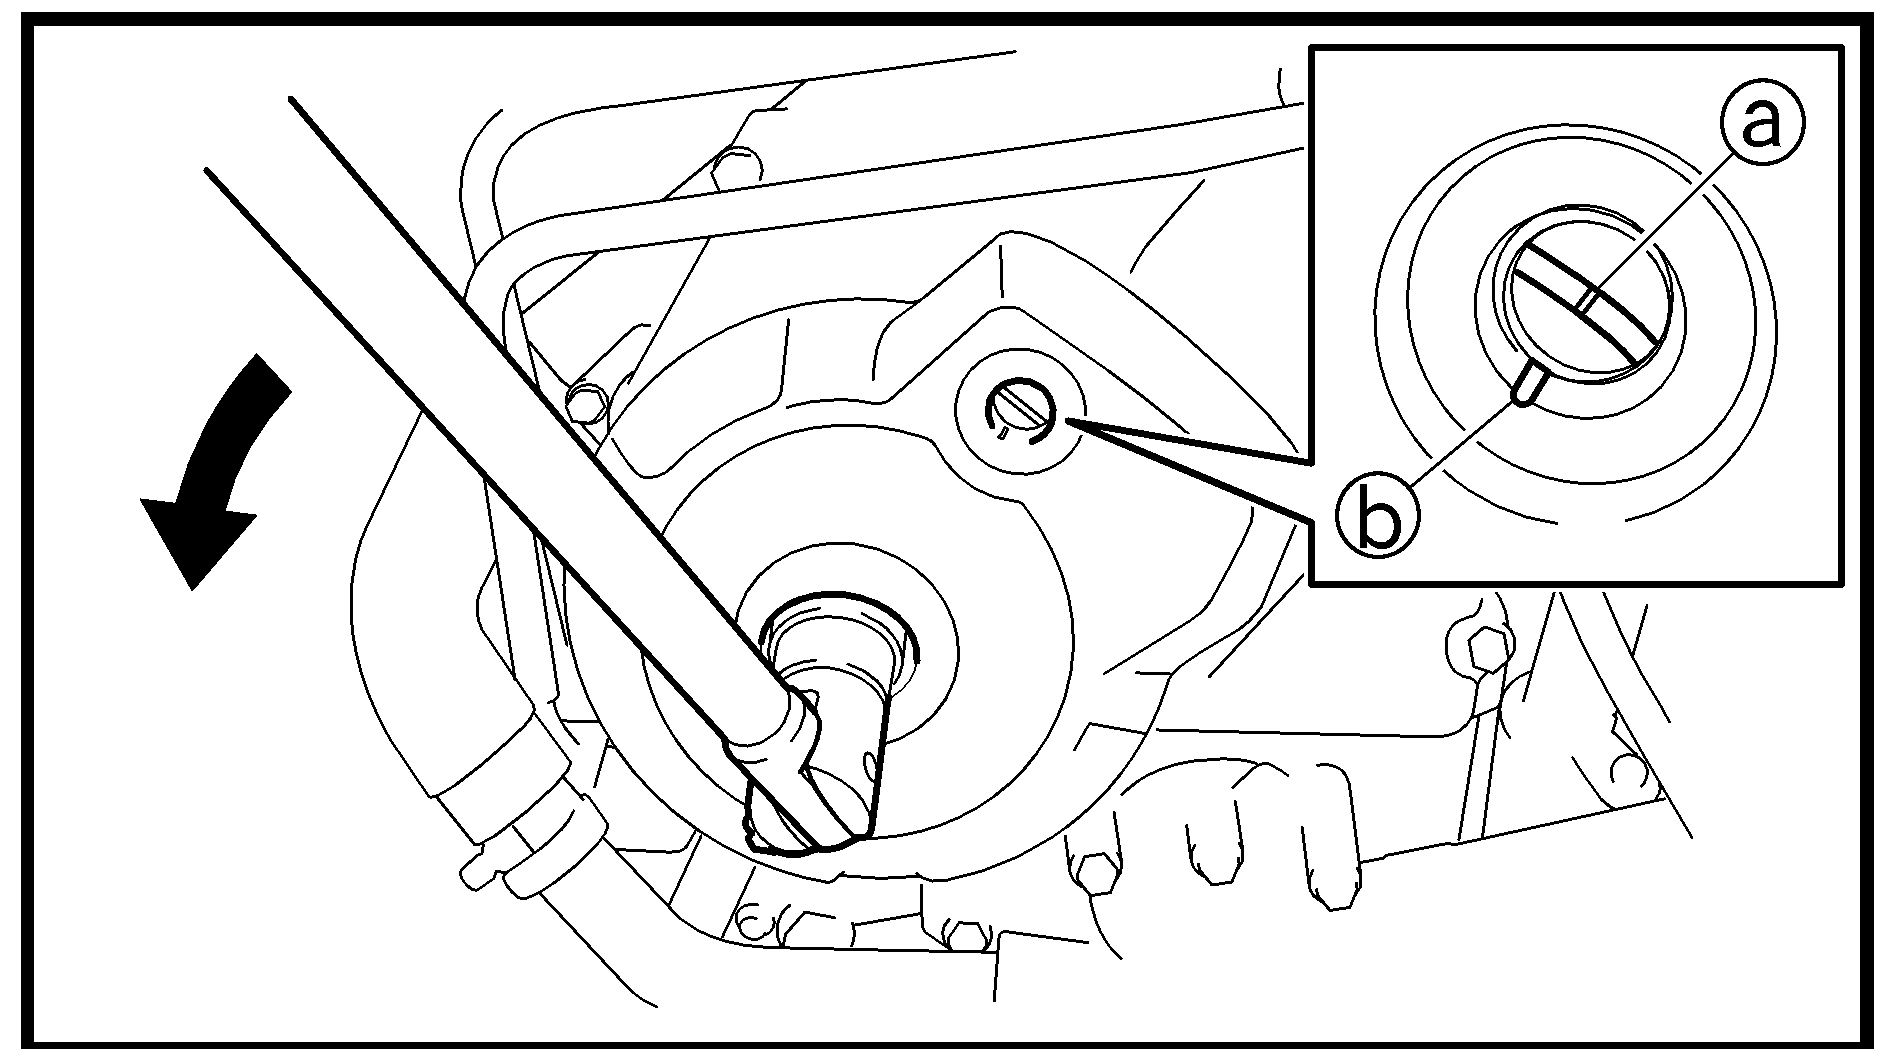
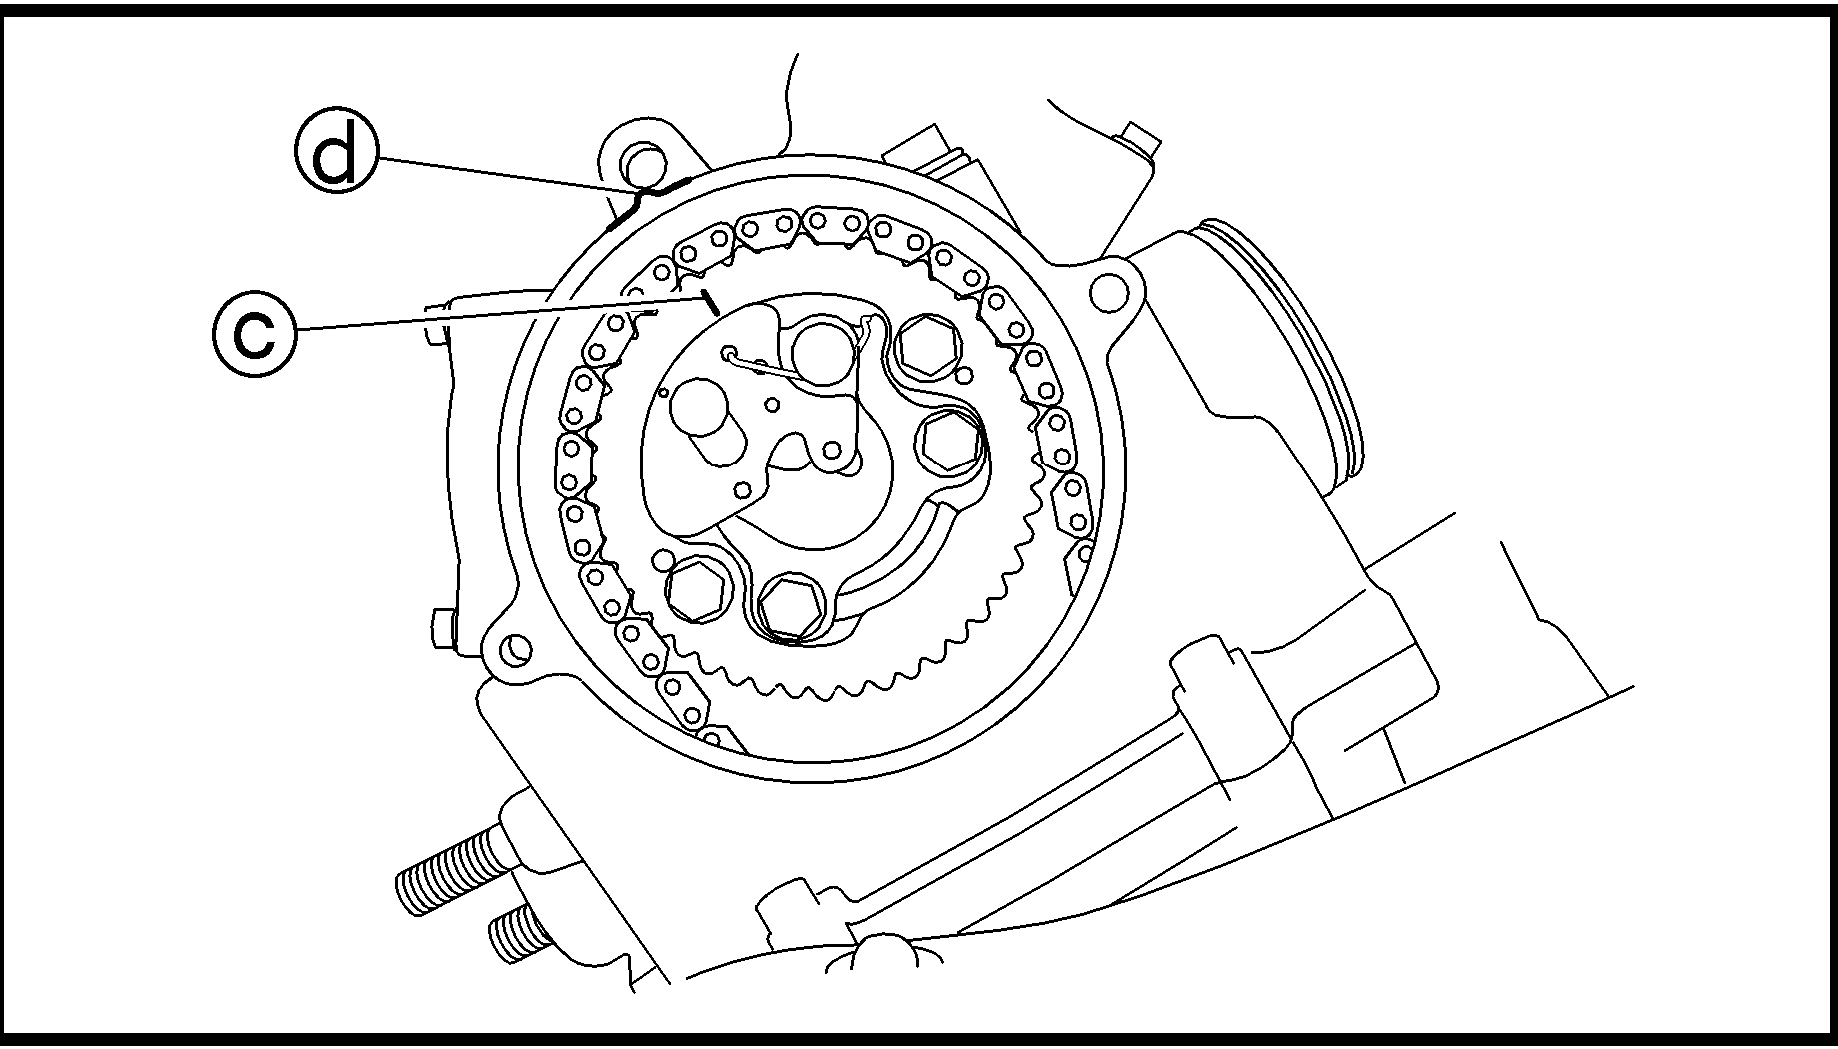
Okay, now that we know the engine is turning over slowly, it really only is limited by a few things. As we are sure there is a fully charged battery turning over the new starter, we have to assume the starter is good and the power to the starter is good. Now the next step is to check the engine timing to ensure it has not skipped a tooth on the cam gear. You have already checked the valve clearance at 0.08 ~ 0.12 mm (0.0031 ~ 0.0047 in) 0.12 ~ 0.15 mm (0.0047 ~ 0.0059 in) So if these numbers are good, then its time to check the engine timing. Put the flywheel at top dead center. you want to get the marks to look like this: remove this cover to inspect the timing marks it could also look like the image below Wrench to counterclockwise rotation Align the “I” mark ① on the rotor with the stationary pointer ② on the A.C. magneto cover. When the “I” mark is aligned with the stationary pointer, the piston is at the Top Dead Center (TDC). make sure the mark on the cam gear is pointing straight up and lined up with the mark on the head as in the picture above. then adjust your valve clearance. This will ensure your timing is correct and that the cam has not jumped a tooth, putting your valve timing incorrectly

-
Try to bypass the starter relay and see how the starter turns over, it should be sending out more volts to the starter than that.
-
when the starter relay opens for the starter to engage. it should have a solid 12 volts going to it, and at lease 8-9 volts minimum coming out of it to the starter. Check to ensure the battery is properly grounded, and ensure the battery cables don't have any corrosion on the ends or at the starter relay and starter. Ensure the starter is properly grounded, meaning it is bolted in tight and that the starter mount bolts are not loose. If you use a jumper wire directly from the battery, (using a cable the same size as the battery cable) to the starter and bypassing the relay, does it still turn over slow? You stated you replaced the battery and starter, was the starter used or new? It almost sounds like a bad starter relay, but need a few more questions first. Is the starter cable or relay getting hot or warm when you are trying to turn over the unit? ? Matt
-
sent you a private message
-
as for the slow cranking, did you make sure the ground is good from the battery to chassis, and from the chassis to the engine? it needs to have a good ground in order for the power from the battery to do its job with the starter. Otherwise you will have an amp issue. Again, I am assuming everything was okay because you stated it ran before you cleaned it. Take out the spark plug and try to crank it over, see how easy it turns over.
-
motorcycle doctor.com
-
it might have a code like this: 0562 = System Voltage Low 0563 = System Voltage High 0650 = MIL Circuit Malfunction
-
Check the fault codes, to see them do this: When fault comes up, the odometer's clock will turn into a number . find out the cause with this number; press clock button, then it will turn back to clock mode, and five second later the fault code will show again.
-
Do you have a copy of the factory service manual? if not I can get it to you. I would also inspect the fuses next to the battery. Make sure there is no blown fuse. Also make sure the battery is at full charge.
-
Contact me, I have the service manual I can give you 562-682-7859 Matt
-
Is the seatbelt plugged in? It has a limiter if not connected
-
I'll look tomorrow at the one I have here to verify. It's a carburator version as well
-
Here is the link to look at the Yamaha part numbers for what you need. https://www.bikebandit.com/oem-parts/2009-yamaha-grizzly-350-irs-4wd-hunter-pastel-deep-green-yfm/o/m144728#sch606931
-
Yamaha CLUTCH HOUSING COMP. Part # 5UH-16611-00-00 Yamaha CLUTCH CARRIER ASSY Part # 5UH-16620-00-00 Yamaha GASKET, CLUTCH COVER Part # 5UH-15463-00-00
-
Yes, I'll provide the Yamaha part number later today.
-
The Yardsport YS400 is a mix of parts from the Yamaha parts bin. The manufacture is HiSUN, who also happens to manufacture parts for Yamaha and more OEM's. The bottom end is basicaly the same as the Yamaha 350 Grizzly/Bruin. The top end is more of less off of a Yamaha Kodiak 400, early 2002 style. I would start by using OEM Yamaha parts for the clutch. 2007-2011 Yamaha Grizzly 350 wet clutch. the parts are of higher quality than the Chinese counterparts. This might be part of your problem. They bolt right on and will work and last much better.
-
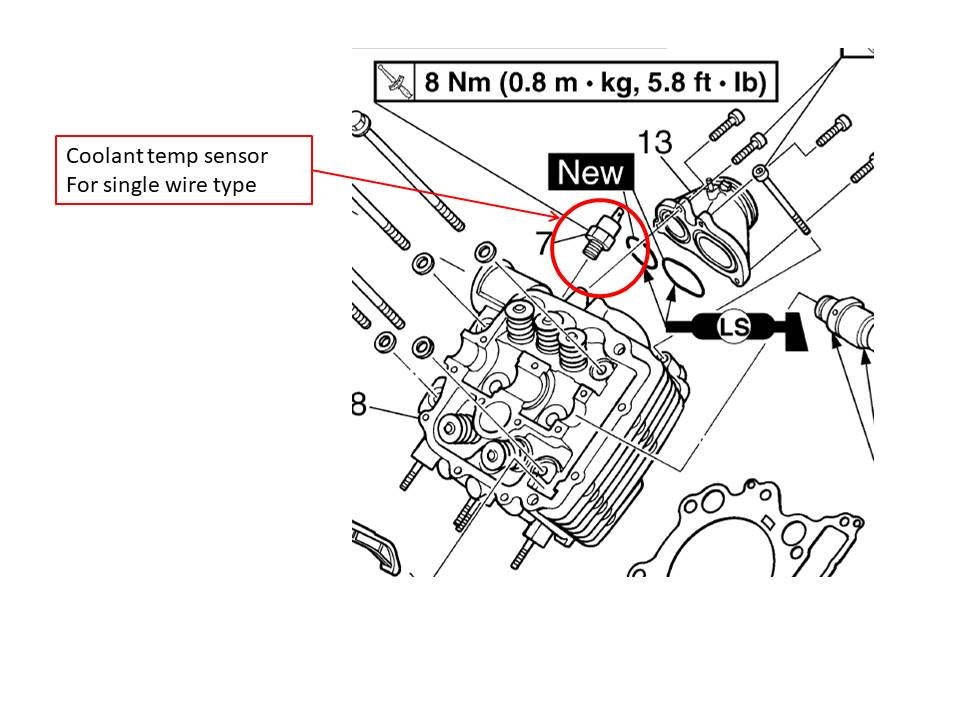
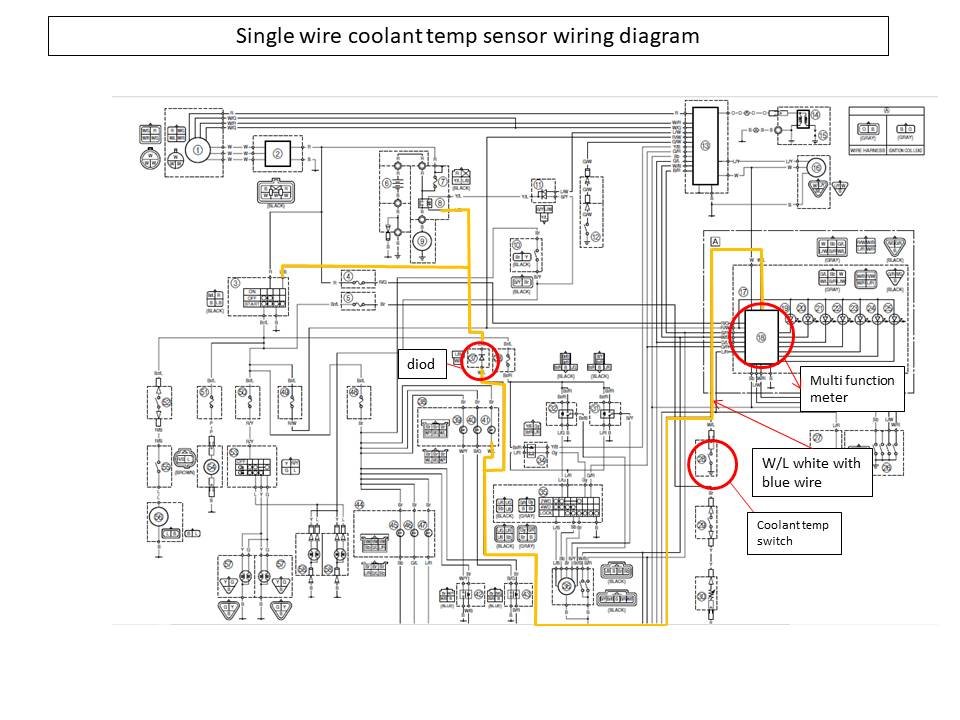
Here is the wiring diagram for the single wire type. Along with a pic of the sensor in the cylinder head. The color of the single wire might be White with Blue tracer.
-
When you say you went through both clutches in just about 250 miles, I'm guess the replacement clutch was worn and possibly had wear marks on the clutch hub as well? did you do any work to the primary and secondary clutches at all?
-
Well, I know a little about these clutches. are you still having issues with them? And if so, what is happening to the wet clutch. and second, are you having any issues with the outer clutches at all? When you replaced the clutch, did you use an OEM clutch or an aftermarket one? Did you replace the one way bearing as well. and when you replaced the clutch, did you replace the outer clutch drum? Matt
-
It's a EFI version right? Or is it a carburator one. Your year should be an EFI with a two wire sensor. The single wire sensors versions had a single wire with a fairly large brass ring connector going to it
-
did you figure it out? just interested. I thought it was the seat belt connector at first. they do that to prevent the unit from going up to speed without the seatbelt connected.
-
has anyone gotten back to you regarding this? if not, let me know.
-
Has anyone gotten back to you regarding this issue. I can help you if you are still having issues. matt
-
Hello, I'm not sure if anyone ever got back to you, but yes they are and should fit in