strike250
-
Posts
208 -
Joined
-
Last visited
-
Days Won
27
Content Type
Profiles
Events
Forums
Gallery
Downloads
Community Map
Everything posted by strike250
-
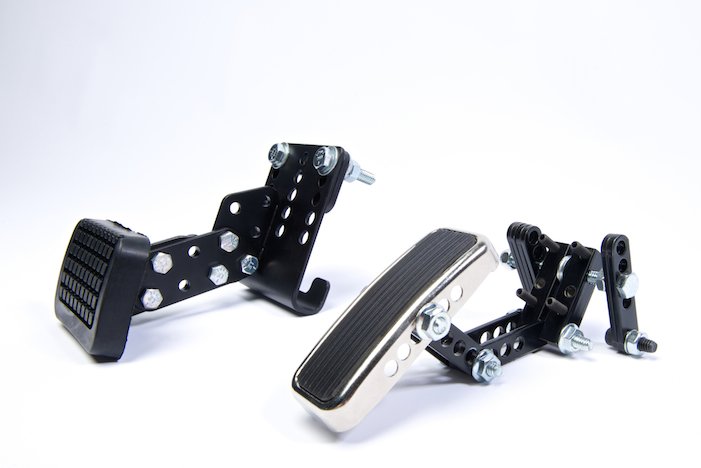
Massimo 500 Throttle Pedal Extension needed
strike250 replied to Tony C's topic in Massimo UTV SxS Forum

-
Massimo 500 Throttle Pedal Extension needed
strike250 replied to Tony C's topic in Massimo UTV SxS Forum
I would also recommend the above people, great quality products. -
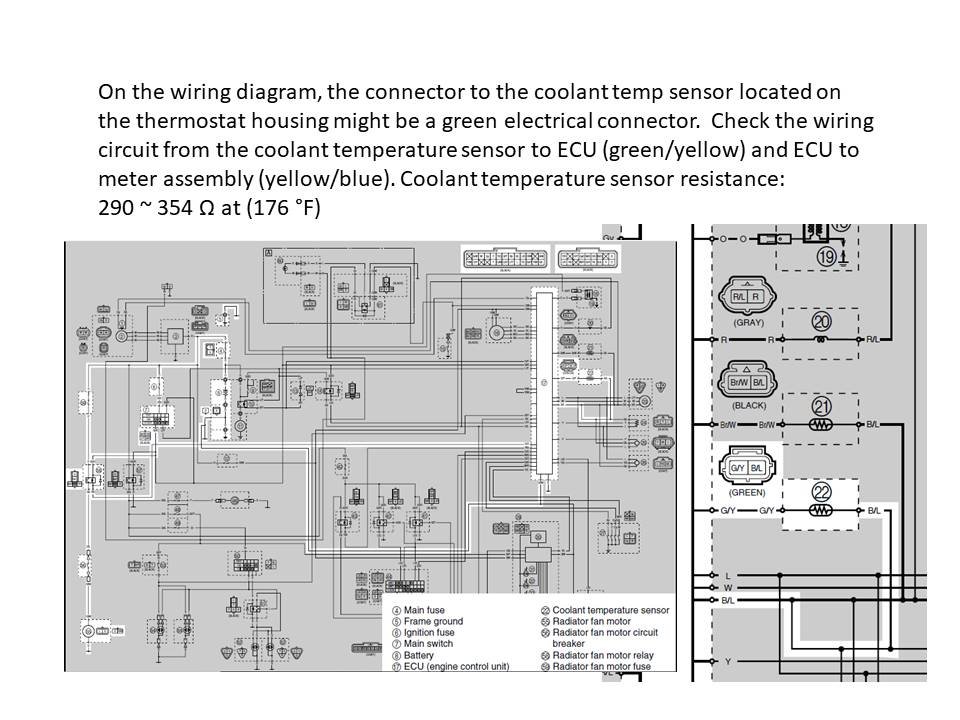
The water temp coolant sensor is located on the thermostat housing. It is a 2 wire connector that goes back to the ECU. On the fan motor side of life there is also a 2 wire connector, but in-line to that is also a coolant fan motor circuit breaker between the fan motor relay and the fan motor. There is also a fan motor fuse before the fan motor relay. So all these things will need to be inspected to ensure a proper working coolant system. As for the wires to the coolant temp sensor, there should be a 2 wire connector close by. As most electrical connectors tend to keep their natural flow. So, it should be somewhere close to the position of the coolant temp sensor. I am attaching a wiring diagram to the coolant electrical system, as well as the colors of the wires to the electrical connector. The wiring diagram is specifically for the 2008 700cc version you have. If you can't find the electrical connector, it might have been zip tied to the wiring harness somewhere nearby. Check for a 2 wire connector not being used with the same wire colors as stated. Again, check the coolant fan motor fuse first, then inspect the coolant fan motor relay, then inspect the connector to the coolant fan motor itself. I would also test the coolant temp sensor for proper OHM (see diagram). If all of these things are working properly, then the coolant system will work as designed. The fan should only come on after about 205 degrees. If the fan is on the entire time, (such as a fan bypass switch) the engine will not warm up properly, and thus run rich during the warm up cycle. You could end up fouling spark plugs over time. I hope this helps, if you have any questions after looking at this, please let me know. Matt
-
-
Awesome! have fun with the family, send me some pics as well and I'll post them on the website.
-
it sounds like a clutch problem to me. I have had bad clutch weights cause this same problem. If you are still having this issue, check out the slider weights in the variator side of the clutch. But it does sound like its clutch related because if the clutch is not fully working, it is telling the engine that the clutch is engaged, causing the big clunk you hear when you try to shift even while not moving. it would also cause the drive line to drag a bit at idle.
-
coleman 500 outfitter wont turn over
strike250 replied to moparman48081's topic in Hisun UTV SxS Forum
Normally the only thing preventing the engine from starting is the brake lock out switch, some units need the parking brake to be applied to be able to start. Next would be the neutral selector switch. Some engines need to ensure the unit is in neutral to start. By the look of that connector, it might be a bypass switch of sorts. But start with the basics, check to ensure the parking brake does not have a switch on it more than two wires. Two wires will be needed to send the signal to the instrument to allow the dash light to come on letting you know the parking brake is on, if it has more than 2 wires, then its likely also working as a safety switch to prevent the engine from starting without the parking brake on. As for the neutral switch, it should have more than two wires, this has to be working for the engine to start. Although the dash light might light up, that doesnt mean the switch is fully operational. If the switch is faulty, then it will not send the signal to the starter relay allowing the engine to turn over. -
I agree with Kenfain, but knowing the HiSUN uses metric bolts and fasteners, I would think 10mm is the closest thing to the 1/2" bolt. the 10mm is smaller than the 1/2", but larger than the 3/8". Most of the bolts on the HiSUN are either 10mm or 12mm when it comes to the big boys. they do have some smaller 8mm bolt openings but this would be too small to handle the snow plow mount area.
-
Im wondering what the problem is still? It was not very clear. I understand he is upset, but I would like to help him as well if I knew the extent of the problems he is still having. Is he having engine issues? rear end issues? Hope he chimes back in so we can try.
-
Just checking in to see how things are going for you
-
did you get this issue fixed? I would see what I could do to help you with it.
-
did you get your problem fixed? just curious.
-
did you check to make sure the cylinder head was not warped? if it was, then the head gasket will never seal correctly. Also keep in mind on the smoke, it will smoke for a bit if any coolant gets into the exhaust pipe, it takes a little bit to burn it out. If you have the head off, check the surface to see if its 100% flat. any warping will cause a poor seal. Also check the cylinder to ensure its not warped as well. \
-
Have you checked the temp sensor? it might not be turning on the fan.
-
Yes, it is very important to have those splines in place before tightening the nut, this is the result. I have seen it on many yamahas as well.
-
Hisun 400 UTV leak from side of transmission
strike250 replied to Davo's topic in Hisun UTV SxS Forum
Here you can see in the parts catalog it calls it a speed sensor, but I will confirm by Monday for you.
-
Hisun 400 UTV leak from side of transmission
strike250 replied to Davo's topic in Hisun UTV SxS Forum
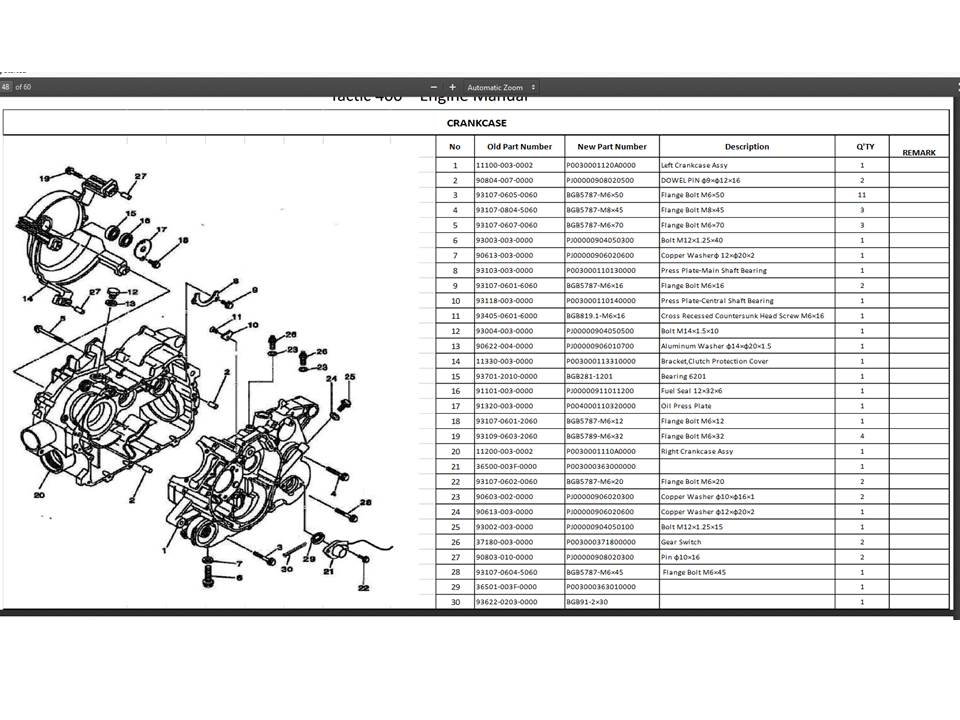
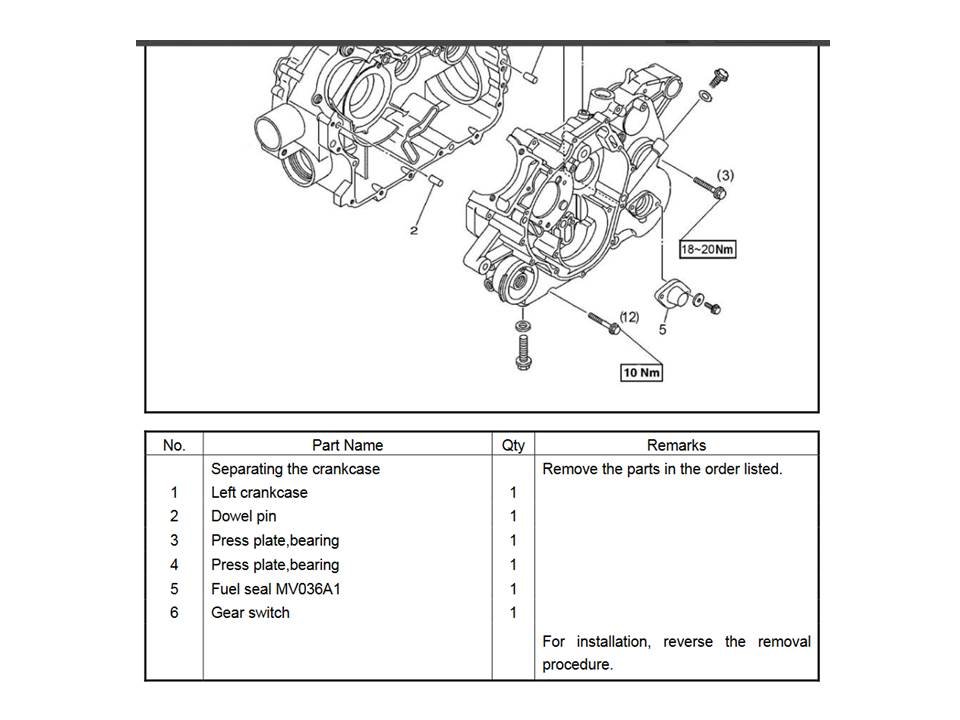
In the manual they call it a fuel seal (#5), but I dont have a part number or price. it doesnt look very expensive at least.
-
Hisun 400 UTV leak from side of transmission
strike250 replied to Davo's topic in Hisun UTV SxS Forum
but with correct year and model, I can get you the exact information -
Hisun 400 UTV leak from side of transmission
strike250 replied to Davo's topic in Hisun UTV SxS Forum
It should be the speed sensor cover, about $20.00 P/N 36500-003-0000 contact motorcycle doctor -
Hisun 400 UTV leak from side of transmission
strike250 replied to Davo's topic in Hisun UTV SxS Forum
can you give me the year of your unit -
I know this might sound silly, but have you checked the CVT belt to make sure it is not broken? This is what a broken belt sounds like.
-
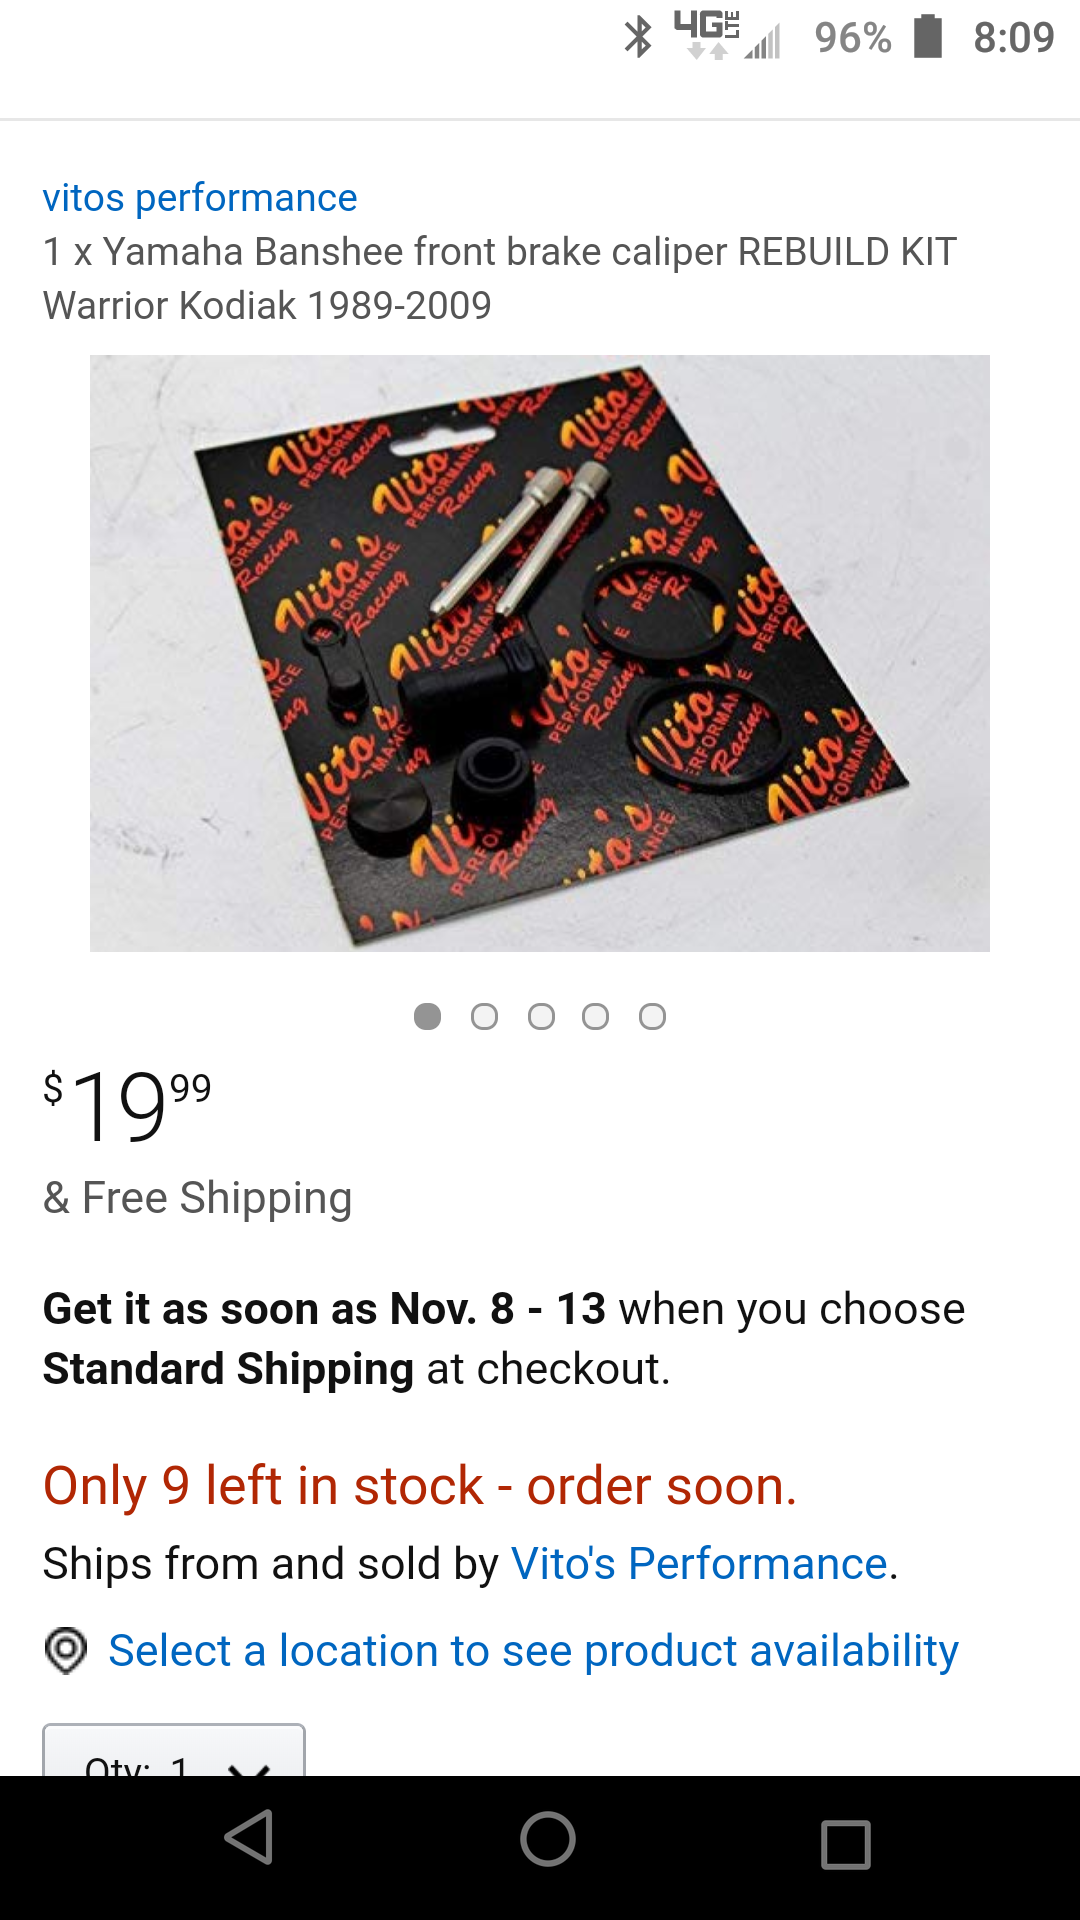
You can get a rebuild kit at your local Yamaha dealer, or Amazon or eBay.
-
As for the pistons in the brake caliper, they are held in place by O'rings. If you are having problems with the brake caliper being locked up, it sounds like maybe you have contaminated fluid, causing it to crystallize and seize the caliper in place. You should be able to use compressed air on the banjo fitting side of the caliper to force the piston out. If not, then you can soak it overnight in wd40 type of fluid to try to penetrate the back side of the piston and help release it. If not, I would just purchase a new caliper. These calipers are the same as Yamaha Banshee or Yamaha Raptor 600. You can find a bunch on ebay. The piston does not screw in, it should simply press in and out. Remember to use quality brake fluid, DOT 3 or 4 is fine as it again sounds like the fluid has water or something else that caused contamination. The brake pads used are: Front brake pads: EBC FA54 Rear brake pads: EBC FA83
-
More than likely just a belt, but inspect it first. You might have gotten lucky. As for the breaks, look at a Yamaha banshee or raptor, same exact brake caliper. Yamahas manuals are much better on rebuilding brake caliper than HiSUN. The brake pads from EBC are listed in the parts interchange list in the download section of my website. Do not go off EBCs website, they have the incorrect parts numbers. The correct ones are listed on my site. Hope this helps
-
Call me if you have questions or problems. Numbers on my website warriorsoffroad.com