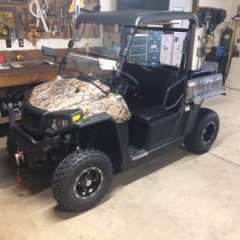
Shortening the turning radius on a Hisun Vector 250
-
Similar Topics
-
By didgeridoo
Hello, All! I've decided to replace the traction batteries in my 2018 Sector E1 with a 48V Lithium set. They may be expensive, but I figure the Discovery Dry Cell are, too. I am not looking for the max driving range, as I have never received near the brochured range to begin with, but a good mix of charge/ get work done/ charge is what I am expecting.
I have settled on the 48V EAGL kit from bigbattery dot com. Each battery pack provides 30Ah. The kit ships with a charger, as well. The packs would be physically connected in parallel (using a busbar) to one another, maintaining the 48V voltage, but together would be able to provide the amp draw the buggy pulls when going up hill or towing a rake (rated 320 max continuous Amps). This is in comparison to the serial connection the eight 6V lead batteries. Each of the EAGL batteries looks to have its own BMS; am I correct in thinking I will have to use their included charger rather than (simply) changing the onboard charger to lithium mode? The chemistry of the pack is LiFe PO4, for what it's worth. I haven't torn anything apart yet (to diagram), so I am not sure how the dash will interpret the AMP draw, but the kit I am looking at includes a dash mounted charge indicator.
If anyone has completed a similar conversion, do you have any tips? Specifically, how did you remove the original batteries, and how did you secure the new ones? I am guessing that almost any change from the stock batteries would involve at least some modifications. Any tips would be appreciated, especially things I may have failed to consider. Thanks!
-
By BuggyBoy
So these Giant 48v/110ah batteries have just become available: https://www.aussiebatteries.com.au/giant-100ah-48v-lithium-golf-cart-deep-cycle-battery
They look like they could drop in either side of the Controller that sits in the middle of the tray as they are 330mm(W) 355(L) 295mm(H). They can be paralleled, and I think two should be enough. Technically once paralleled the system should output 400ah continuous and 800ah Max (5 secs), more than enough for the E1 - probably 1/3rd more than is needed.
However, the sales person stated that if the regen braking exceeded 400amps, it would put the batteries in standby mode for protection and they would have to be 're-started' with a jumper pack to reset them. Does anybody know the max output of the E1 Regen system, and if it does exceed that, is it possible to disable/bypass the regen so it has a zero output?
Thanks.
-
By The Road Hound
Hi,
New to the forum.
Came here looking for some experienced UTV users who can enlighten me about which brand should I pick for my very first UTV or SXS.
I'm between 3 brands and 3 models:
*Kawasaki MULE PRO-FXR 1000.
*Yamaha wolverine rmax2.
*Can am Commander XTP.
The use I'm willing to give it is mostly to go to the range with my wife, load steel targets and all our shooting gear, we shoot a lot, rifles, Shotguns and Handguns for practice, training and competition. (Range is about 10 miles from home)
But also I want something that I can take to the trails and have fun on dirt, mud, rocks, puddles or creeks.
Any objective information will be appreciated, specially which is more reliable and durable.
Thank you and happy 4th of July.
-
By darth vadner
I have a 2019 hi sun 750 I parked it in my garage last fall and about a month later I went to ride it and I had no power but the battery shows good. I’ve taken the ignition switch out and cleaned it. I cleaned the battery terminals and replace the main relay all my fuses are good. I still show strong battery but get no power, can anyone help or have any ideas? I have yet to find any wires chewed up like from a mouse or anything all the wiring looks good.
-
By Pop Bob
While adjusting my suspension, I noticed an unused two wire connector on each side just hanging loose. Anyone know what they are? Nothing in the manual about them.
-


Recommended Posts
Join the conversation
You can post now and register later. If you have an account, sign in now to post with your account.
Note: Your post will require moderator approval before it will be visible.