
aefron88
-
Posts
343 -
Joined
-
Last visited
-
Days Won
55
Content Type
Profiles
Events
Forums
Gallery
Downloads
Community Map
Everything posted by aefron88
-

2022 Hisun Sector 750- Oil drain plug leaking
aefron88 replied to Roadstar515's topic in Hisun UTV SxS Forum
Not sure on that one. My UT400 has a copper crush washer on the bolt rather than an O-ring. Can you try putting just the o-ring (no bolt) in the groove and see how much it sticks up past the face. IIRC orings are supposed to compress 30-40% for proper sealing. So it should stick 30%-40% of its thickness past the face. If it doesn't you could try a thicker o-ring with the same diameter. They are sold in diameter as well as material thickness so you should be able to measure and order one. Keep in mind it is probably metric. Grainger is a good place to buy random weird size metric o-rings in my experience. Edit: had one other random thought. I had a plug on my oil tanker that was a perpetual leader. It was gaskets internally. Anyway long story short after much frustration the issue was the hole was not tapped perpendicular with the deck it was going thru causing it to never seal tightly on both sides. I wonder if your drain plug is tapped slightly crooked causing it to not seal on one side when the other side is tight? -
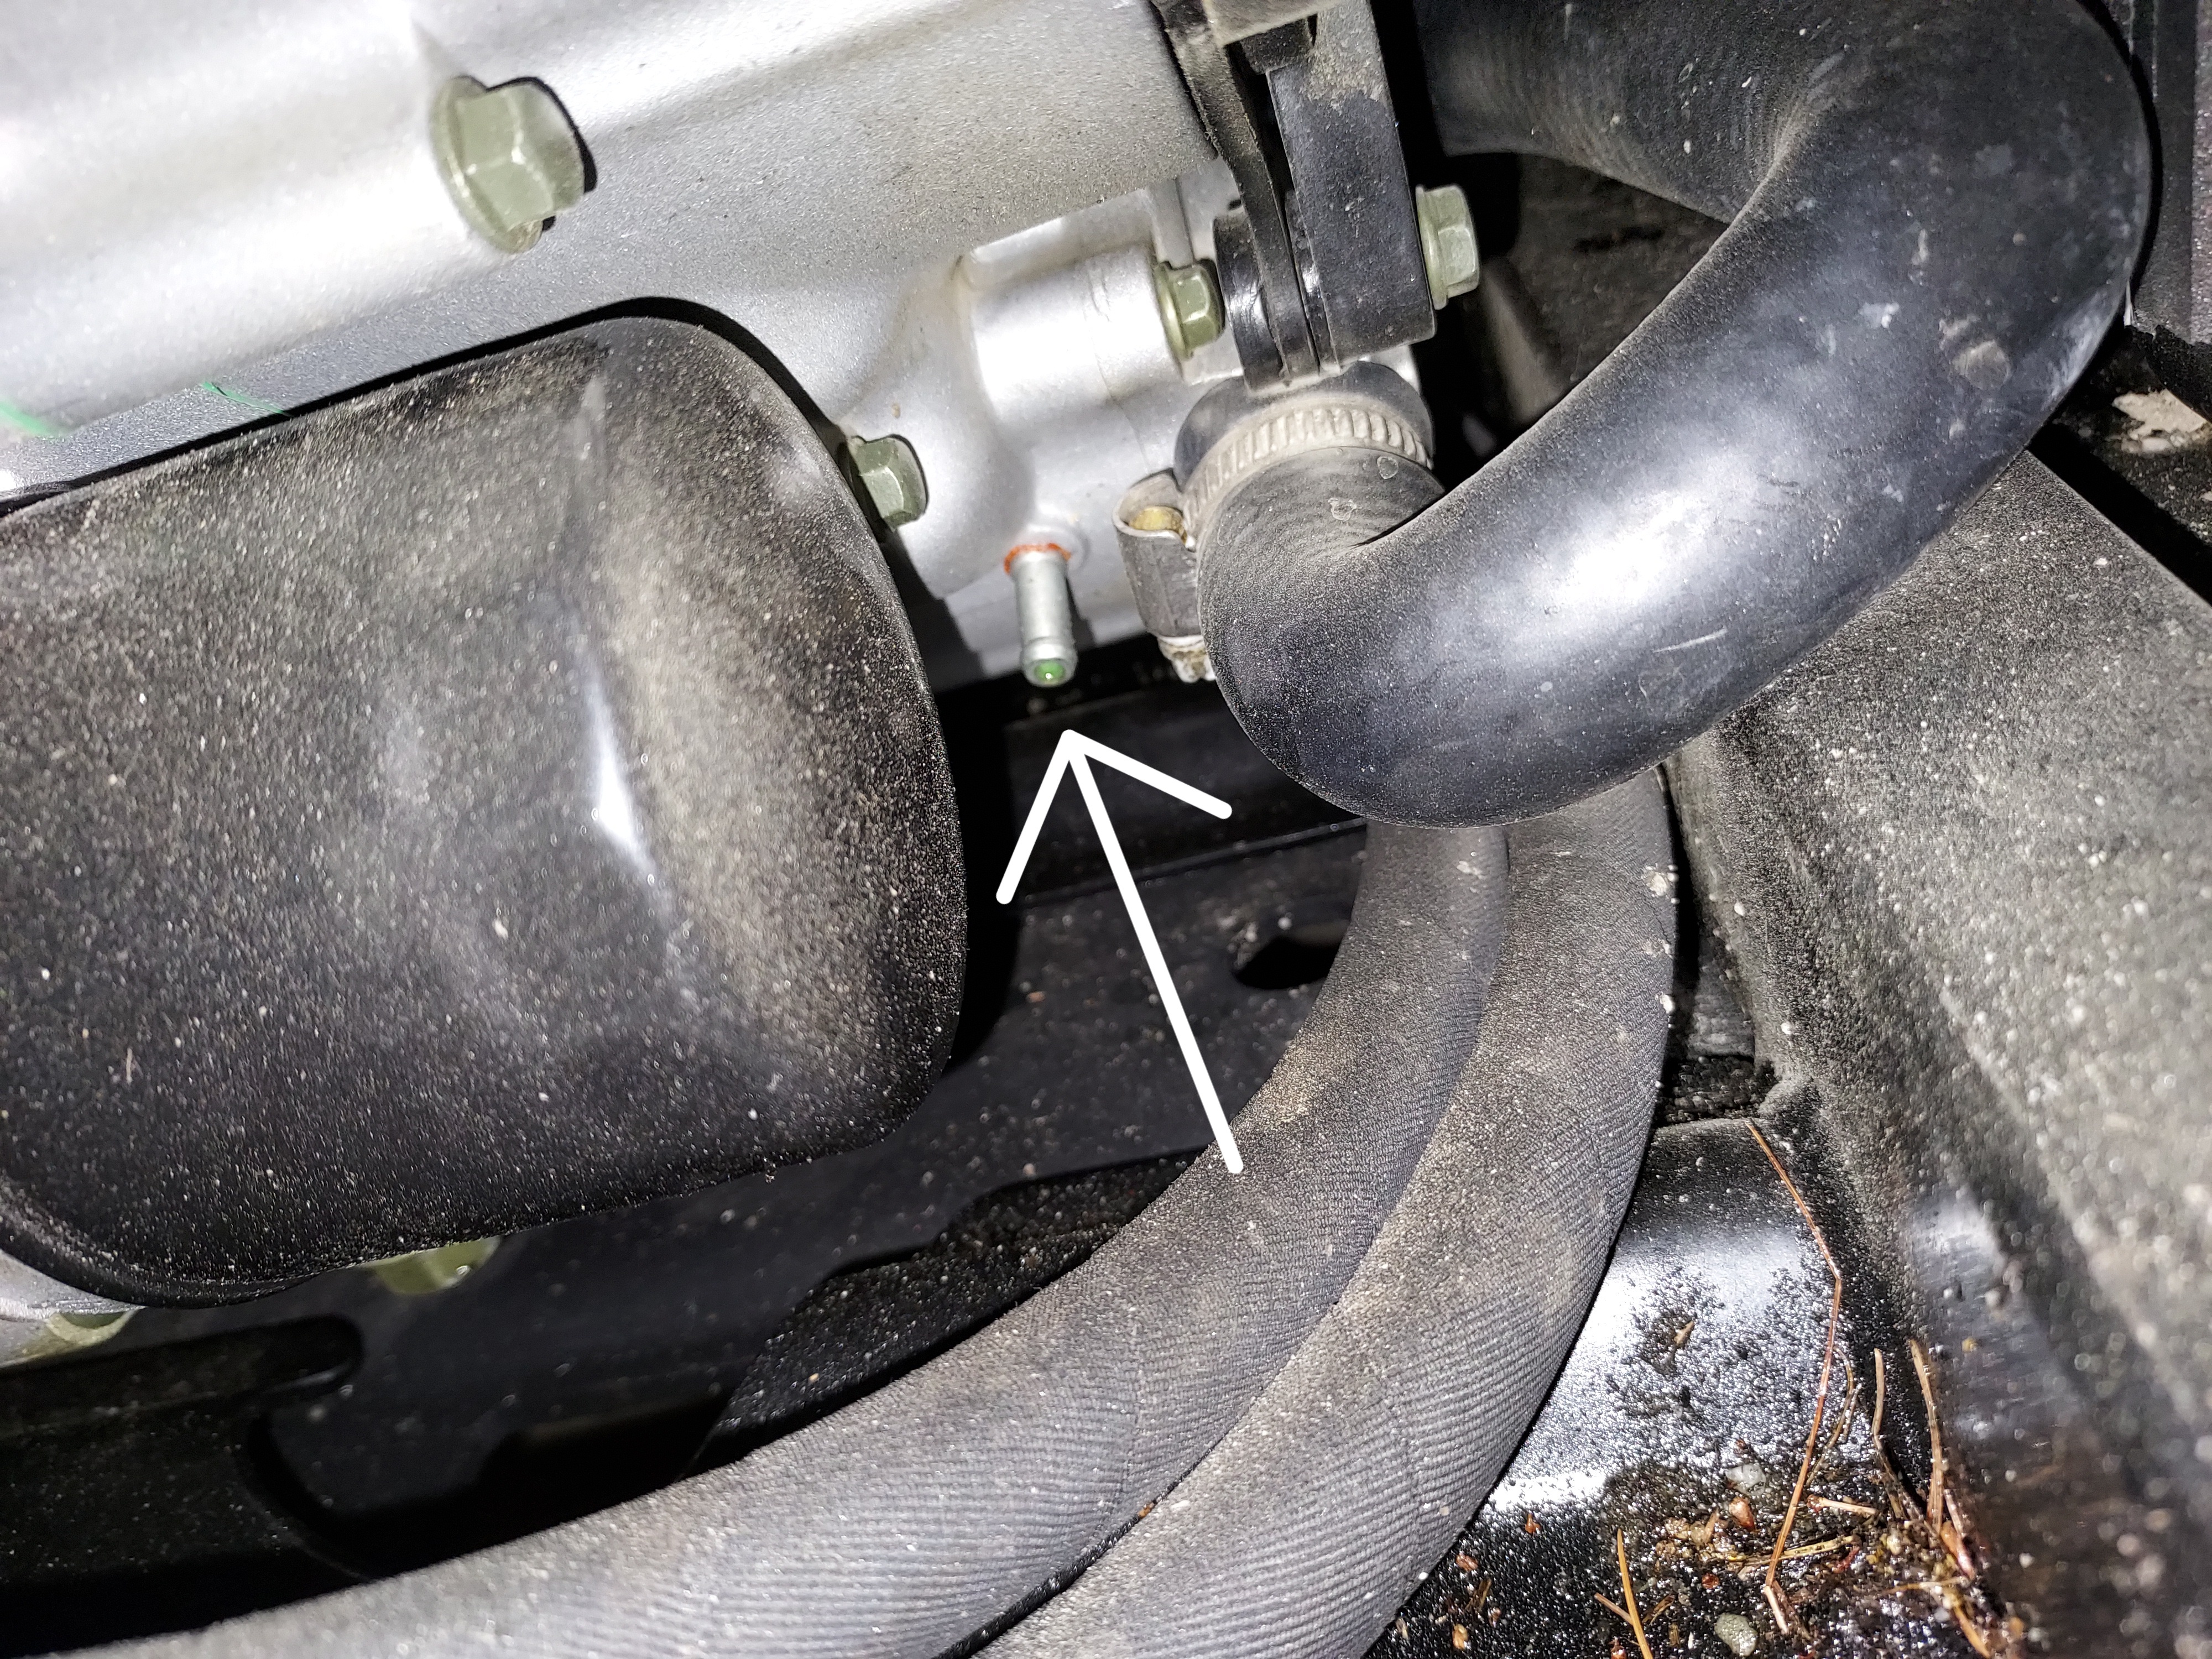
If you're talking about the spot where the arrow is pointing in my picture, I believe it is the weep port for the water pump. If it's actively leaking you probably need a new water pump. If it's just dripping occasionally you're probably ok. You can see some drops of coolant in it in my pic, but it's not actively dripping.

-
Something like that will work i you can find the right size plug. They are litterally just a matching plug with a wire that runs between the two terminal also. You could do the same thing with a straightened paperclip and some electrical tape if you want. The plug is under where the seat belt female part is, you can see the wires running down into the seat gap. Flip up the bed and follow the wires coming down from it.
-
I'm not familiar with that model, but typically the keyswitch connects to the ECU so switching it off shuts off power to the ECU which kills the spark. Some older small engine type stuff (stuff without a computer) it physically grounds the spark plug wire. Energy prefers the direct path to ground without having to jump the spark gap and the engine dies. This is still how lawnmowers, chainsaws, weed whackers, etc work today.
- 1 reply
-
- 1
-

-
Steveo, This is a UTV forum so I'm not familiar with the ATVs, but it seems to be. PZ19 CARB. They seem to be widely available small Chinese CV style carbs. You could try a larger main jet and see what happens. They seem to only run $20-30 anyway. If you google "pz19 jets" you can get a full set of different sizes for around $10. There are also some other performance kits that seem to be available. As far as a starter (I think thats what you're asking?) I don't see one available in the parts diagrams.
-
Does that diagram show the hose by chance?
-
You can either get a buckle end to plug in or rewire it to bypass. There is a 3d printing file for the buckle end in the files section if you have a 3d printer. I did see a thread on either the hisun or coleman forum that someone found a comparable buckle end you could buy for a few dollars on amazon (do a search, it was older). The other option is to disconnect the connector under the seat, and connect the two wires in the plug together, which will fool ecu into thinking the belt is always buckled.
-
Hey Trevor, Do you have a picture so we can try to help figure out what it is? Don't run it low on oil, it only holds like 2.5L so 2 low is more or less empty. Running it empty of oil may cause it to self destruct rapidly, which may explain the rattle.
-
I did .005 inches cold for both, yes. Not sure on the 500. I would imagine it would be similar. Check the manual and see what it says. It may be under the coleman or hisun parts of the download section.
-
Good to hear you got it running. Not sure if you reset the ecu, it may be compensating for how the engine was mechanically before the rebuild. As the engine operates it adjusts the fuel trim over time. It may be way out of wack vs what the newly rebuilt engine needs to properly run. In order to reset the ECU, while running push the throttle down and bring the engine to redline and turn the key to off. Let off the throttle and wait 30 seconds restarting. That will bring the ecu back to factory settings. If you're still having issues after that I have a post in the Coleman forum explaining bow to buy and use $25ish dollars worth of cables to access the ecu with your computer. You can see what all the sensors show and troubleshoot any ECU or sensor issues from there.
-
Joe, everyone on here is well aware of your opinion. Feel free to share useful technical info or answer questions. You have contributed plenty of useful posts over the years, but showing up just to post garbage bashing certain brands isn't useful to the discourse. We are all aware we bought cheaper machines and made compromises in doing so. This forum can be a useful place where we can all come together and share helpful info about these machines.
-
Couldn't have said it better myself. For a guy who hates Hisun he sure spends a lot of time posting in the Hisun forum...
-
So far so good. No signs of any issues.
-
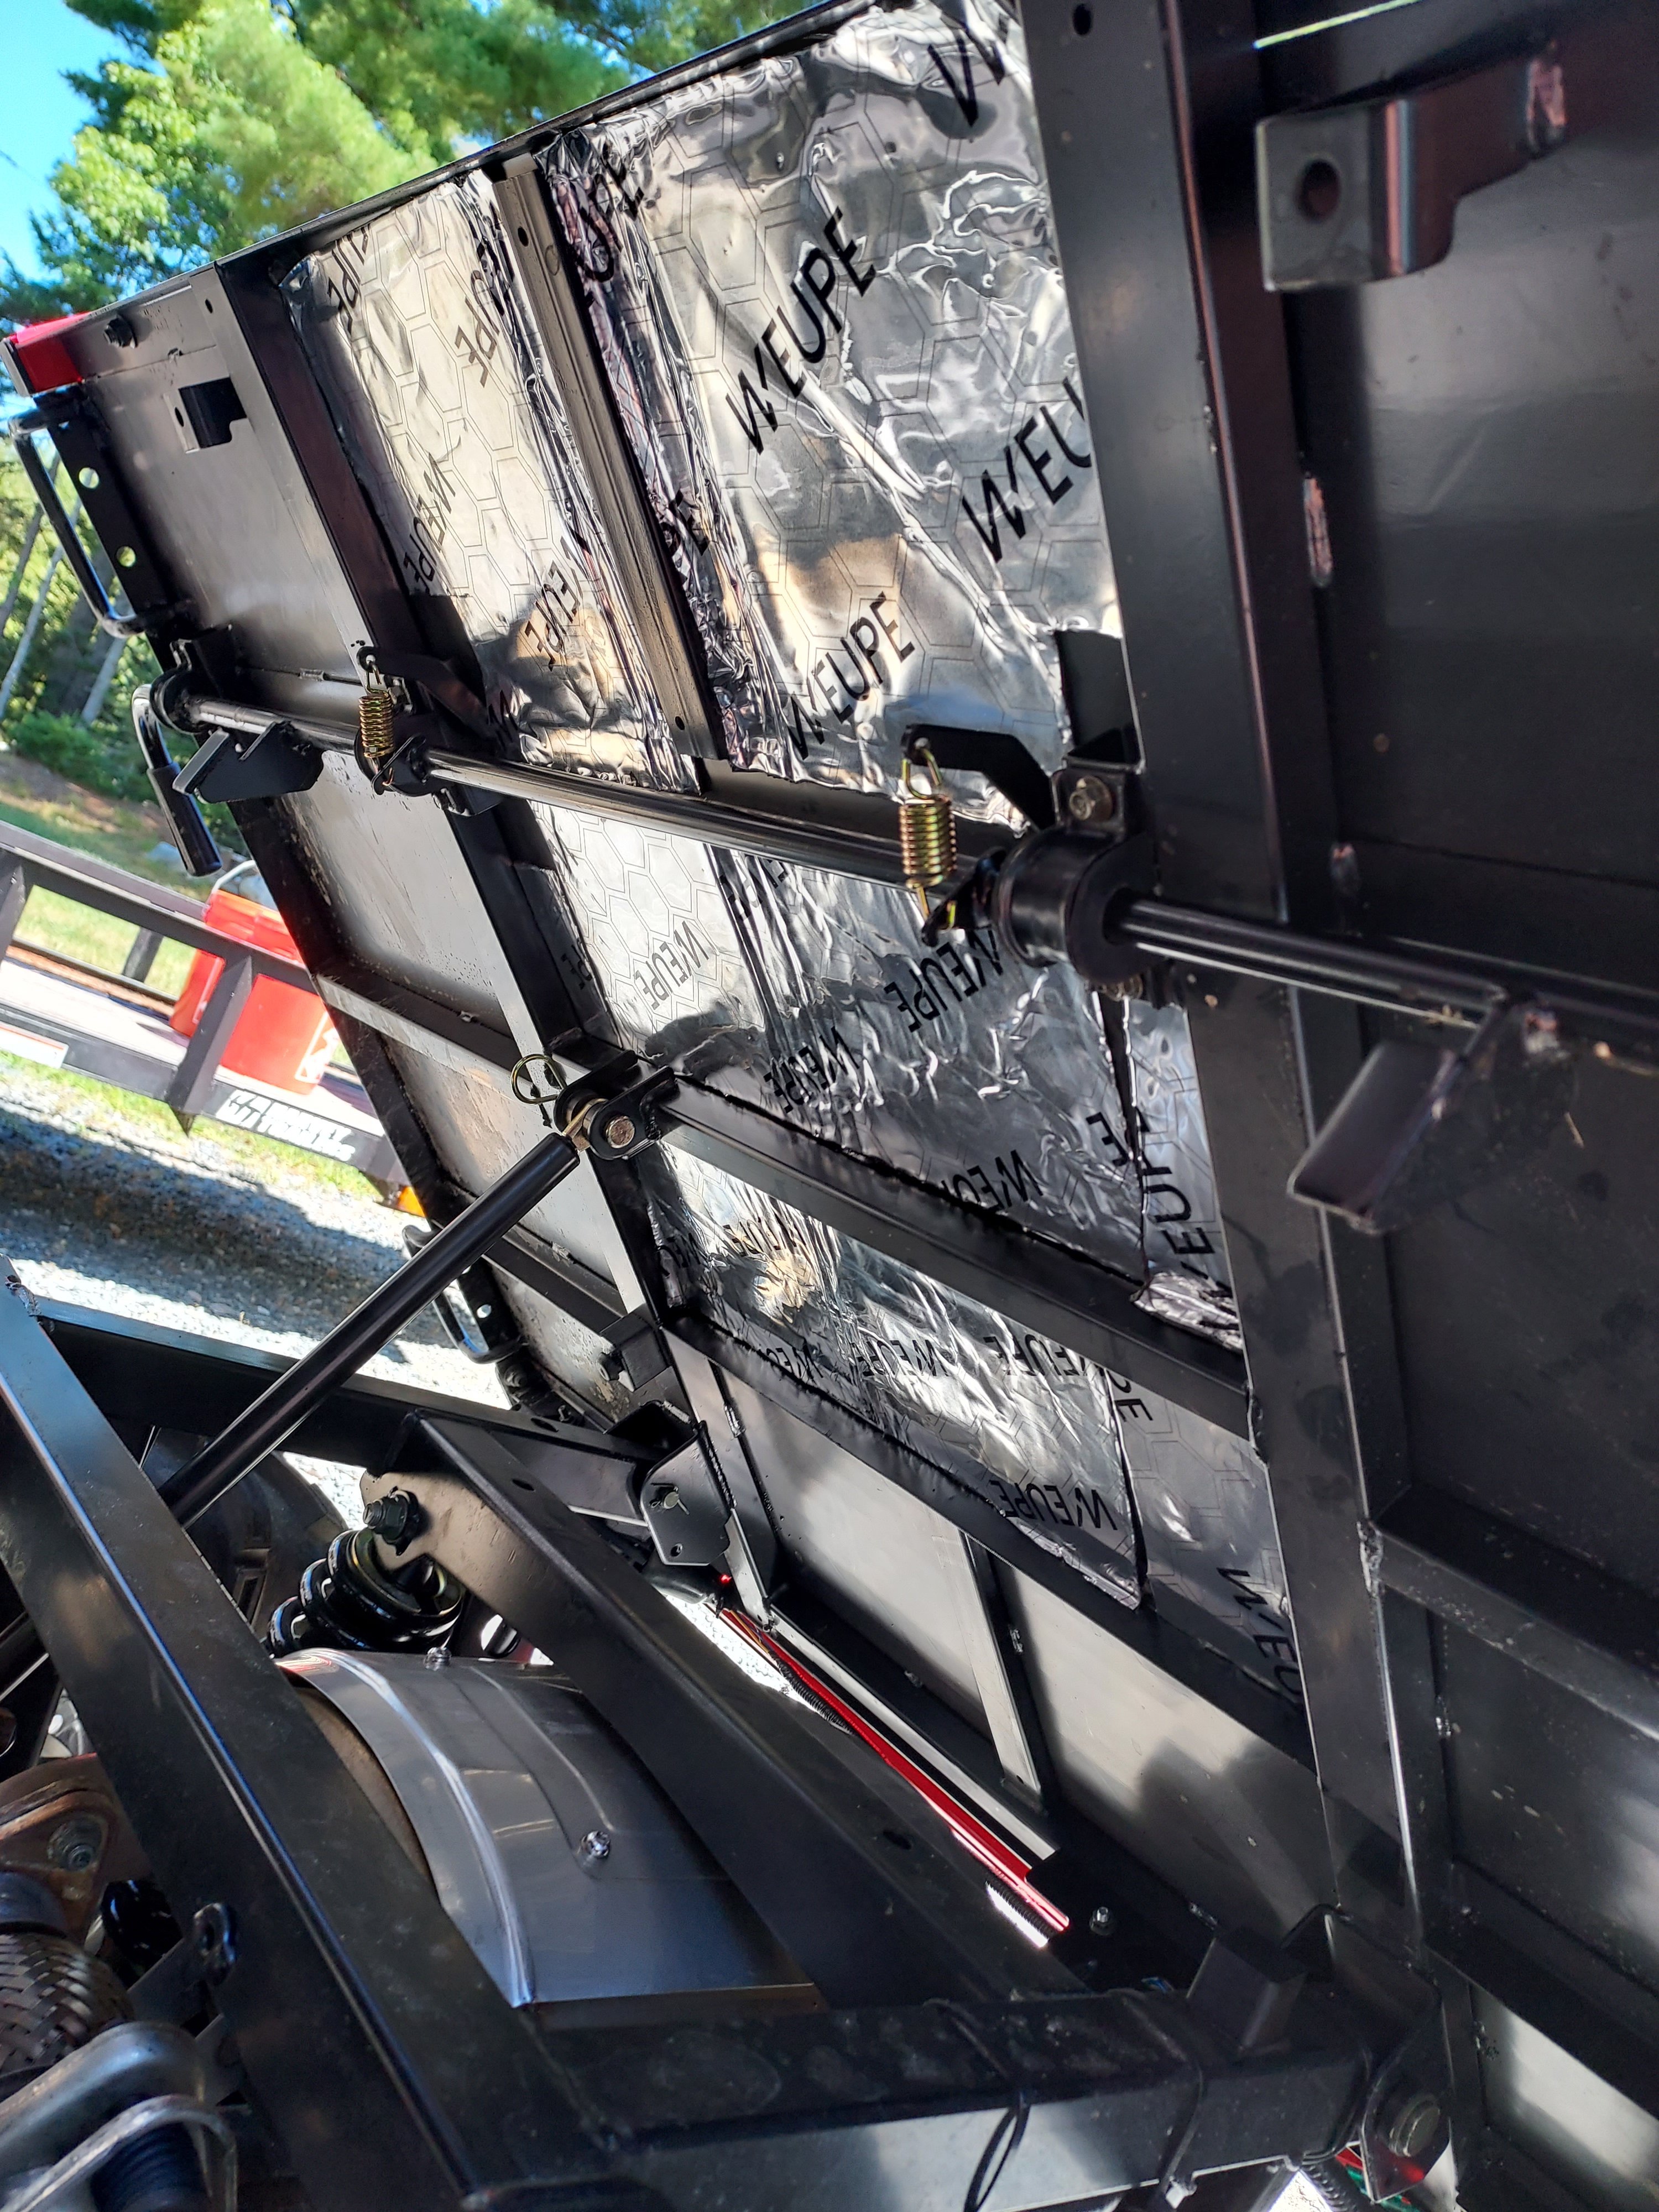
Playing on some crappy gravel roads I've noticed a fair bit of rattling from the bed area. I decided to try adding some soundproofing mat under the bed. Here's what I did: I got some peel and stick sound matting with a foil backing off Amazon. It's meant for sound deadening in automotive applications. I Cut the pieces to size so they would fit between the framing and applied. I only did the middle as the sides of the bed are part of the wheelwell and subject to mud spray and splashing. It has eliminated all the bed rattle and seems to have reduced some of the engine noise. I've done a few test drives and have no heat issues on the matting.
-
2013 Hisun HS400 transmission grinds and will not stay engaged
aefron88 replied to Rarule's topic in Hisun UTV SxS Forum
Have you seen the service buletin ut400 shifter adjustment? assuming you're running the proper wet clutch approved oil.. What RPM is your unit idling at when you try to shift. If all of the above are good some people have modified the back side of the shifter pawl to give the cable more movement. -
No worries. Good luck getting her back together and let us know how it goes.
-
Unfortunately there isn't a manual for that year on this site. 99% chance the spec is the same which is why I posted it. Believe it or not all these hisuns are all very similar mechanically and have very few changes year to year. Look thru the service manual and see if it looks like the same vehicle. If so you should be good to use it.
-
Hisun 2020 Strike 550 having trouble switching gears
aefron88 replied to techno10's topic in Hisun UTV SxS Forum
These unit have a wet clutch. Modern car oils have energy conserving slip modifiers that prevent the wet clutch from working properly. Switch to a "MA" approved wet clutch oil and it will likely fix your issue and keep from destroying your wet clutch in short order. -
Hisun 2020 Strike 550 having trouble switching gears
aefron88 replied to techno10's topic in Hisun UTV SxS Forum
Is it a "motorcycle" oil with the MA or MA2 rating? If not the clutch is likely sticking. What oil is it specifically? -
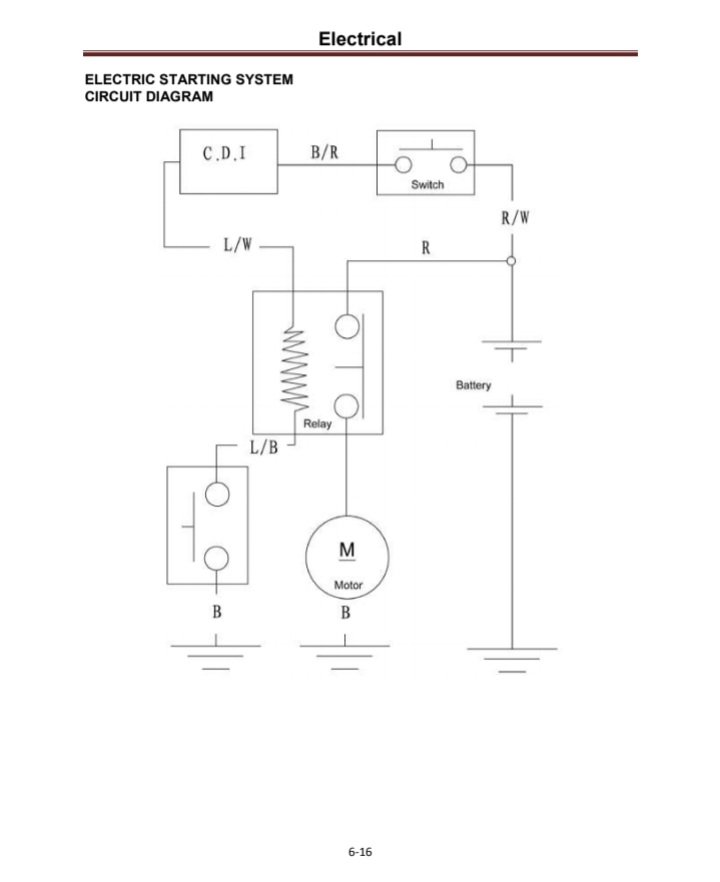
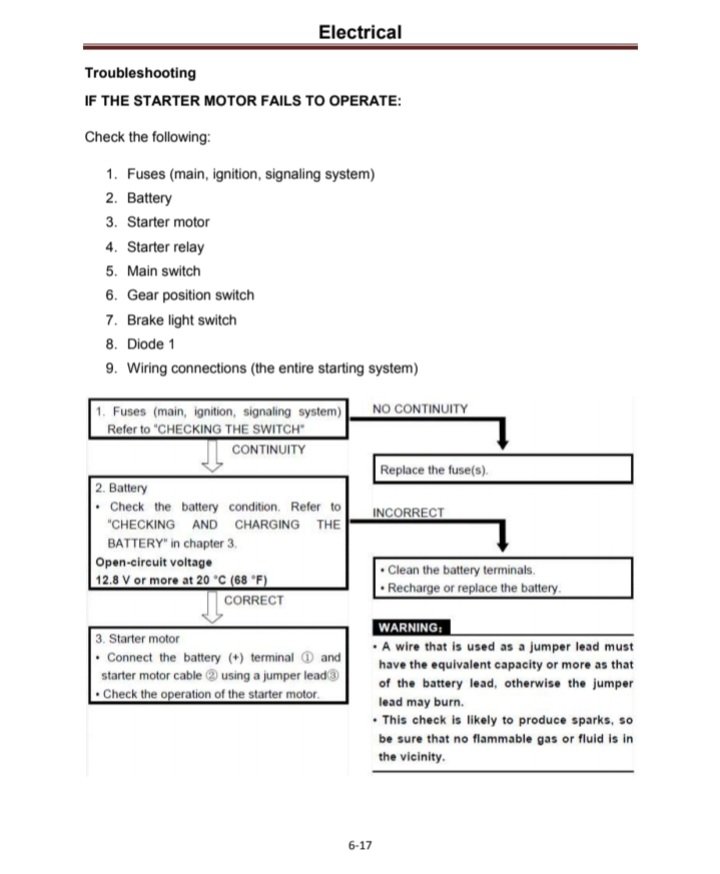
2017 Hisun 500 vector utv starting issues
aefron88 replied to Michael R's topic in Hisun UTV SxS Forum
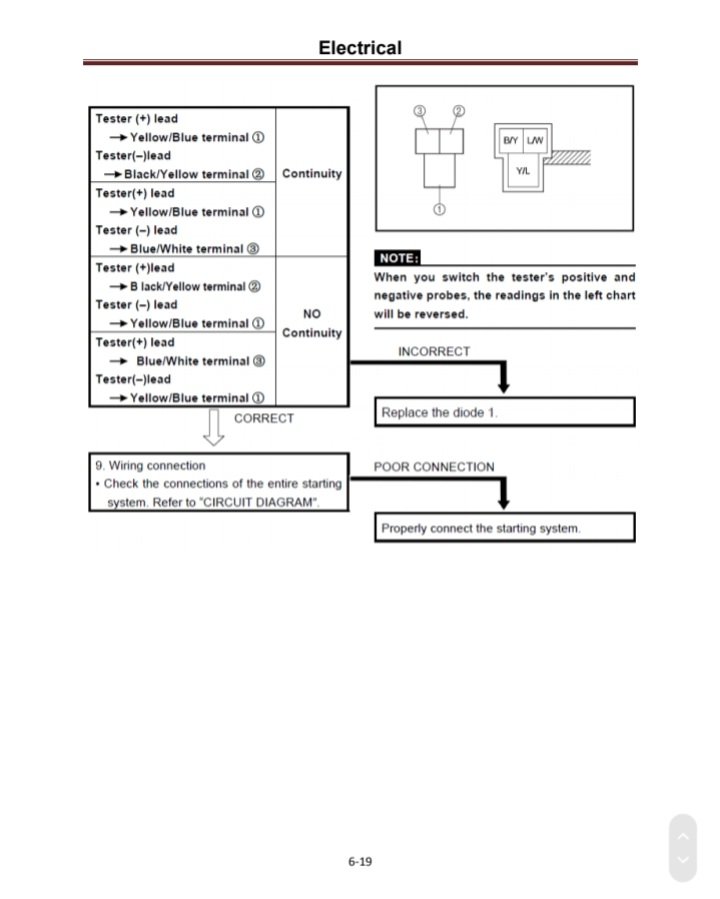
Sorry I missed where you already replaced it. Below are the starting system diagram troubleshooting flow chart from the service manual from the 400. I believe is the same for all of the various sizes.
-
Phil, it would be helpful if you want to start your own thread and we can help you there. My guess would be the battery is shot and can't put out enough cranking amps to get the motor spun over. Go ahead and start a thread and we can work on the issue there.
-
2017 Hisun 500 vector utv starting issues
aefron88 replied to Michael R's topic in Hisun UTV SxS Forum
Based on those symptoms I would remove and bench test the starter next. It sounds like there may be an internal short. Remove it and clamp it to the workbench. Connect a battery with jumper cables to the ground, and tap the terminal briefly with the positive cable and see if it spins like it should. My guess would be it doesn't. -
Assuming that it's made by Hisun there is an older service manual for the 800 downloadable here
-
Candl, For little more information: What year and model? When did this start? Did you have any prior recent issues? Do you own a volt meter or 12v circuit probe so I can walk you thru troubleshooting?
-
The next thing I would do is check the fuel injector. Ground the spark plug wire. You can make grounding apparatus with a bolt, a ring terminal, a wire, and an alligator clip. The ring terminal goes on the bolt, bolt into the boot wire, and clip the other end of the wire alligator clip on a body bolt. This ground will prevent ignition damage, as well as sparking during the FI test. Once that's done remove the fuel injector, put it over a rag with the wires and fuel hose attached, and try cranking the engine over. Check for good flow and an even pattern. If you are unsure it's probably worth throwing a new injector in to be safe. I would go back to driving at this point and see if the issue reoccur. If it dies my next step would be to get an engine scanner setup. The cabling is only around $25. Read my post on how to set up code scanner in the Coleman forum. What you can do with that is bring a laptop along and use the recording mode. Drive until the drivability issues reoccur, and you can then go back and replay the file and see what changes over that time frame. It's possible a sensor is failing.