aefron88
-
Posts
343 -
Joined
-
Last visited
-
Days Won
55
Content Type
Profiles
Events
Forums
Gallery
Downloads
Community Map
Everything posted by aefron88
-
 What do you mean by "relearn procedure"? ECU reset? How did you perform this? Did this start with an outdoor temperature change? IE it ran fine when it was warmer out but now that it's cold it dies at idle. If you give it a little gas does it stay running? I'm wondering if the coolant temp sensor might be giving a false reading which would adjust the fuel map to where it won't idle
 -
Are there any performance parts for ut400?
aefron88 replied to lincolnsq175's topic in Coleman UTV SxS Forum
Let us know if you find parts that fit. I believe it's a rhino 450 clone, but not sure if engine parts are swappable,, AND I've yet to read any definitive reports of anything swappable. The engine tune is adjustable via HUD ECU hacker software, which is free. Just need about $25 in cabling and the time and knowledge to play with the fuel mapping. Here's my explanation on how to get HUD ECU hacker working on these rigs and what you need That having been said its a 400 so you wont likely squeeze much more out of the engine. -
There are a bunch of options on amazon. I don't have a specific recomendation as I havent needed to swap one, yet. I probably wouldn't bother paying an injector shop to clean a $40 injector, but maybe that's just me.
-
Coleman UT700 Output Shaft Leak Need help!
aefron88 replied to Psparr's topic in Coleman UTV SxS Forum
Someone already answered your question in the coleman forum: -
2018 Hisun Strike 550 Backfires on deceleration
aefron88 replied to y2kbmet's topic in Hisun UTV SxS Forum
There's no MAF it's a MAP/intake air temp (pressure as opposed to flow) sensor. I would replace that torn up o-ring and lightly lube them with silicone grease (avoid regular petroleum based grease as it can cause the rubber to swell) Since you've already replaced the plug and checked the air filter, have you ever checked the valve lash? I would start there. If the valve lash is in spec I would check the injector next, it may be partially plugged. It's also possible you have a sensor feeding bad info into the ECU which would effect fuel mapping, like the sensor noted above, but aside from fixing the orings that will be harder to track down. -
-
Gear oil on what? Front or rear axle? Which model?
-
Thanks for the picture writeup! I haven't had that issue yet with my UT400, fingers crossed, but I'm glad someone posted detailed instructions and pictures if I need to do it eventually.
-
Headlight Bulb LED Cross-Reference???
aefron88 replied to Dan_Lockwood's topic in Coleman UTV SxS Forum
I believe it's just a standard H6 bulb so any H6 replacement should be compatable. There are tons of LED options available. -
New, There is no way to adjust the fuel/air mixture manually. The ECU adjusts automatically based on the O2 sensor in the exhaust just like a modern car. I can't see a pic of your plug, care to upload one? If you have excessive carbon build up it may be too low a heat range, or you may have something else going on. What model plug did you uave installed?
-
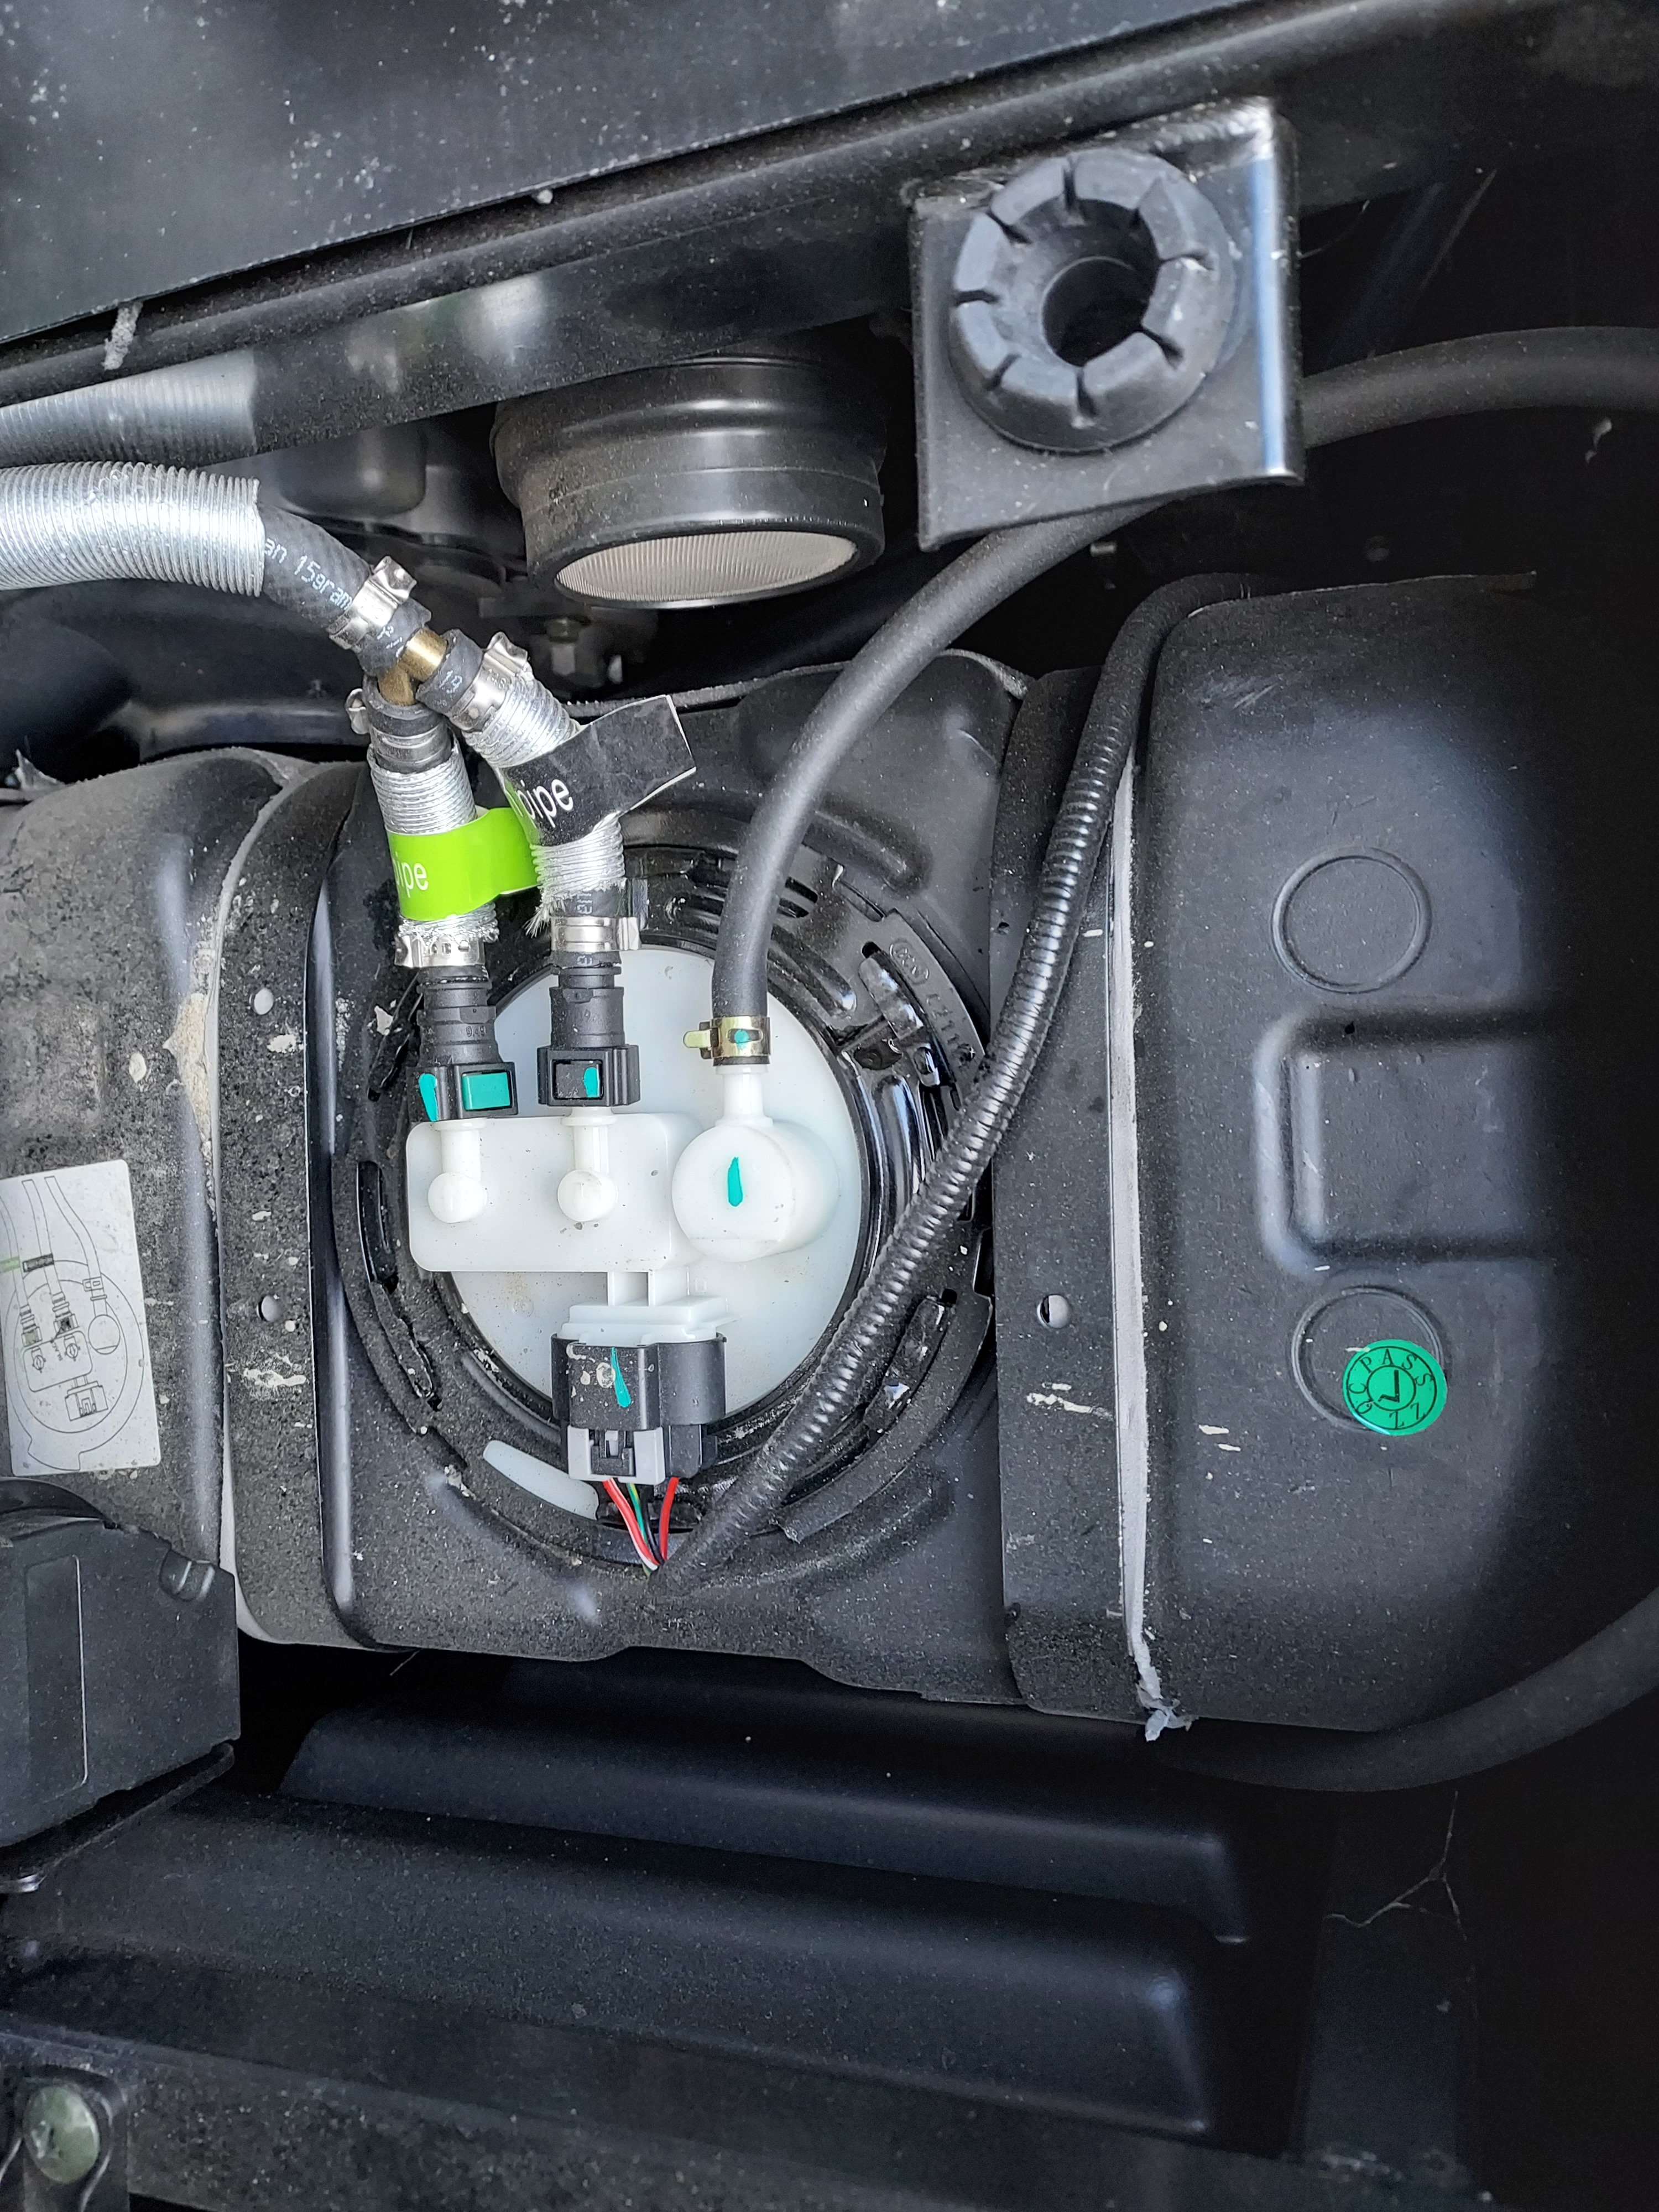
That means the tank is empty. First make sure there's fuel in the tank. Next lift up the seat and check the wire connector going to the fuel tank on the passengers side. Make sure its not loose.

-
what size engine? got a picture of what you're talkng about? it should be a lip type flange seal that seals the shaft from oil leakage
-
Seat cover for Coleman Outfitter 550cc
aefron88 replied to lambert808's topic in Coleman UTV SxS Forum
I haven't seen any factory fit type covers, but you can probably measure and find a universal. I don't have a 550 to measure but something like this would probably work -
Coleman Outfitter 550x alternator capacity
aefron88 replied to jmutv's topic in Coleman UTV SxS Forum
The blower on that heater and a reasonably sized light bar should be fine. With the Chinese noname light bars the wattages get large quickly. The stock halogen headlights on these UTV's I believe are only 35 watts, so I think like a 40-80 watt light bar would be plenty. -
Coleman Outfitter 550x alternator capacity
aefron88 replied to jmutv's topic in Coleman UTV SxS Forum
I've never seen a spec published anywhere, maybe someone will chime in. I doubt theres enough overhead to run an electric heater that puts out enough to be worthwhile. My experience with these types of things is there might be 10-15 extra amps of overhead MAX at idle, quite possibly less. A 100 watt light bar will eat half of that. A 100 watt electric heater would eat the other half and isn't going to heat the cab. If you feel like experimenting you could keep adding load until the battery voltage is <14V at idle, that will give a good idea of the max limit. Dont forget to turn on the factory lights (35W ea), brake lights (10W ea), turn signals (10W ea), etc as all that has signifigant draw. -
Axis 500 driveshaft out of transmission.
aefron88 replied to Greg Kilgore's topic in AXIS Off-Road UTV SxS Forum
Hey Greg, I'll be interested to hear what the actual root cause of the failure is. My assumption was weak splines + torque. It could be the splines are not proper spec metal or not heat treated properly. I've seen a couple posts of the exact same failure now. Based on the sizing I wouldnt expect any issues as these things don't make that much horsepower. Either way good luck, and keep us posted. -
Welcome. If you have any questions there's plenty of info in the coleman and hisun forums (it's a rebranded hisun, but most of the 400 posts are in the coleman section) there's a couple posts in each about things to help quiet these machines down. People have had good luck with adding various sound deadening materials under the front/sides of the seat and under the bed. I would love to see a post about the heater setup with some installed pics. I've seen them listed but you're the first person I've heard of actually installing one on a 400.
-
PICTURES - My UT400 Loves To Smoke...
aefron88 replied to Dan_Lockwood's topic in Coleman UTV SxS Forum
Looks like you've been busy. Glad you got it all running right! -
No one sells a tune that I'm aware of. With HUD ECU hacker you can adjust the fuel map and a few other limits. You would basically need to play with it and adjust. Factory fuel map is set to meet emissions, prevent damage to the engine, and make it operate smoothly. If the engine is in good shape you can likely get away with a little more fuel and a little more spark advance without any issues, but it's not a big displacement motor and there's no way to adjust the valve lift or timing so you're not likely to get more than a couple HP max, just not worth the effort without making other modifications.
-
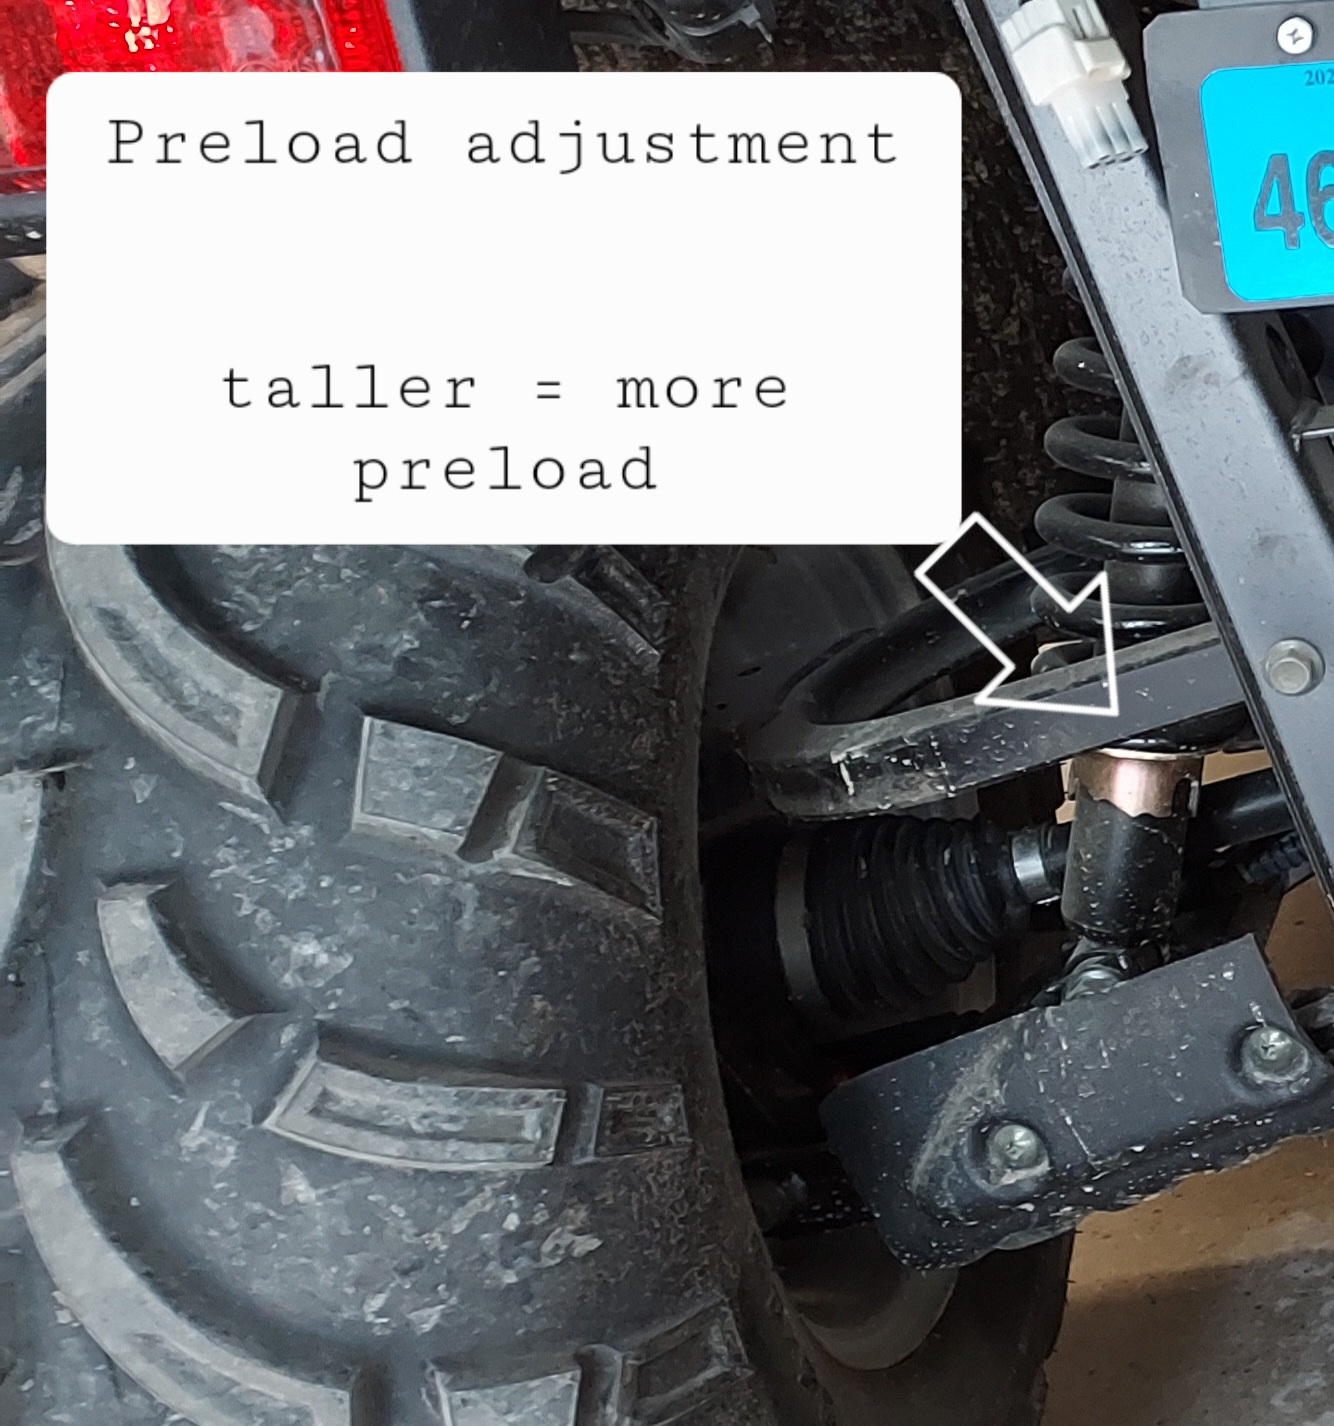
2021 Coleman UT400 rear suspension upgrade.
aefron88 replied to Brando040's topic in Coleman UTV SxS Forum
Have you adjusted the spring preload to max for starters? Keep in mind the coilovers are not the only reason for the weight limit; vehicle weight balance, frame strength, and max tire load are also limiting factors for the max safe load. I'm not aware of any upgraded coilovers available, but I'm sure you could find something and make it fit if you wanted. It's just a function of spring weight and length between the mounting points.
-
You didn't answer my other question, are you hearing the fuel pump come on for 5 seconds or so when you turn the key to "on" before starting? And you do have fuel in the tank correct? I'm also assuming with the key on you aren't getting any "P" codes on the display. If all that is good I would go after the spark plug next, then valve lash (if it hasn't been checked recently), and then the injector
-
So what exactly happened between Nov 24h (when it was running, correct?) And today. Have you used it at all? Did it give you any issues? So just to confirm you have 12.8V still at the battery, it cranks over, but doesn't start? You have fuel in the tank? When you turn the key to "on" but don't crank it do you hear the fuel pump hum for 5 seconds and then stop?
-
The rear is always locked on these by design. There's no way to change that unfortunately. The wire you are seeing is probably the speed sensor.
-
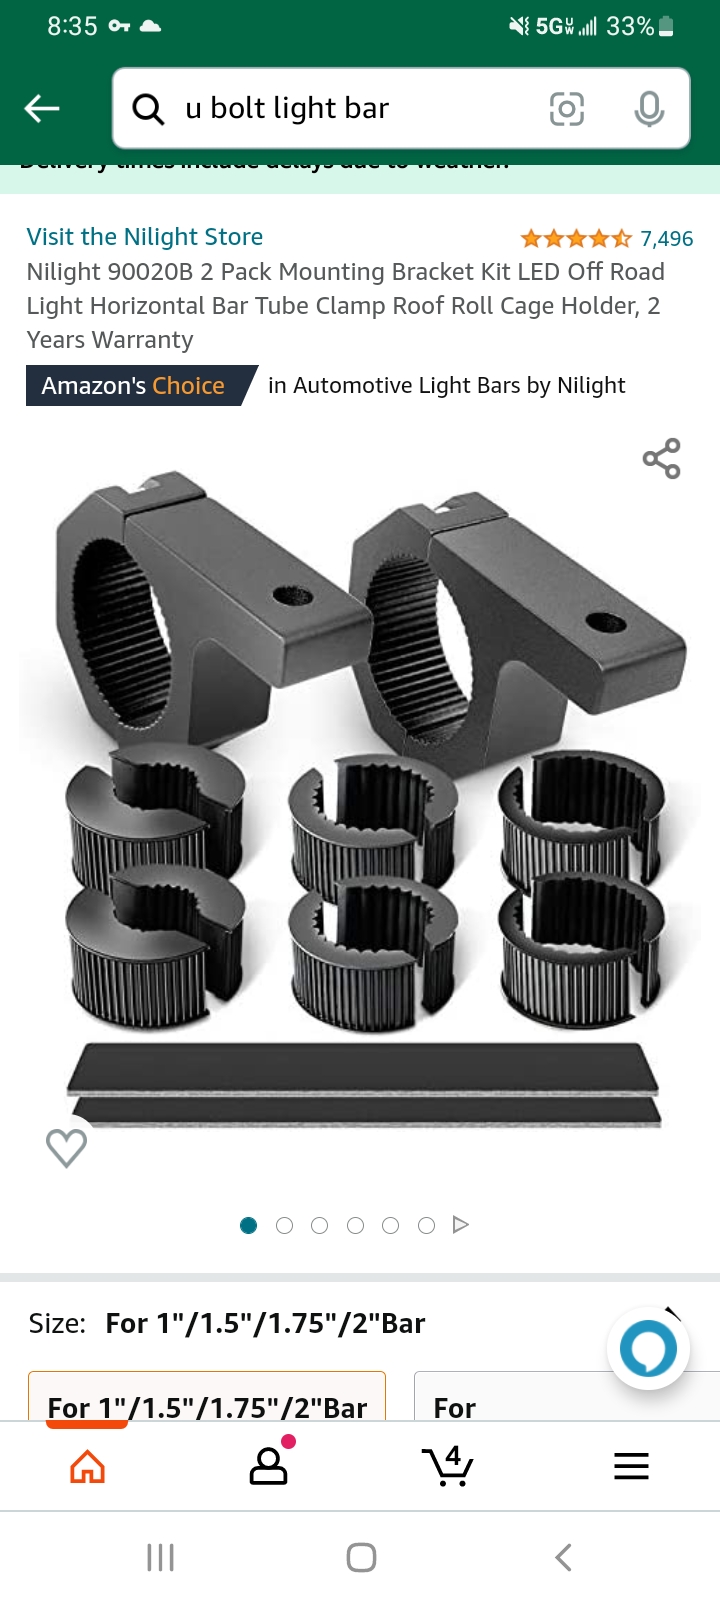
Coleman UTV400 Speaker System and Lighting Help
aefron88 replied to Molly A. Block's topic in Coleman UTV SxS Forum
You get something like this to mount the light bar to the round tube. You can mount the switch anywhere you can get wires behind. The spot you mention is the ugly for where the ignition used to be on the older 400s. Should be doable. You will need to run wires from the battery under the seat, underneath the body up to the dash and up to the light bar. A pack of zip ties will be needed to attach the wires so they don't just flop around and chaft on stuff or catch on things. Order a kit with the wiring harness and we will be happy to help you get it all set up. I know it looks daunting but it's a lot easier than you think and most people are more than capable of completing the project with a little guidance. The best way to learn this stuff is by doing it! You've got this!
-
PICTURES - My UT400 Loves To Smoke...
aefron88 replied to Dan_Lockwood's topic in Coleman UTV SxS Forum
No worries, not sure on the hole location. Got a picture? It's very possible a low oil situation can toast the wet clutch quickly, as can a wrong type of oil situation. The manuals for these things have a mixed messaging on what viscosity and type of oil, but it should be MA2 rated due to the wet clutch just like any wet clutch vehicle. Modern conventional automotive oils have viscosity modifiers which can cause the clutch to slip and once it starts it goes downhill quickly. Being an automatic (CVT) it can be harder to noice a slipping wet clutch unlike on a motorcycle. Sounds like you've got a big project ahead. Post lots of pics and what you find/do as it can always be helpful for the next guy.