
Leaderboard


Popular Content
Showing content with the highest reputation since 07/18/2025 in all areas
-
2020 Massimo T-Boss 410 efi, UTV has approx. 600 miles on it. Traveling down a dirt road at 20 mph and slowed down to make a sharp turn, engine stuck in fast idle. Fast enough that the clutch would not disengage. Forced it into neutral and punched gas pedal trying to get the idle speed down to where it should be. Idle started to come down from the fast idle then in about four seconds the RPM dropped to zero and engine would not restart. Towed it back to the cabin. No one around here will work on Chinese UTVs so if I don’t fix it will be just another P.O.S. Checked: Spark plug sparks. Fuel injector injects. Rocker arms rock, cam turns Will not run on a prime. (Prime, squirt gas in the spark plug hole, replace the spark plug and attempt starting the engine.) Ordered an OBD reader and the adapter for the Massimo /Delphi 6 pin connector. Down loaded fault codes from the; Delphi MT05 # 28265491 ECU P0311 Cylinder 11 misfire detected P1800 Manufacture Control P0711 Trans fluid temp sensor A PIC Manufacture Control None of these fault codes matched up with any published list of the Massimo/Delphi ECU and fault code reader would not reset codes. With all these nonsensical codes it must be a faulty ECU. After all how can you have a misfire on Cylinder 11 when it’s a single cylinder engine. Ordered and Install a new Delphi MT05 28265491 ECU. (Fig. 1) After attempting another unsuccessful start the new ECU showed P0311 Cylinder 11 misfire detected. Now I know what “P0311 Cylinder 11 misfire” means. It means the engine is not running and the ECU does not know why. An engine needs three ingredients to run, Fuel, Compression, Ignition. Confirmed it has spark, fuel, and assume it has compression. After all it had enough compression to run moments ago. Ordered a compression gauge that fits that little spark plug hole used in the Massimo to get a real reading. Compression test, 35 psi. OK, now I know why it will not run. Guess the cylinder head has to come off to find out why it has so little compression. EUREKA, FOUND IT! A small piece of metal stuck in the intake valve seat. (Fig. 2) Therefore the intake valve would not fully close. After further examination found a piece of aluminum mesh stuck in the intake port. (Fig. 3) Checked the cylinder bore for defects caused by the aluminum fragments. None were found. Removed the aluminum fragments from the head and reassembled the engine. (Fig 4) The valve timing was a challenge doing this in the field. After reassembly tested compression, 165 psi. Attempted another start. Started right up and ran as good as it did before. Shut it down right away to check for more aluminum mesh in the induction path. The air filter is where the aluminum mesh came from. (Fig 5) Now that all the facts are in, this is what happened. The 352cc, Chinese made Linhai single-cylinder, 4-stroke, liquid-cooled, SOHC engine with Electronic Fuel Injection (EFI) and 25.5 horsepower is a very rough running engine with excessive vibration. It rattled and shook the air filter to the point where the screen on the inside of the filter fatigued and piece of screen broke off. The screen fragments traveled down the induction path and lodged in the throttle body jamming the throttle plate preventing the engine from returning to idle speed. When I punched the gas pedal the screen dislodged and traveled to the intake valve where the screen got stuck preventing the valve from closing. The engine died and would not restart. Now I know, change the air filter yearly whether it needs it or not. Took 20 min. of running the UTV for check engine light to go out.
 4 points
 -
Unplugging the connector doesn't cost anything and does not suggest one should not wear the seat belt. However, freedom of choice is ours in this country and as long as we accept the consequences of our choice it should not be judged by big brother.3 points
-
1st buy from a reputable dealer w their own service dept. I own a dealership in DFW and when someone buys from us we take care of legitimate warranty work regardless of hisun pre approval and we pre delivery inspection before we accept from hisun and then our mechanic does a full inspection before it is ever offered for sale, BUT if you bought box store to save a couple bucks ( you don't really as our units have far more options standard but some people only think $ 500 cheaper) they are never inspected just dropped off a truck to sit till you buy it. Box stores offer no service either - NONE! we are an authorized service center but we don't wait for hisun to approve your work if you didnt buy from us, we get it done BUT you pay for the work upfront and get reimbursed what we get when we get it and no more. So buy from a GOOD DEALER and you will get taken care of if needed without a wait for warranty approval. Plus we have numerous sources for new parts besides hisun older parts if necessary off salvage units we buy. As for massimo/ hisun as a person replied in dec 2025, hisun hasn't built Massimo branded units in many years as I inderstand because of massimo failure to handle their own customer issues on their rebranded product. Matches what you said about massimo issue you had, but massimo is the distributor and accepts that responsibility. Bad Boy UTV current does same w Hisun but they are Bad Boys units and BB responsibility. Hisun takes care of hisun branded product. Additional hisun use to be imported by a distributor in US much like massimo but Hisun factory took it back from distributor due to service and bad reputation problems with that distributor. Now Hisun is hisun owned and making big push to build US market and take care of customers. I call the head of Hisun US and he always answers or calls back promptly and is very motivated to help if we have an issue. If we cant find or fix something they will send head factory service person out to our shop to help. As for bad reviews, most people only do a review if unhappy so they tend to be higher. Also many never even owned one and post bad comments because it is Chinese, but truth is many parts and components for all brands are made or built in China. Finally, go to Facebook group for Hisun. Tons of happy long term satisfied owners. The 400 model has been around for ever, is almost just like a mule and people have owned and run them for years and love them and it's the base cheapest model. Finally all brands gave problems on some units. A friend had a can fully enclosed H and A. O paid over 40k and problems from day 1 and finally forced can to buy it back! Years ago I had Polaris unit. Would just die a refuse to restart for hours or days. Polaris never was able to fix it. Someone stole it from my farm and didn't even realize it was broke down again sitting there Ha! Long but hope all this helps. You can find us on hisun dealer list if anyone wants to reach out for anything. Glad to try and help out if we can.2 points
-
There are a lot of factors in play. This thread has been going on for almost four years and the availability of replacement batteries has increased quite a bit over that time. What country you're in comes into play, too. We have people from Europe/UK, Canada, US, and Australia and the available selection can be very different. Those in the US seem to have the greatest number of options. I did my conversion almost three years ago and at the time there were very few GC2 form-factor lithium batteries in the US market, and really only one maker that had 48V batteries with a high enough constant amp output to match the Hisun motor. You could probably spend anywhere from $1,500-$5,000 US depending on what combination of amp output, capacity, and form factor you're looking for. GC2 form was important to me so I could just drop in replacements without customizing the tray to hold a physically larger size battery, but some of the conversions here did do just that. You'll pay more for batteries that have cross-BMS connections so all the batteries "talk" to each other to optimize output and charging, but depending on your use that may not be necessary with batteries connected in parallel. Gorj got to 48V using 12V batteries wired in serial, I and a number of others went with 48V batteries and went for increased amp output and capacity by using (generally) four GC2 form factor batteries. Some of the conversions just used one or two very large form factor batteries. Most of us also added a digital readout. You just have to weigh your own local battery availability, cost, ability to customize, time, performance needs, and how long/far you want to be able to go between charges (capacity). For me, four 48V batteries that combine to 120ah and a continuous output rating of 400A has been great on my 6 acres of wooded property with lots of uneven ground and some fairly steep hills. I never get below ~70% in a day even when running a 120V inverter for power tools, but I also get to plug in the evening. If you plan on going far into the wild for a few days then of course you will need more capacity. If that includes heavy loads and steep hills you want to make sure your amp output is at least 400A. By going with the 48V GC2 form batteries, I reasoned that if I later found I needed more capacity I could easily just add more batteries in parallel. I've found those four have been enough for me, but I can see how others would need more. The good news is that there are a lot more options now than years past and you can customize your solution to you.2 points
-
2nd UPDATE: It ended up being the single wire sensor in the head that controls that light swapped it out and light went out2 points
-
cut your financial losses and your stress level....scrap it, and go buy honda or kawasaki..........2 points
-
Top quality work!2 points
-
So here’s the setup I used to replace the Silent Rider silencer. Materials 2” 16 ga mandrel bent 90 deg elbows (2 pieces) [90 deg elbow] 2” 16 ga mandrel bent 90 deg elbow with tail piece [90 deg + straight] 2” resonator [resonator] Rubber exhaust hanger (note- only used one) [hanger] 2” butt joint band clamp (2 pieces) (note- the exact brand I bought is no longer on Amazon but here’s an identical one) [butt clamp] 4” diameter band clamp (2 pieces, local hardware store) To make the exit pipe from the original muffler, I used the original spark arrestor flange cut from the arrestor and opened the ID to fit the 2” elbow OD. Then I welded the first elbow into the stock flange and welded the second elbow to the first at 90 degrees. The orginal trim ring can slide back over the pipe into place for aesthetics. This forms the new exit pipe to the resonator. In addition, I used some 1” x 1/4” flat stock and a piece of 1/2” rod (cut from a stainless bolt) to fab up the upper hanger that bolts to the Hisun frame, and a piece of 1/8” plate formed to match the radius of the resonator that I welded to a short tab and another 1/2” bolt shank rod. The 4" band clamps attach the resonator to the plate, and the rubber exhaust hanger provides support and vibration isolation. So originally I had intended to have the tail pipe extend straight down, but the elbows I chose wound up a bit longer than anticipated and conflicted with the rear wheel. I shortened the elbow legs on either side of the resonator as much as practicable while maintaining what I estimated to be minimum safe clamping area of about 1” to 1-1/4” (which also required “notching” the band clamps on the inside bends, see photos). I was able to get the tail pipe piece off of the tire, but it’s still pretty close and cannot aim straight toward the ground. Doesn’t look as clean, but I deem it acceptable and it does not heat the tire. I will turn down the last few inches at a later date, which should also reduce sound a bit more. So how does it perform I'm sure you are wondering... ***OUTSTANDING IMPROVEMENT!*** Much quieter, particularly outside the vehicle. Definitely quieter than the Silent Rider and lower cost (at least from my perspective since I could fab up the bits). Moreover, the stainless should last the life of this vehicle. Not a simple install for the average owner, but a muffler shop or local welder could do it for you. If I had to do this again I might source some tighter elbows or I would just shorten all the legs and weld up everything including the resonator in order to get the tailpipe straight down. But I didn’t want to weld in a resonator in general just to make it more serviceable, and also definitely not until I had assessed the performance of the mods and the selected resonator. You might look at the Evil Energy ones...more expensive but it looks like all stainless. Also, the exhaust clamps I ordered do not have stainless bolts. And finally there are more heavy duty band clamps available for the resonator that I may switch to in the future. Sorry I forgot to take a picture of the resonator hanger before installing, but you should be able to see it clearly in the installed pics. Post any questions and I’ll reply as best I can.
2 points
-
I have all the parts but I’m traveling. Should post installation in about 2 weeks.2 points
-
I’ve ordered some stainless pipe and a stainless silencer. It will be a while (probably 6 weeks) before I can get it all installed, but I’ll post the parts and results then.2 points
-
We have a new Axis XS 750 and live in east Texas. My wife also has a John Deere 955 tractor with loader, back hoe, auger, and brush hog. I also have a Ford 600 tractor with a cultivator, and a cub cadet lawnmower..we have 22 acres of trees and are working on trails through it. We believe that the UTV will be a great addition. Any thoughts on the winch? And we still need to get a working remote control form Lowes where we bought it. They are not UTV EXPERTS. The remote control battery reads9.3 voltage, it’s a 12V battery. I hope that is the only problem. Works with the incab switch but not really practical for normal use and requires a 2person operation to use the in-cab switch with any speed. Looking for a window kit for doors and back window, and additional support racks possibly. Any feedback would be appreciated Gar.2 points
-
Welcome from north of Tyler2 points
-
When a new clutch it is supposed to be soaked in the correct oil for 24 hours. So maybe changing to the correct oil and a few oil changes will prolong the life of the clutch. But I will probably need to be changed in the near future. When changing the oil. Disconnect the hose at the top of the radiator that goes into the oil cooler. Do not use an air compressor. Just use your lungs and blow the oil out of the cooler back into the engine. Then hook up the hose back to the tube and unhook from cooler. To blow the oil out of the tube. You'll get most of the bad oil out that way. If you do use an air compressor be careful and remember I told you not to use the air compressor. Good luck.2 points
-
Updated profile, burned wire replaced, first battery connected, CAN port connected to digital LCD screen; everything looks good so far. Glad that onboard charger didn't appear to burn out due to whatever caused the burned wire.2 points
-
All of those issues you mentioned are run off the small 12 volt battery and have nothing to do with the drive battery. Did you reprogram the charger for the lithium battery? I would check your 12 volt system. Possibly you have lost your 12 volt ground. Good luck!2 points
-
That exact failure occurred with my 750 with about 3500 km. It's clearly a factory defect...either the splines are not hardened or they just corrode and degrade from moisture. Really ought to be greased IMO but mine was dry as the desert from the factory. When I replaced, I greased the parts well for assembly.2 points
-
I asked HISUN Tech Support exactly that, and the answer is no. I also found out that it is probably not my rear differential that has gone bad. It is more likely that the splines in the coupler have sheared. It's engineered for them to fail first, in order to save the differential. In any event, the HISUN Tech Team is going to work with our local repair facility, to walk them through diagnosing and repairing our Sector 750 EPS. Hopefully it is just a $20 coupler.2 points
-
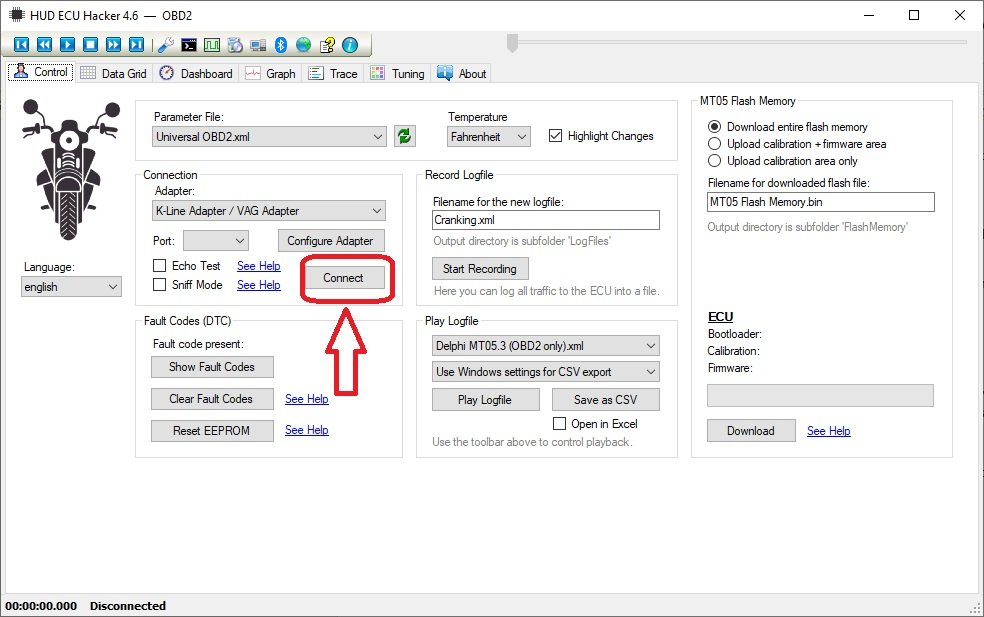
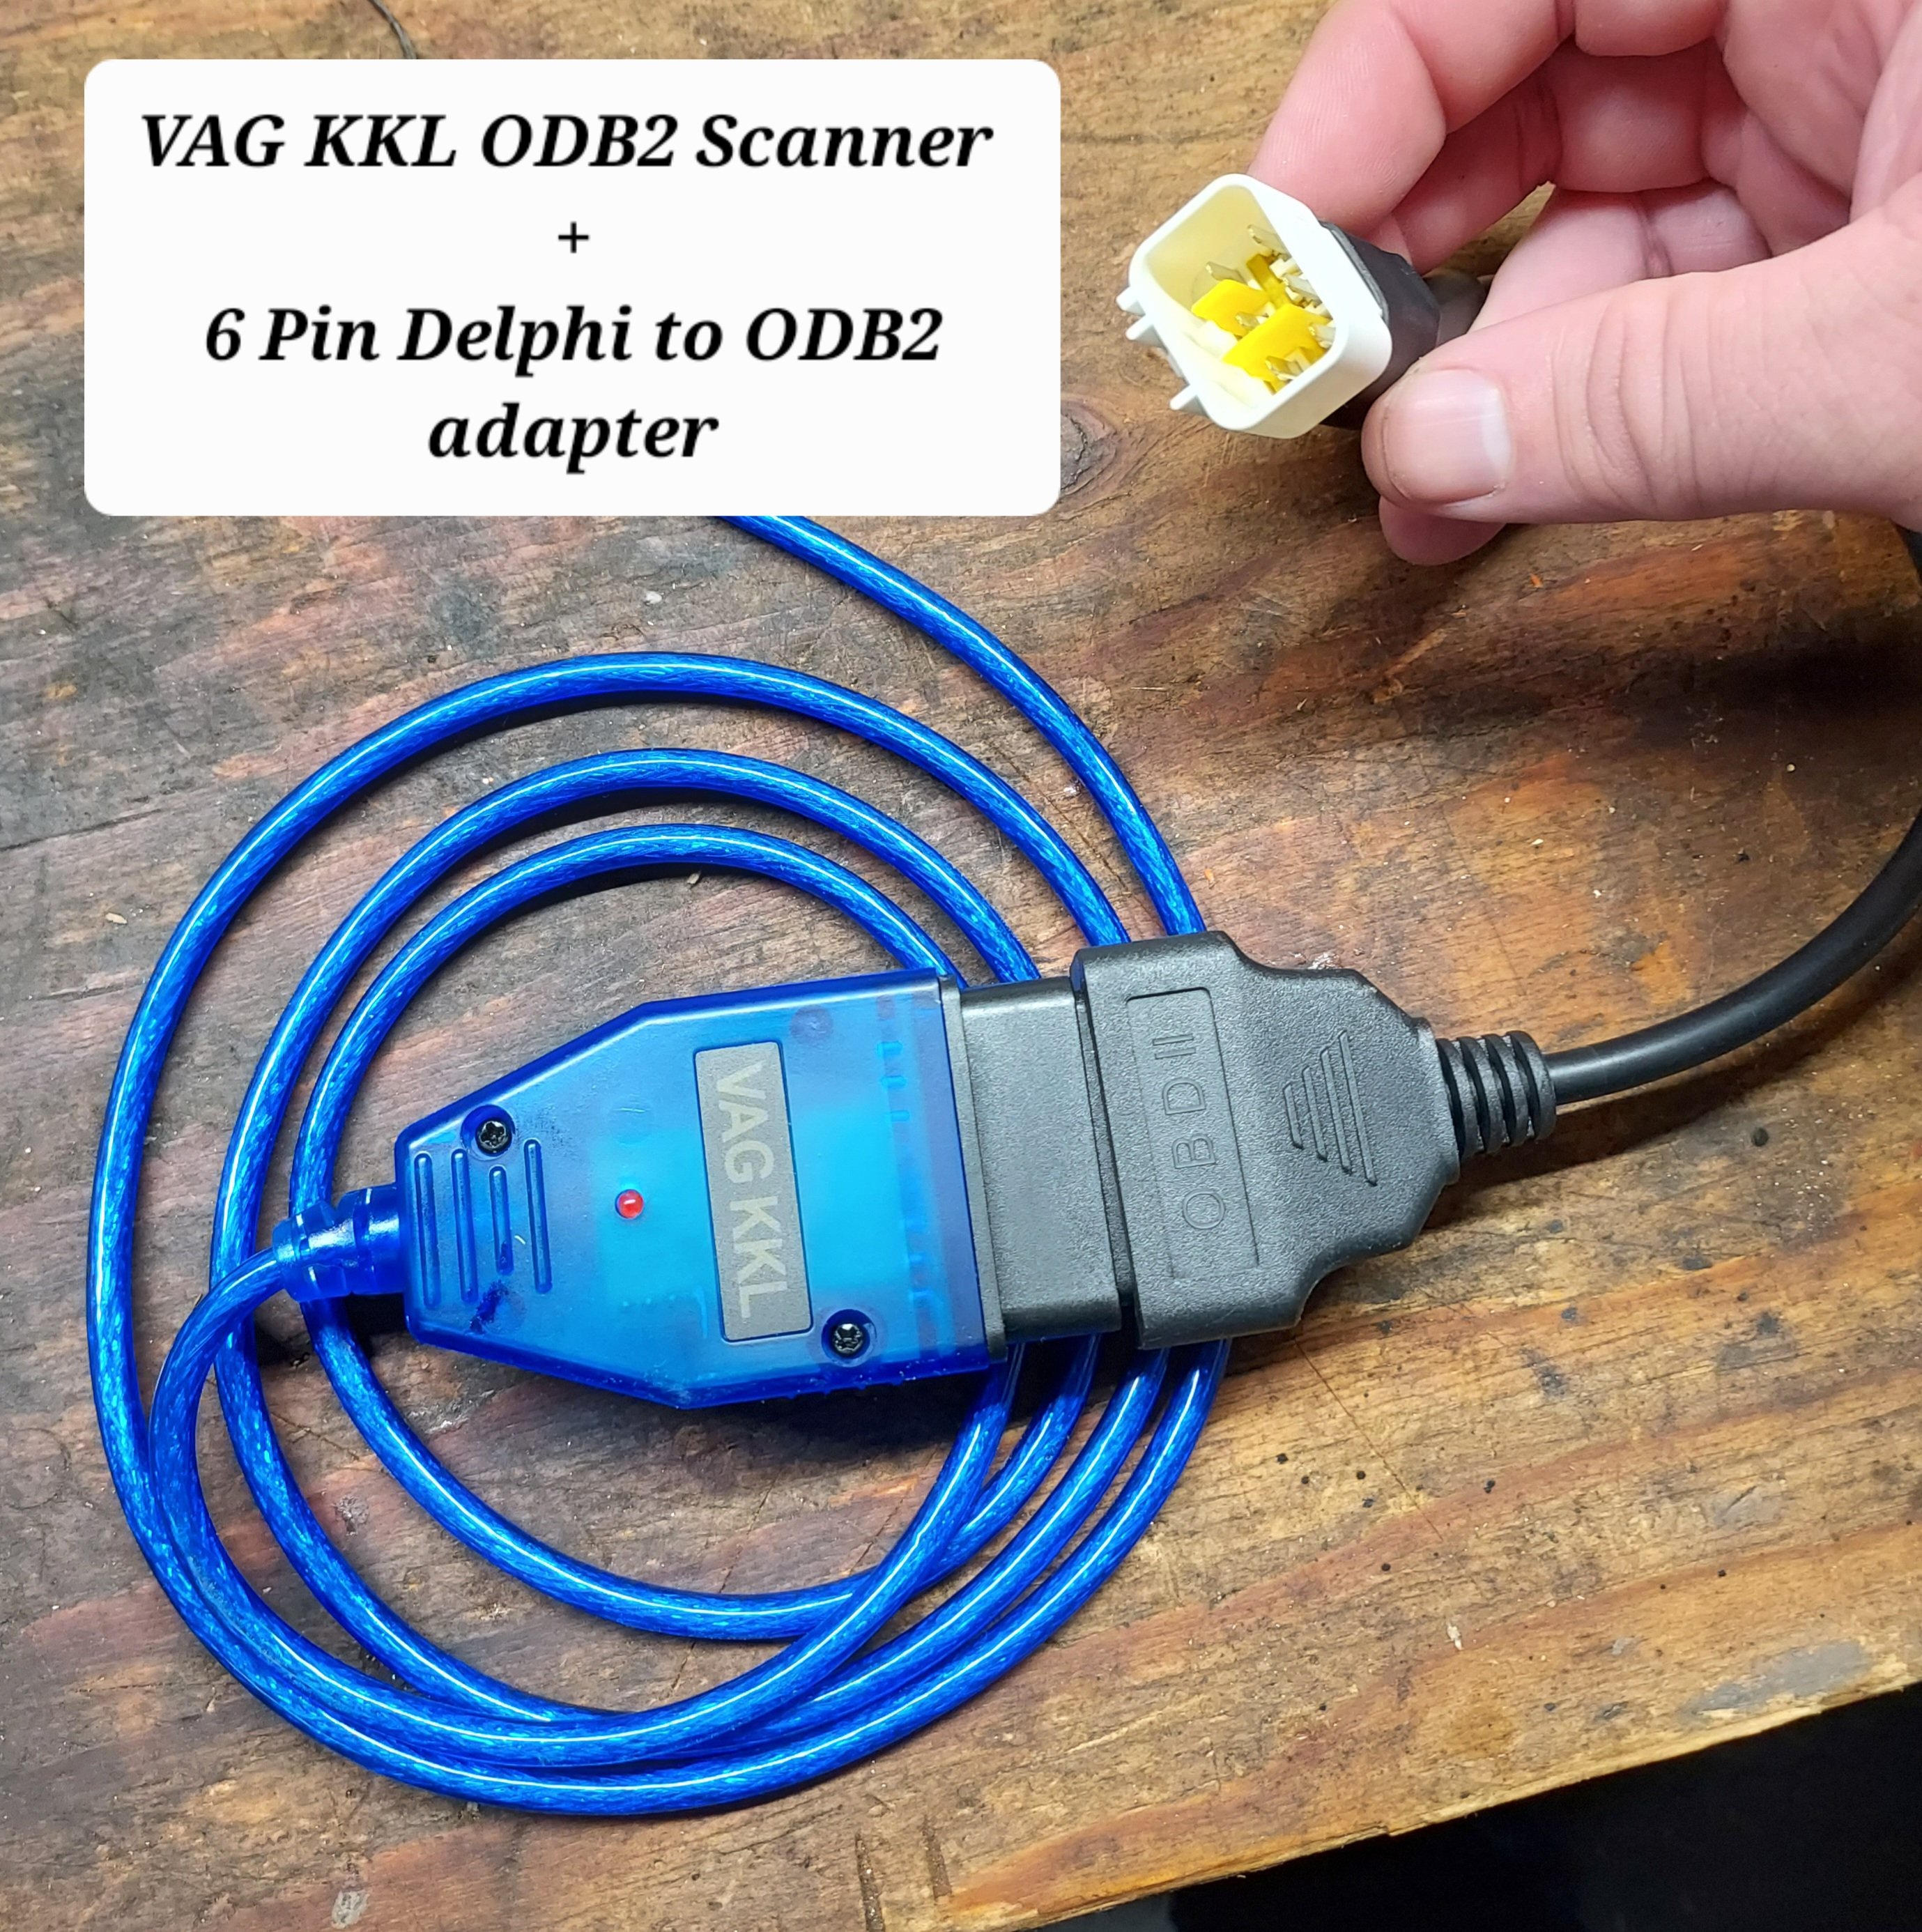
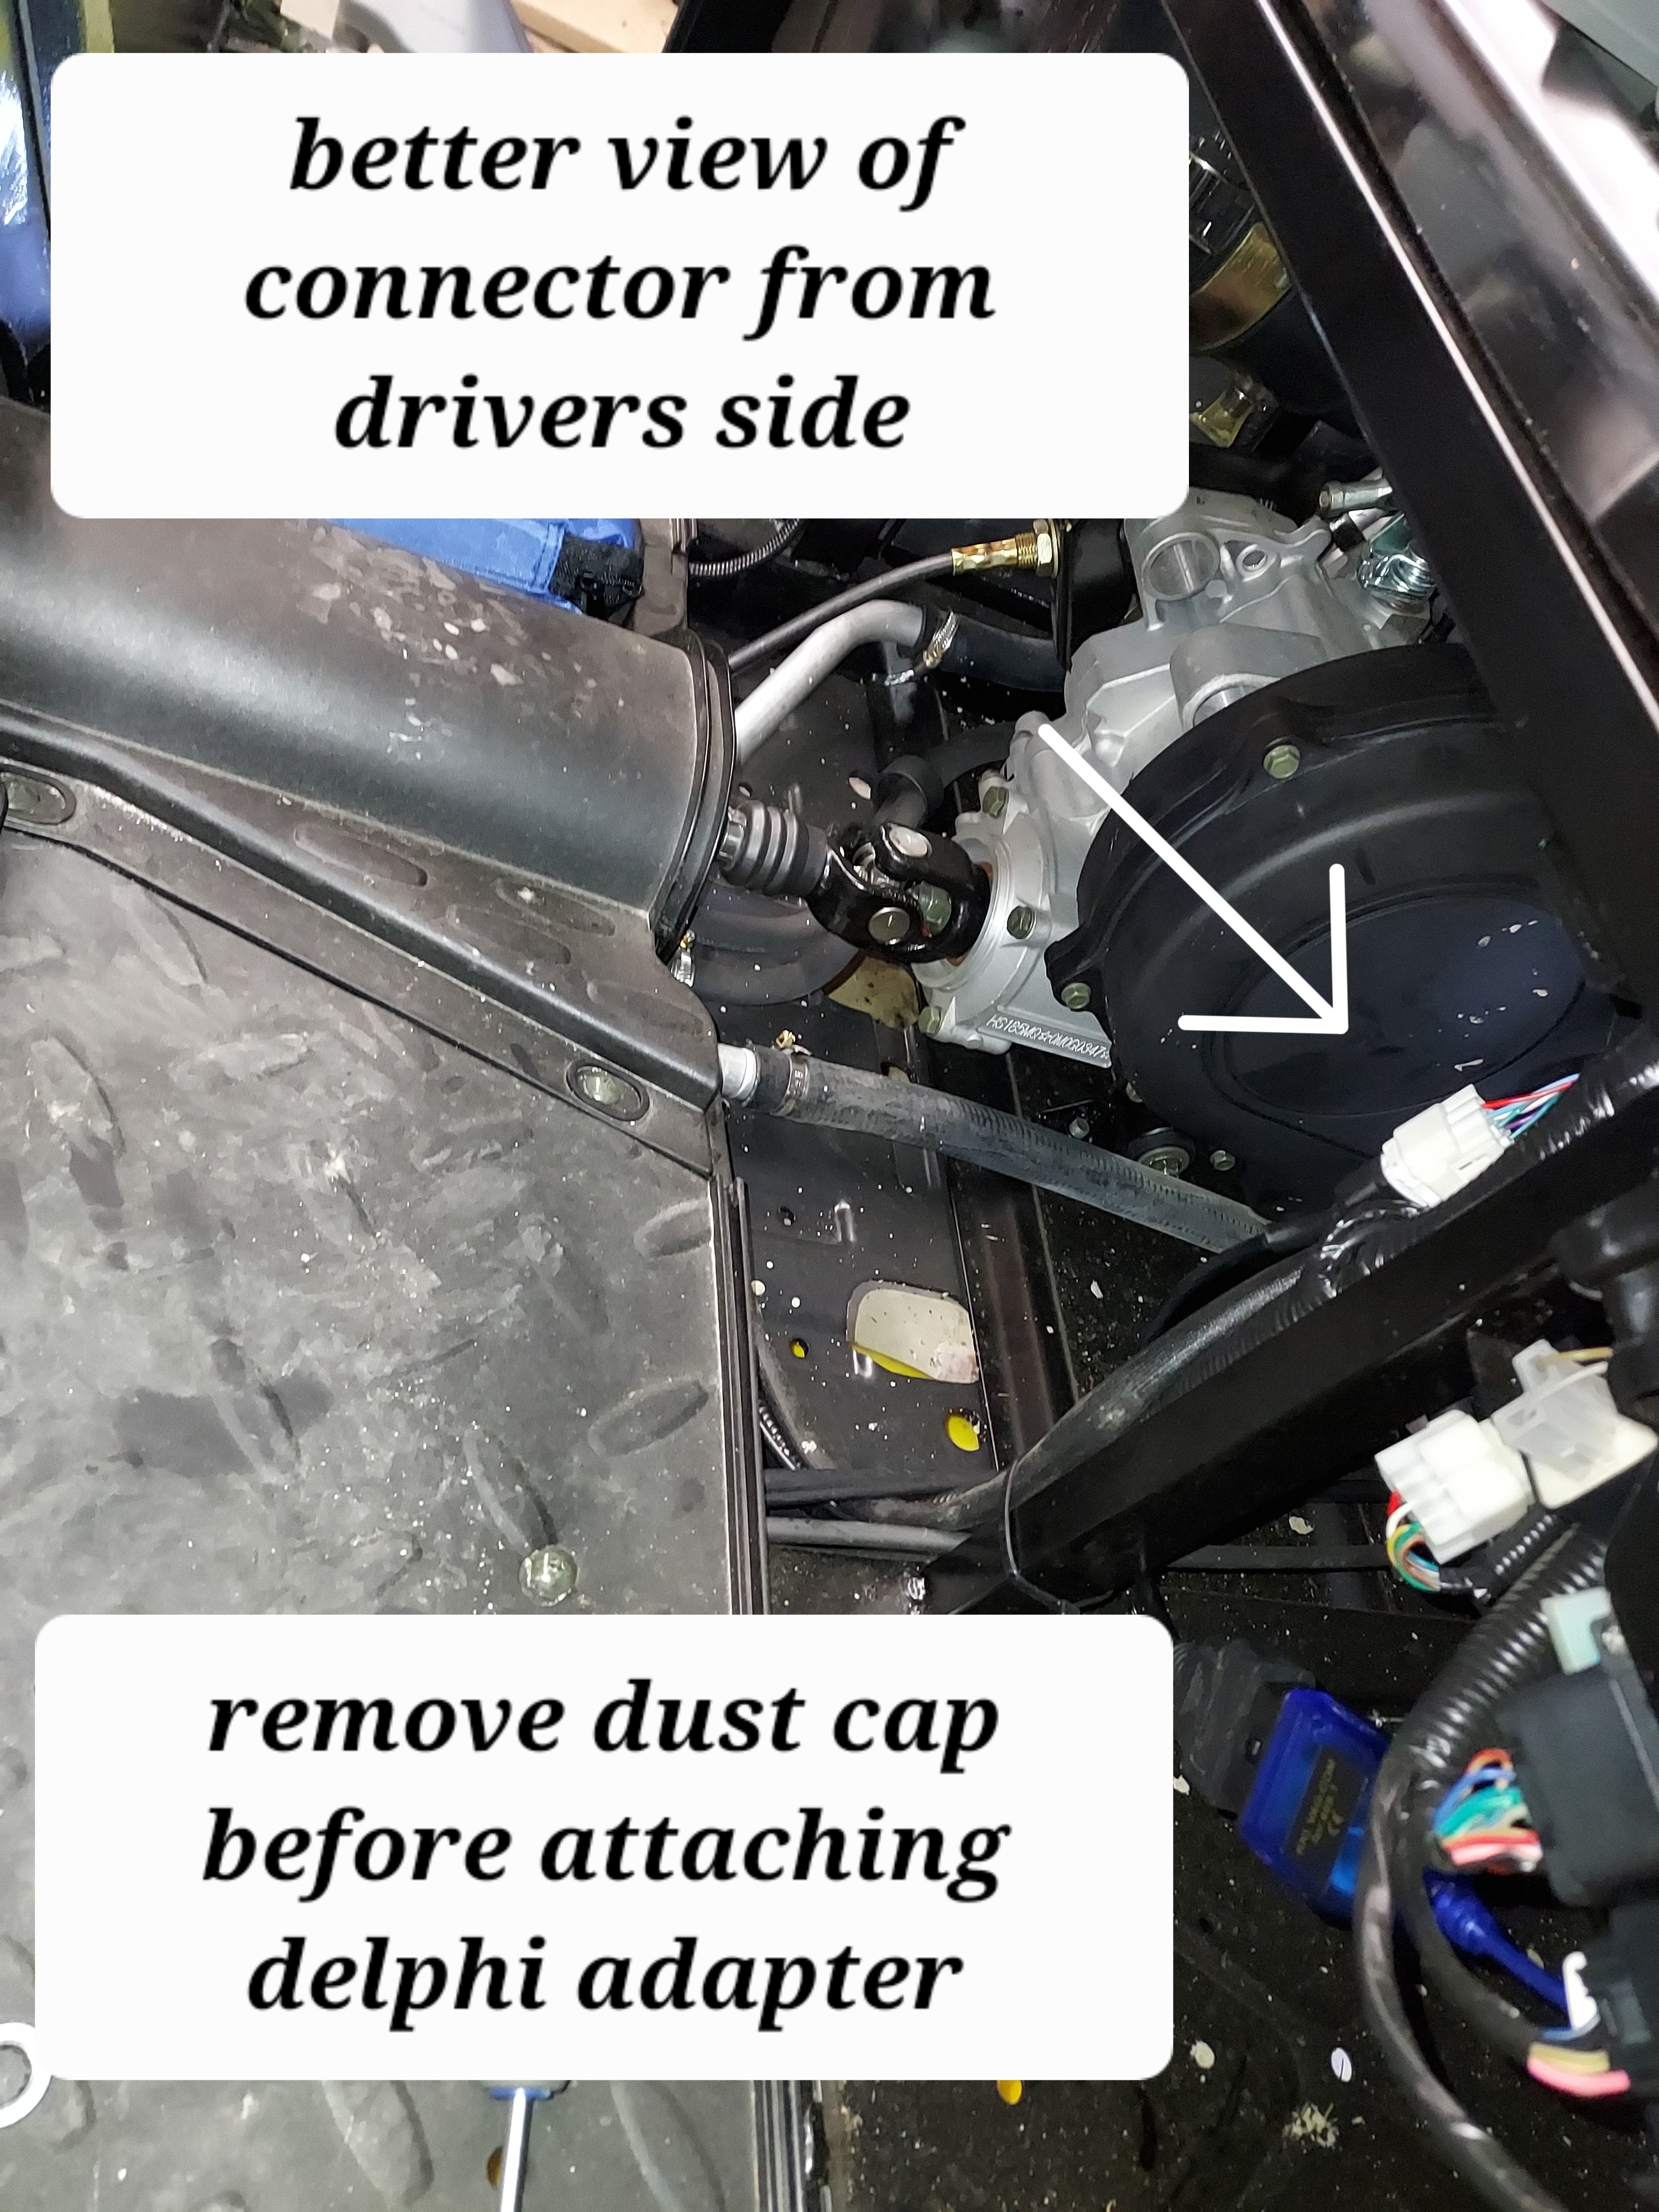
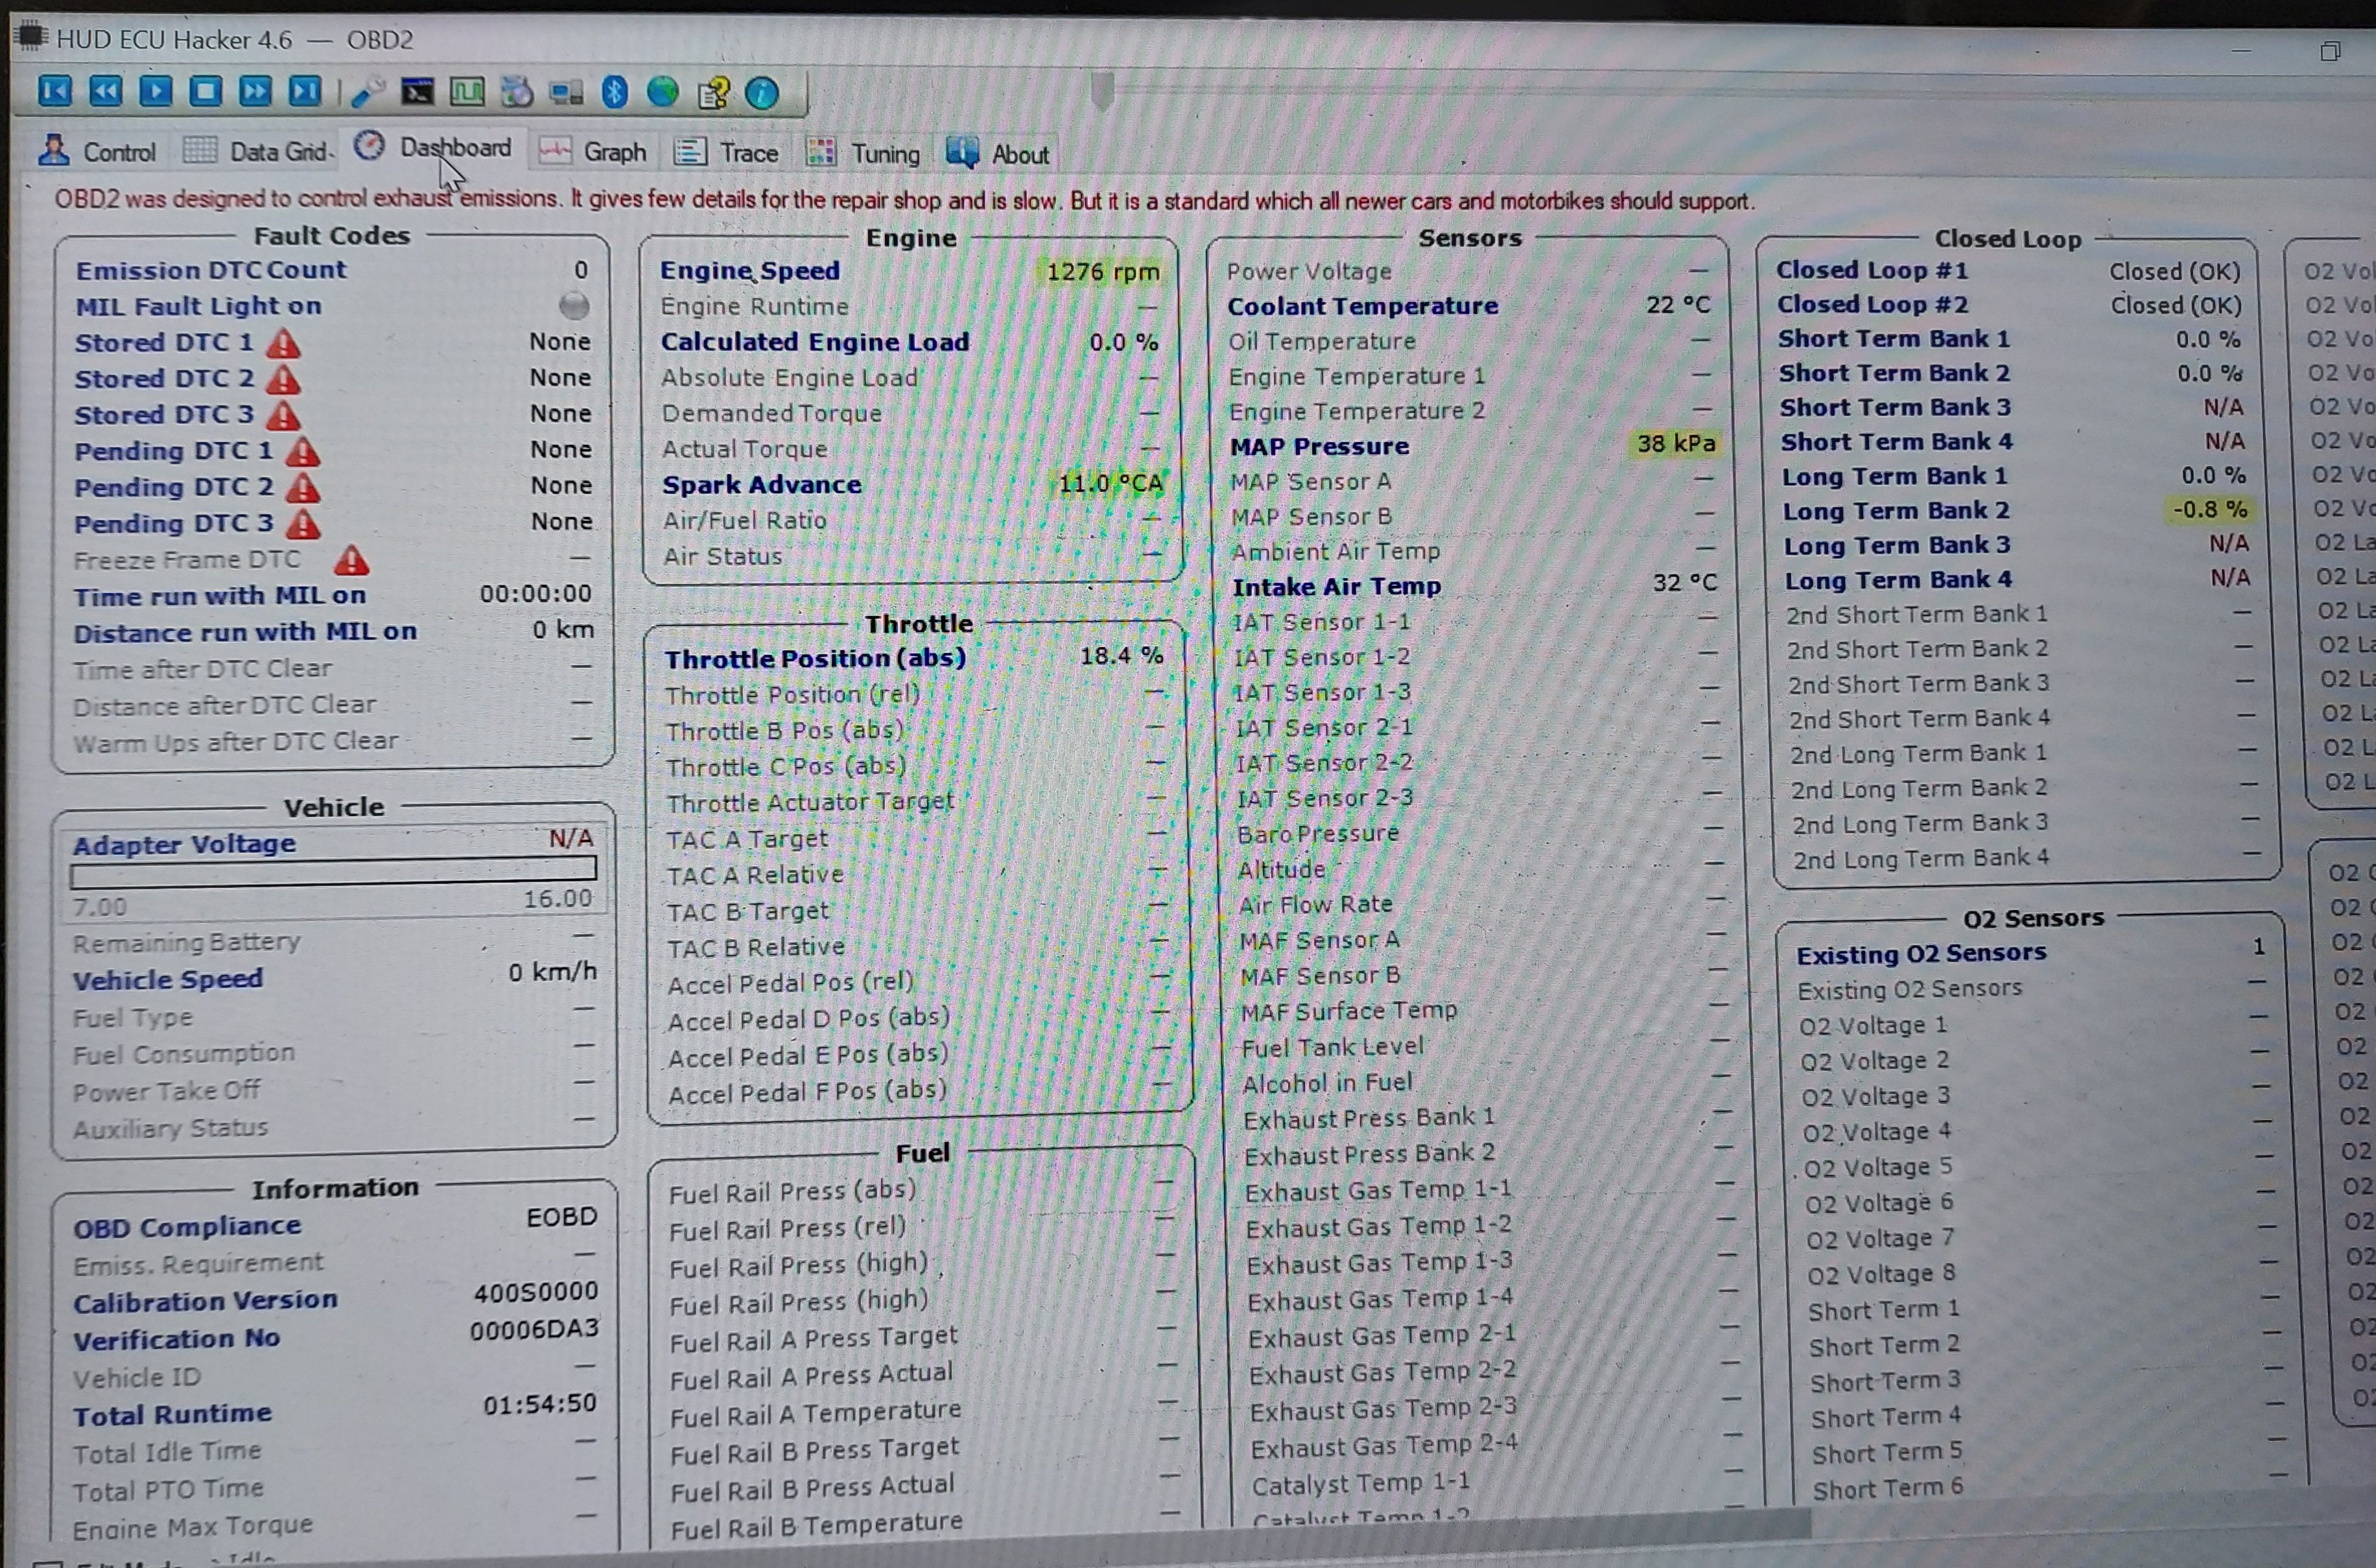
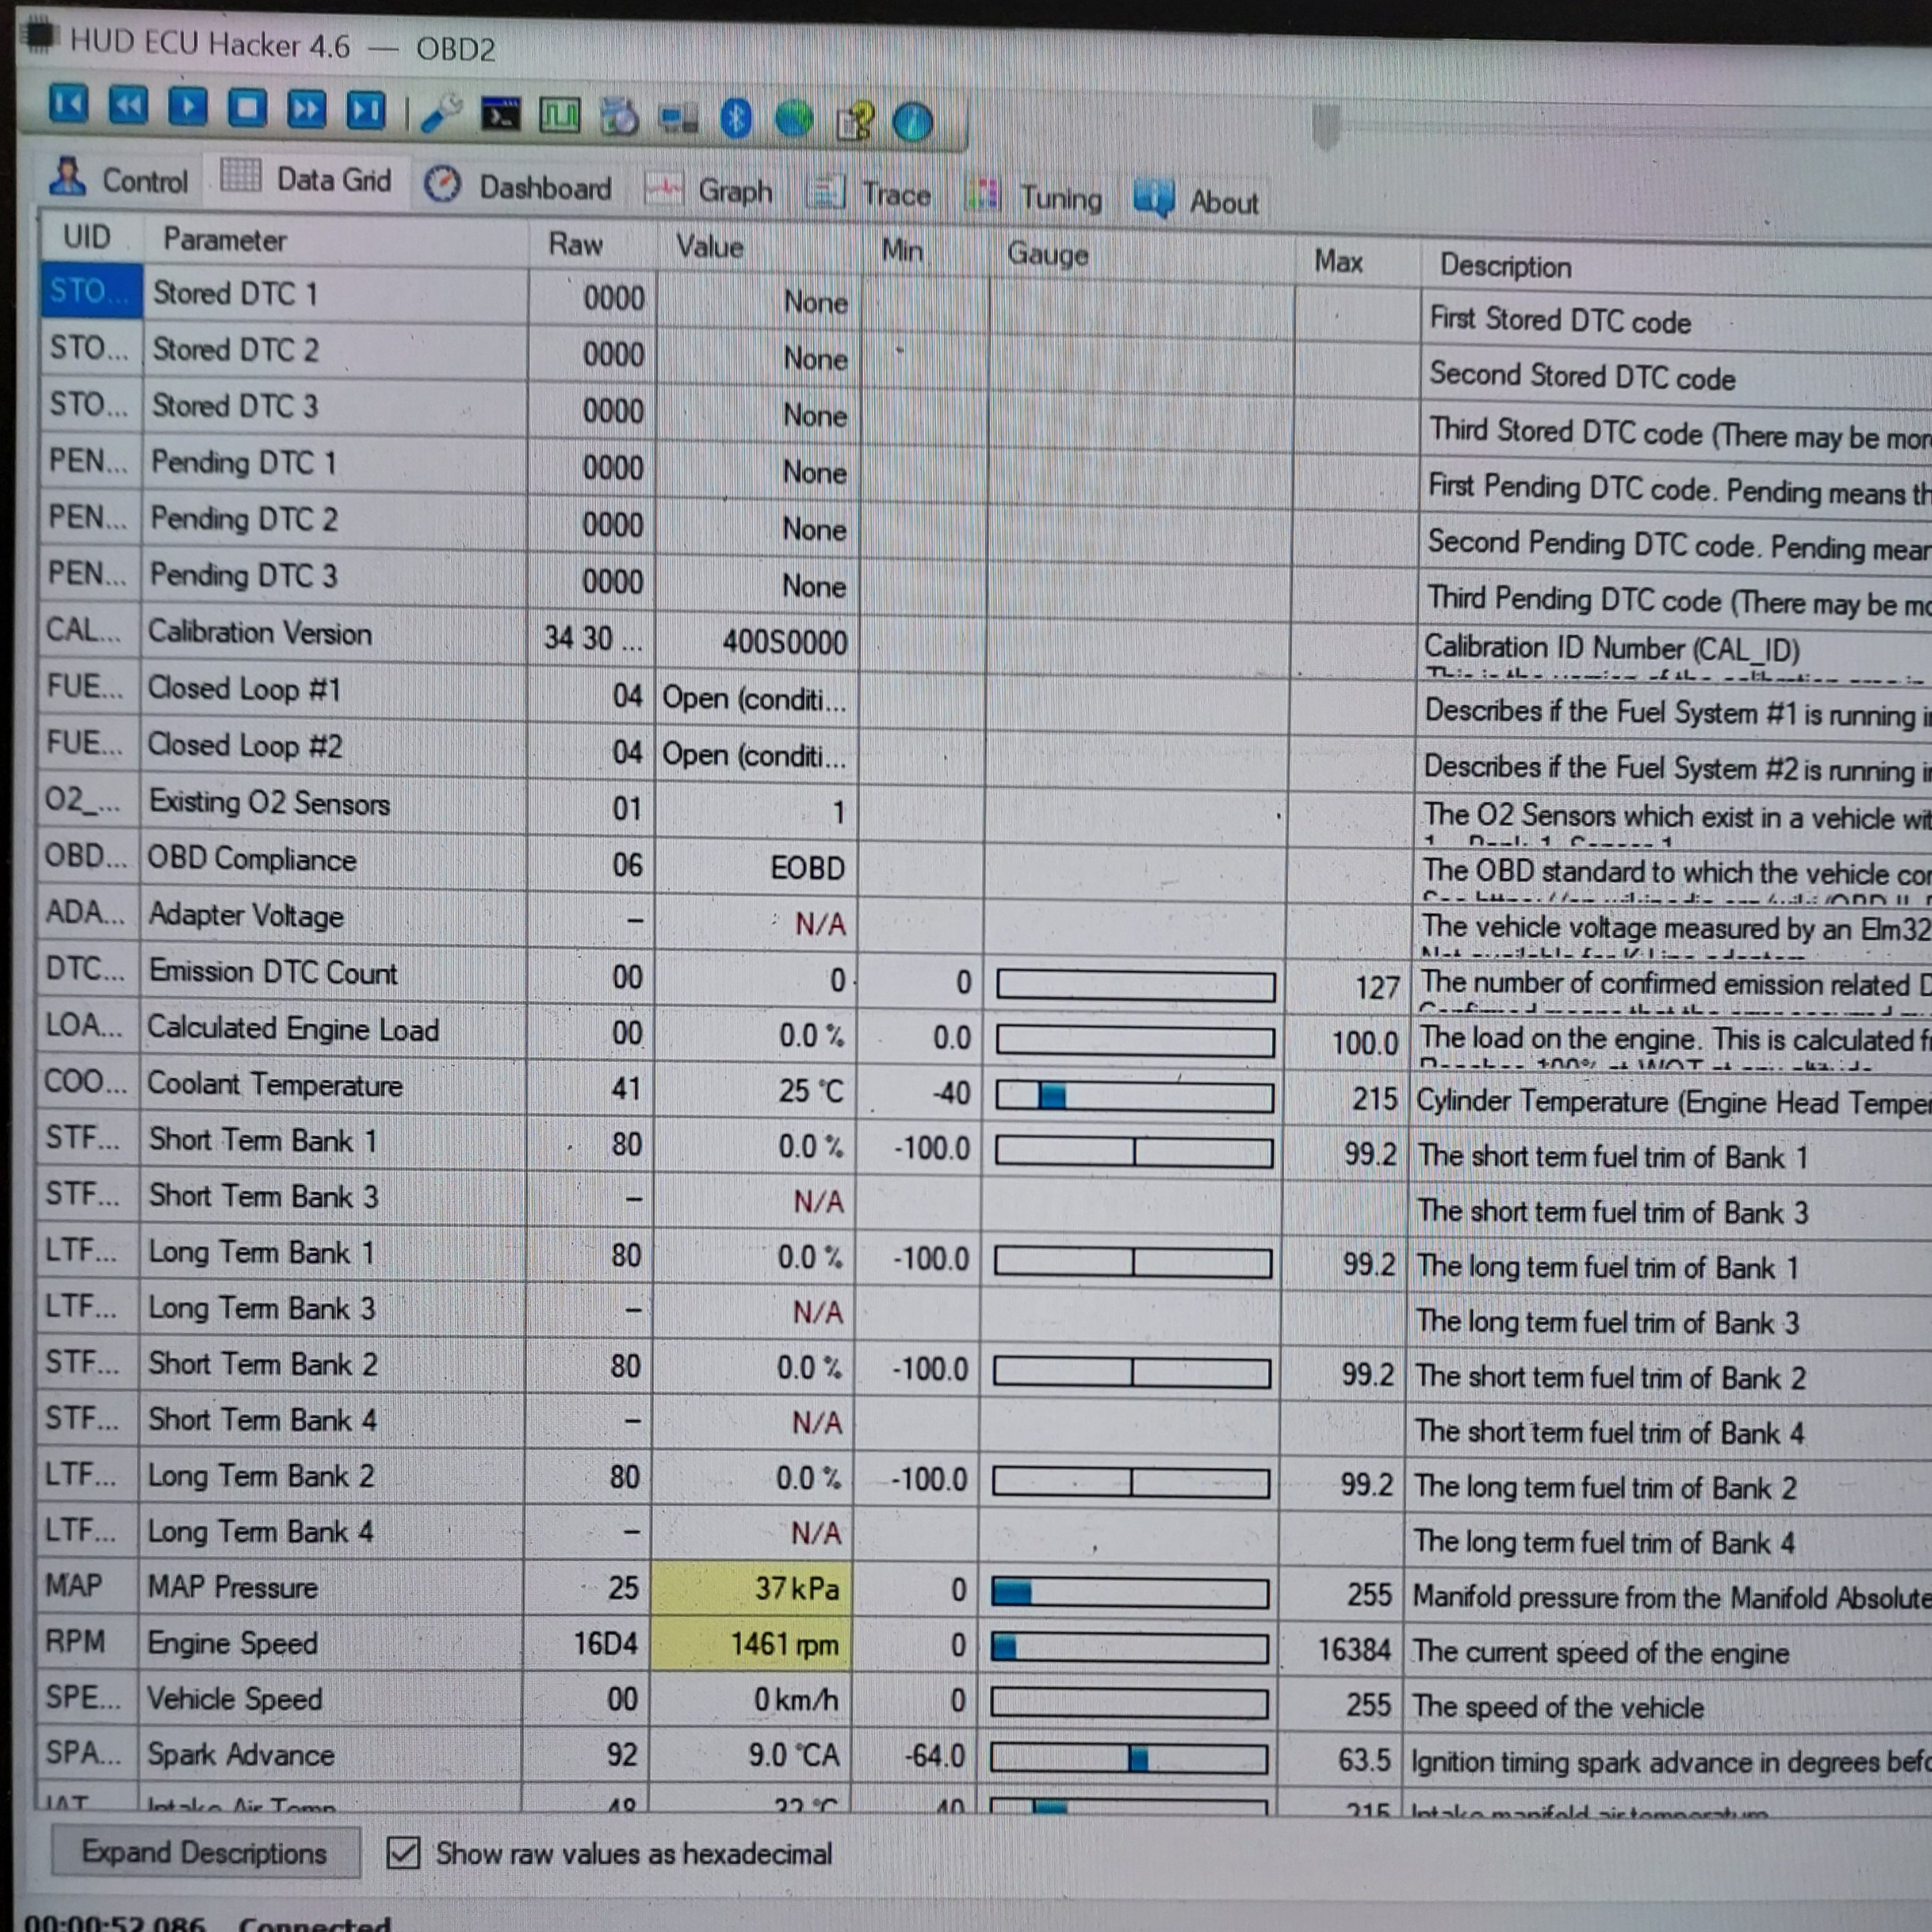
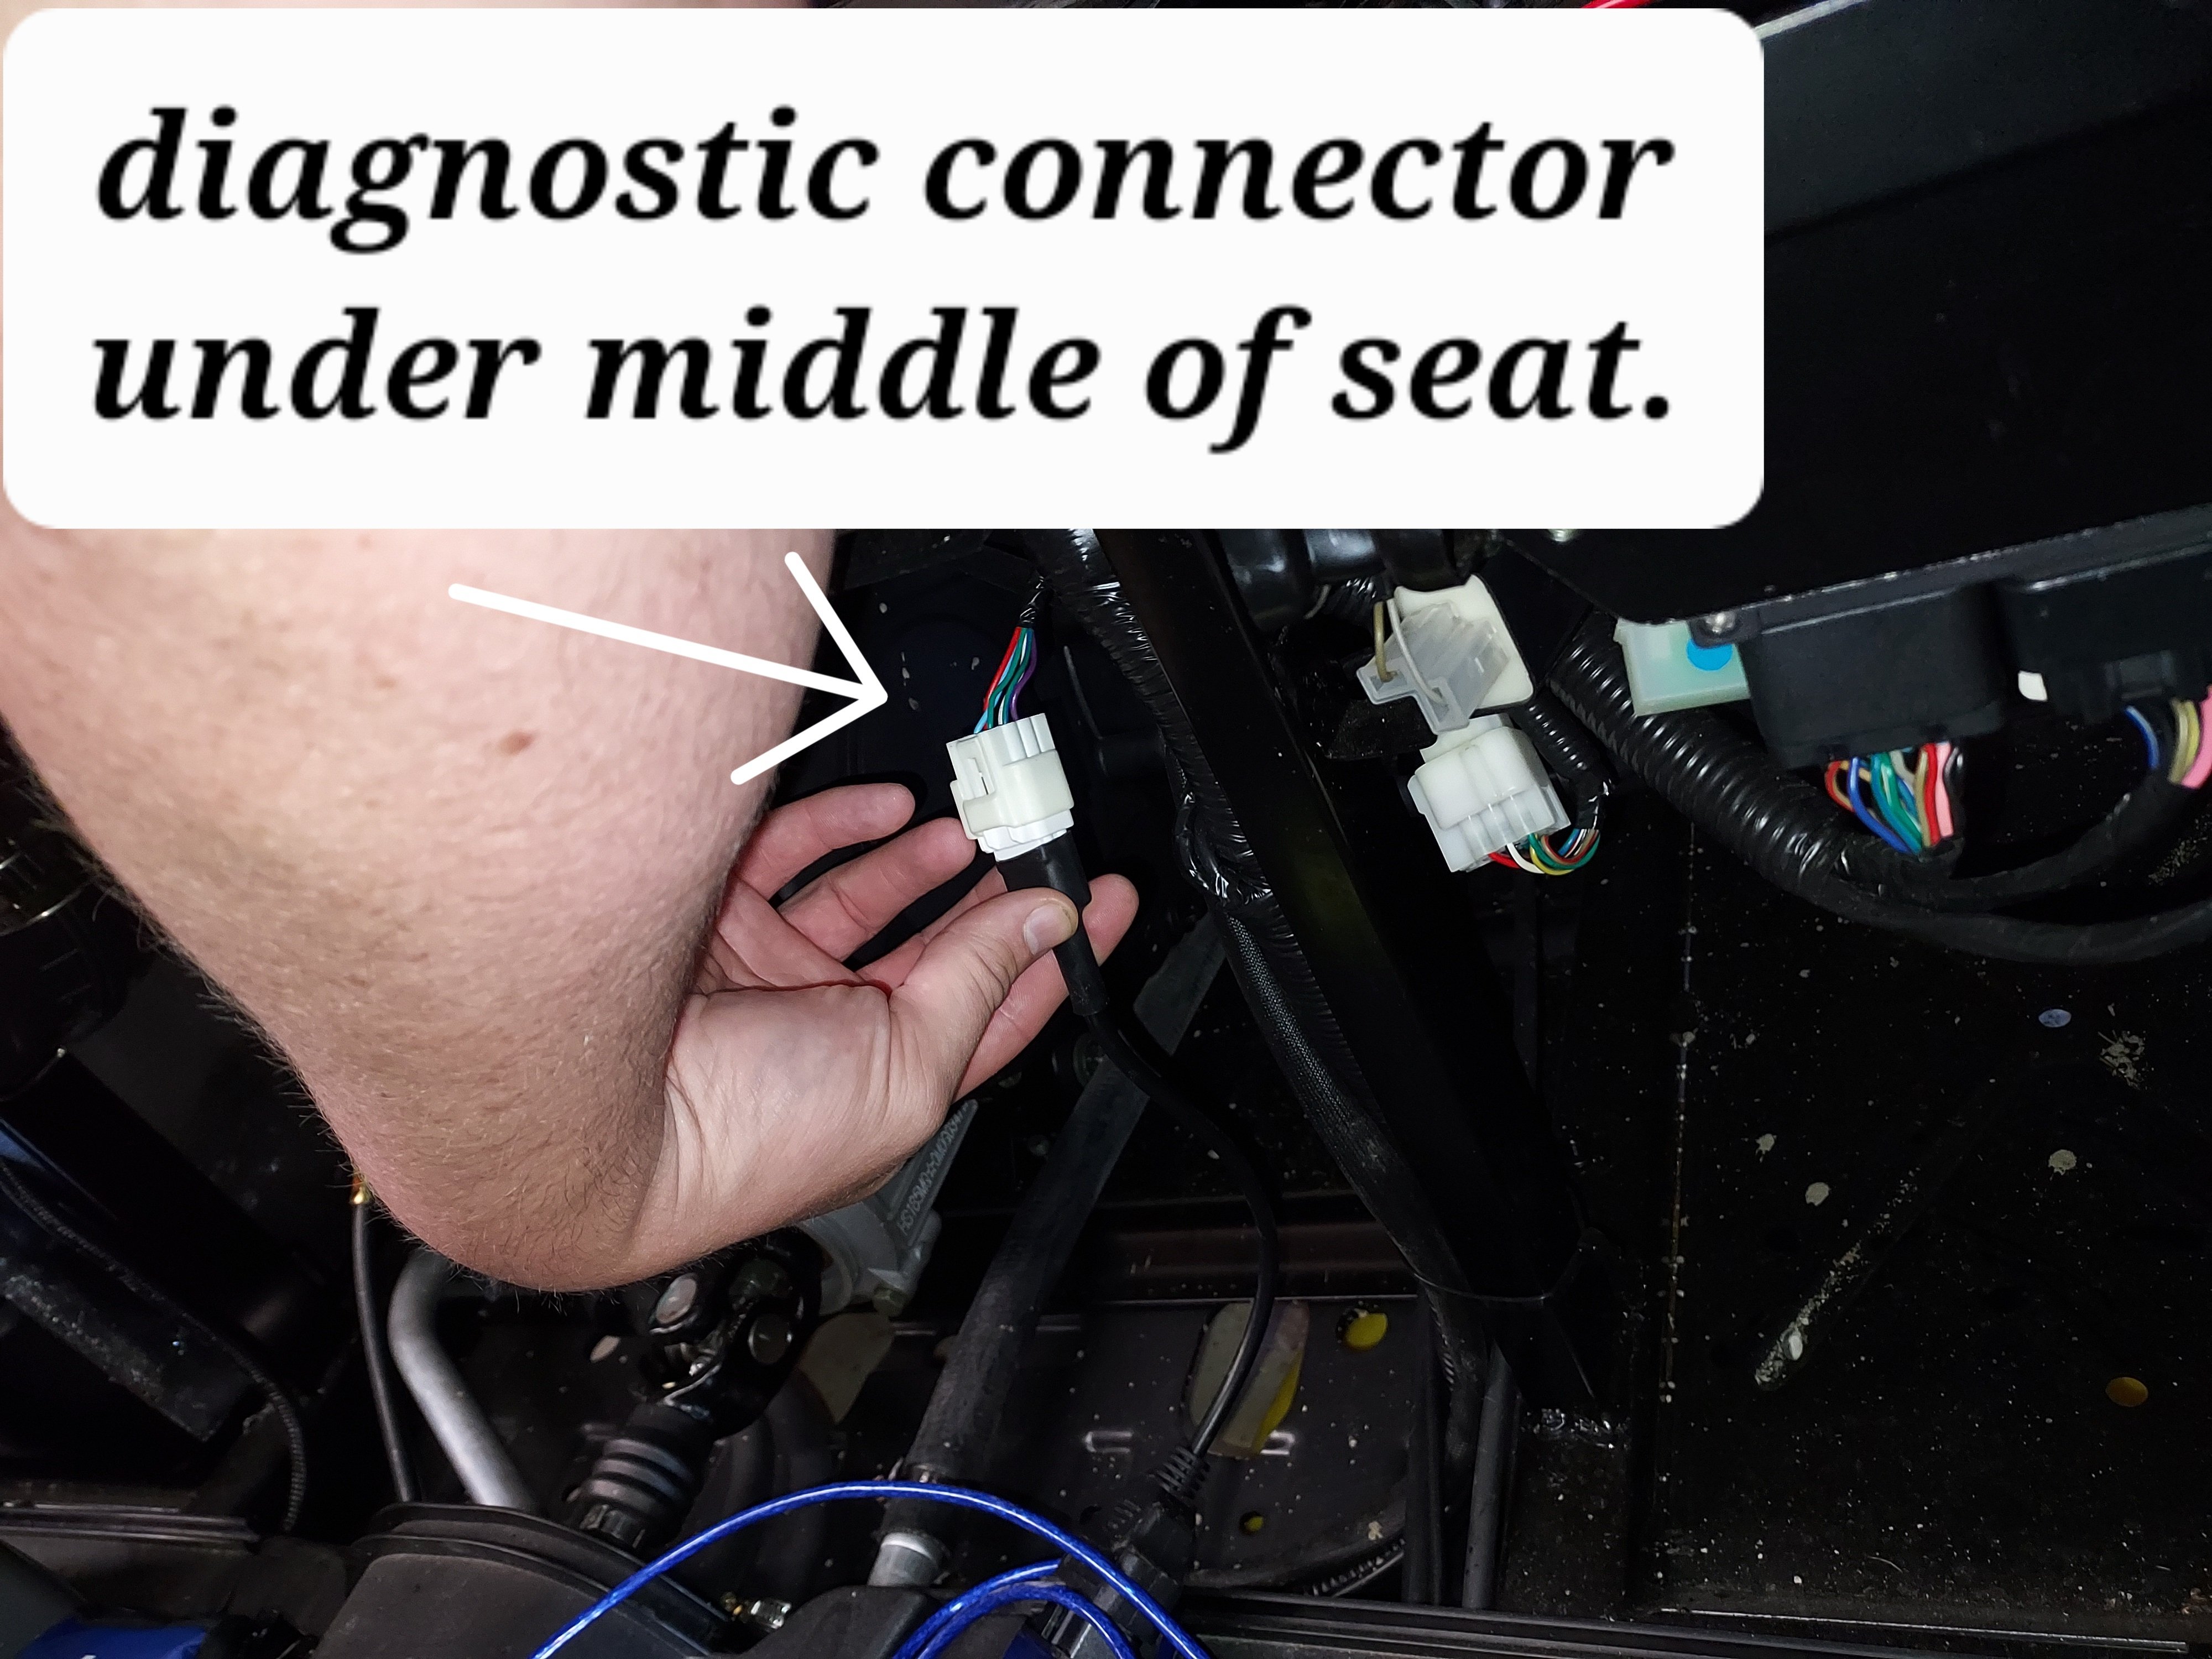
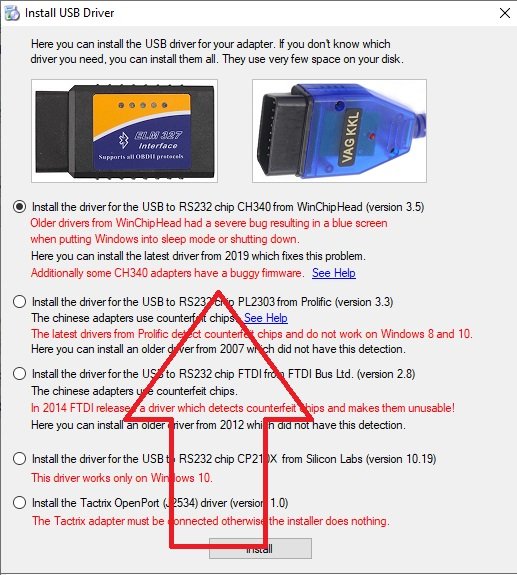
In order to connect with the ECU we need two cables. The first is a USB ODBII cable. HUD ECU Hacker’s documentation has a lot of different confusing options, but here’s what I went with and managed to get working, the cable is called “VAG KKL” it is a USB to ODB2 cable. It is available from a variety of sources for $10-15. The second thing we need is a “6 pin delphi to ODB2” adapter cable. It is also available for a similar price. In my case I ordered both from ebay, but there are other sources. Once we have our cable in hand we need to find the plug it in on your machine. My personal rig is a Coleman UT400, but the wire location should be similar for all Hisuns. My cable was located under the middle of the seat area. Just inboard of the battery, where the main wire harness split loom runs. The cable is a 6 pin (3x2) with a dust cap. Remove the dust cap and plug in the 6-pin end of the Delphi adapter cable. Note: When I was done, I left the 6-pin adapter connected, and zip tied it so it now runs to in front of the battery for easier access in the future. Next download and install HUD ECU HACKER DOWNLOAD Open HUD ECU Hacker on your PC It should prompt you to choose a driver to install. This particular cable uses the “CH340” driver (First choice on the menu) click to install, once installed hit the X in the corner to go back to the main page Once the driver is installed plug in the USB Cable, and plug the ODB2 end into the 6 pin adapter. The red led on the adapter should light up indicating it has power. Drop down and pick a com port on the main screen, it should show the VAG KKL adapter as a com port. Click connect on the main menu. It will pop up a bunch of fast scrolling text indicating it is connecting. Once connected you can click through the various tabs to see different data sets. The main menu also has the option to show fault codes, clear fault codes, reset the EPROM back to factory. The other function that may be helpful is recording a log file. You can record a log while operating the unit, and come back later and replay it to try to better diagnose what is happening. Within the various pages you will see the reading from each sensor. Sometimes a sensor reading will be off enough to cause running issues, but not enough for the ECU to realize its an issue. For example if the engine thinks it’s really warm, but its actually cold, it may not inject enough fuel to start. There are also more advanced functions, like adjusting fuel mapping, but that is beyond the scope of this tutorial. Full HUD ECU Hacker Documentation (Very technical reading) If you find this helpful give me a comment below or a thumbs up.
2 points
-
I have a screen. It helps but does not cure it. Running with front vents open also helps.1 point
-
head-gasket maybe1 point
-
Maybe on a day I'm not replacing the driveshaft! 😝1 point
-
Oh damn! I've seen those before. Yeah that is a solid idea to get. Thanks!1 point
-
Nice work I am going to give this a try thank you.1 point
-
That’s cool, didn’t know that, thanks. I didn’t see they mentioned checking the injector but they said they did. I believe they said they got a very good deal on this machine. If so, since they’ve basically checked everything they could, Maybe letting a service dealer take a look???1 point
-
I have a 2019 hi sun 750 I parked it in my garage last fall and about a month later I went to ride it and I had no power but the battery shows good. I’ve taken the ignition switch out and cleaned it. I cleaned the battery terminals and replace the main relay all my fuses are good. I still show strong battery but get no power, can anyone help or have any ideas? I have yet to find any wires chewed up like from a mouse or anything all the wiring looks good.1 point
-
Jay: Yes, maybe I'll try to snug up the tube's fit to the frame but leave it removable. I have some 3/16" flat stock that might do the job by fitting in on the outside of the hitch tube then bolting it in. Hadn't thought about the possible interference in maintenance you mentioned, perhaps of the rear differential. Will have to take a close look at how that might be removed in the future if the hitch tube were welded in there. Thanks for pointing that out. Joe: My wife says I'm crazy but I take your point about limited welding in case I find it has to be cut out at some future point. And OH YES!! that battery caution is well taken!! Thanks!!! By the way, have you ever heard of welding on a frame damaging any of the various sensors on a machine even with the battery disconnected? Good stuff here guys, thanks!1 point
-
Dont go crazy with the weld and you can always grind it out if you need to remove it..Dont forget to disconnect battery first..or buy a new one1 point
-
351 downloads
This is a complete service manual for the Kawasaki Mule 500,520 and 550 models. Topics covered include Brakes, Steering, Electrical system, suspension and fuel system. As well as engine repair procedures and Transmission/Final Drive procedures. ******************************************************************************************************************************************************************************************** If you need more information about the engine this manual linked below is chock full of information. Thanks goes to @cliffyk for getting these files all into one PDF format for uploading.1 point -
Acrobat (current version 2025.001.20997 64 bit) gives an error message indicating the file is mis-sized, and will only show partial pages. Adobe further indicates the resolution is to recreate the file and resave it using whatever software was used to create it. I've tried resizing and reformatting using Acrobat (full version, not Reader) to no avail. Does anyone know a solution, or can we ask the Author to rework the file please? Thank you!1 point
-
Here is the diagrams I used and I watched a couple of YT videos. The ones from the Hisun/Axis were junk. I will list the ones I watched in another post. Any links have to be approved by the admin. So it may take a minute before that post is up. The numbers in the boxes with Nm after them is the torque specs. But I think I tighten the head bolts to 40Nm instead of the 38Nm listed. I reused all old fasteners.
1 point
-
Complete guesswork here, but going with the easiest first - have you checked your 12V battery or replaced it? The items you mentioned are 12V driven I believe, and since the main pack constantly charges the 12V battery through the DC/DC converter it can hide the fact that the 12V is dying. Is there a chance the battery has never been changed an maybe it just got to the point where it couldn't drive the lights anymore but can still muster enough current to start the UTV initially? The only way to check the battery is turning off the 48V batteries themselves (if they have that function on each of them like mine) or completely disconnecting the 12V, and then checking the voltage. When I did that, I found out my battery was at 6V when it wasn't being propped up by the main pack. I didn't have any errors though. If it isn't that, looking at the wiring diagram it gets more complicated and all I can suggest is follow the wiring diagram from the 12V back to the combination instrument (the display).1 point
-
I have to disagree about beating a dead horse. Being persistent, polite, patient and non-threatening does pay-off. I have posted in the past on some of the issues I was dealing with, my list of problems was long and ever evolving, but they all were addressed up until the last one witch they said they were unable to repair After that Hisun took a different approach and I ended up with a new and different model. Have one problem with the new one but am working to get it resolved. Don't expect anything much to happen around the holidays but things will get resolved in the end. I do not really see a point in going to Honda, Kawasaki or another brand. They all cost much more comparably equipped and if there is no local dealer for service you have gained nothing. I am wondering why Hisun did not send a Road service Tech to address the issues you that you are dealing with, that's what those guys deal with.1 point
-
I hate to be the barer of bad news but you are beating a dead horse..I fought with Hisun and Massimo from the first day i owned it..They refused to honor warrenty , and laughed when i threatendd legal action..I tried bbb , consumer protection , attorney general..got no where..these people are untouchable..you will get nothing from them..find a local mechanic and pay cash..that was my solution..6 different breakdowns in first 6 months...I learned my lesson...only buy from a local actual orv dealer that you can sue if he screws you1 point
-
My bad completely misread the post. I have no clue what the issue could be. Only think I can suggest is try rocking forward and backward while trying to shift. But definitely looks like something is in a bind.1 point
-
Turns out the relay switch was missing. As stated, it was a demo model, so they probably removed it and gave it to another customer or whatever the reason. They dispatched both a relay and switch and I received them the same day. Plugged them in and my issue was resolved. Hard to find something when it isn't there...OMG!1 point
-
Did the lights come with any instructions? If not, go to their website where they will have instructions, I looked. They also have a support phone line, that would be your best resource. They apparently have a wide selection of lights and may have various wiring options.1 point
-
You need a pack that under all conditions will cope with the max demands of the motor controller. If you ave a decent pack of a high Ah, its never under stress, that means lower heat, that means longer lif. When not being pushed to the limit a pack will hold its voltage up, if a too small pack is pushed the voltage drop will be much greater and more quickly show up poor cells. This is especially the case with cheaper lifepo4 which generally are not as good at holding voltage as Li Ion (Nickel, Manganeese, Cobalt ) So if you go for cheaper Lifepo4 always have enough Ah or more than the minimum.1 point
-
That's exactly what i recommended. Like I said, those using it are used to the clutch slipping (they are clueless), so hopefully it won't get worse if we switch oil, twice.1 point
-
Change oil , run a few days and change it again is what I would try..oil is cheap, changing clutches is not1 point
-
Got my Massimo T-Boss 550 back. It took a while, almost 2 1/2 months. The problem causing it to be locked in 4 wheel drive was the front Wheel drive Servo. The shop I took it to is the only shop in my area that works on them. The shop seemed to be really busy, as every time I called to check in I had to leave a message. Only answer I got was "waiting on parts" I finally drove to check up thinking it may have disappeared. When I got there It was sitting outside, but the shop was full with all brands, plus three Massimo's . The owner was loading up a trailer to deliver to their owners. Yes, he does pickup and deliver. His employee told me they had tried to unlock the front end with no luck. The new part was in, but they thought they would have to return it since they said they checked the old Servo and it did actually work when tested not installed. They wanted to show me. Well when they tried to show me the old unit, which only had 27 hours on it, did try to work. Well it didn't . They put on the new one and low and behold it worked. I test drove it, worked. I am hesitant to use the wheel drive completely locked up, but the few times I have tested it, It works. Glad to have it back and I am back to spraying my fence lines. The weeds had gotten out of hand. To many miles of fence line to spray with a hand held pump. All caught up now. Fingers crossed that this was a fluck !!! The shop owner said he will be becoming a Massimo dealer in the near future. They are good units if gone through and serviced before the sale. The ones sold strictly through a certified dealer should have all the minor adjustments done with all oils checked and everything lubed before sold. Cost from an ATV./UtV dealer may cost a couple hundred more, but worth eliminating the issues.1 point
-
I hate to bring up an "old" thread, but did you ever get this solved? I have exactly the same issue with my 2021 Hisun 750 ATV. I attempted to start it a week ago, it turned over, then just shut off completely after abut 5 seconds...No power to the dash, winch, lights, turn signals, etc. will not turn over or start. Shorting the solenoid will only spin the starter motor, and not actually "start" the vehicle. I read somewhere else about a "dash ECU Fuse" causing a similar problem - mine tests fine with my multimeter.... I need my machine to work!1 point
-
Thats scarey to me1 point
-
Yes it is much better then the factory option Kioti offers. They break off once you hit a tree branch. Very poor design! But this option works very well.1 point
-
You really want to use an automotive or motorcycle battery tester to test your 12 V battery, and not just a multimeter. The automototive tester will apply a load to the battery and measure the voltage while the battery is discharging through the load.1 point
-
I don’t think I agree with the tech’s advice about off road only. The machine doesn’t know or care where you are. Now there will be added stress to the clutch on road if you make tight turns. This is because the rear wheels are fighting one another and increasing rolling resistance. However, off roading also increases rolling resistance. Compare pushing a loaded wheelbarrow on concrete vs across the lawn. Point is, just drive the machine and don’t worry about this stuff. If the clutch wears out- replace it. About the only thing I’ve found that can’t be fixed is stupidity. And as yet I haven’t detected much of that on this forum. Pop Bob1 point
-
Thanks CMS, not sure I will go this route but will watch the local auctions for "boat parts" & see if a good deal can be had. If so, I think I'd give it a try. This is the KFI kit and appears fairly simple in concept. (1st pic). I can easily fab a bracket and mounts for a hydraulic cylinder. I'd use an electric actuator but the light aluminum tube used on most of those concerns me that repeated pressures from the blade in heavy snow would doom them to early failure. Also many use plastic drive gears. One other option might be a self contained 12v pump/cylinder unit but those are kind of pricey too at $300 to $400. (2nd pic below). For now it looks like planning a plow pattern favoring mostly one position with maybe one angle change change just to clean up.
1 point
-
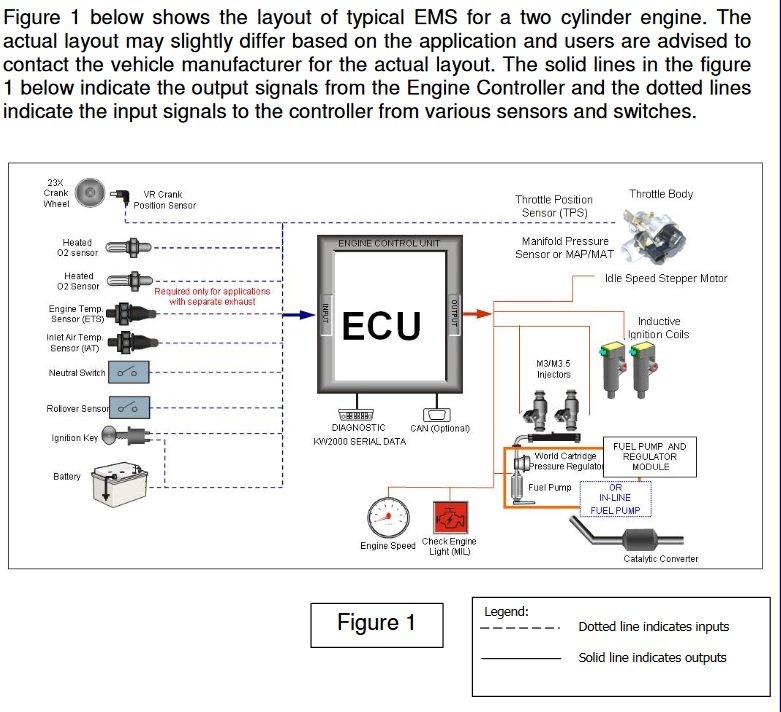
This post will explain how to hook up your PC to the ECU of a Hisun/Coleman/Etc UTV to be able to read error codes & engine parameters for troubleshooting purposes. This is applicable to all small engines using the Delphi MT-05 ECU. This should cover all fuel injected Hisun models, as well as various other Chinese FI engines, as the Delphi MT-05 ECU seems to be the favored ECU solution. Even though we get actual engine error codes to display on the dash, sometimes we have “pending codes” (not yet confirmed by the ECU) or other intermittent issues that are hard to diagnose, for example a poorly connected sensor that may give intermittent false readings, or a sensor that’s putting out bad date, but not bad enough for the ECU to realize. The setup requires 2 cables, which are available for around $25 combined, a PC with a USB port, and some charityware software called “HUD ECU Hacker”. This gives the same functionality as the $300 dealer code scanner for a fraction of the price. In searching I found info about HUD ECU Hacker, but I have yet to see info anywhere about how to hook it up to a Hisun, so I took the leap and bought some cables, and made it work. I will show a step by step of how to do so in post two. I will be breaking this down into 2 posts: Delphi ECU Info & Overview (This post) System setup & use Delphi ECU Info (Skip ahead to the next post if your eyes glaze over technical details) The Delphi MT-05 ECU was developed to allow small engines to use fuel injection. A fuel injection system requires feedback from various sensors to operate efficiently. This feedback allows the adjustment of ignition timing, fuel injection volume, etc to efficiently and cleanly produce the most power possible from a given engine. The MT-05 ECU has a number of sensors that are required for proper functioning including; Coolant temp, crankshaft position, intake temp, intake pressure, exhaust O2, throttle position, as well as some other optional sensors that are used on more complex vehicles. From the sensors the ECU adjusts: Fuel injector timing/pulse, Idle air control valve, and ignition coil The Delphi MT-05 puts out diagnostic data, however it is not ODB2 like a modern car, where is where it gets tricky reading it. There are three options, there is an old 16 bit piece of software Delphi has that is not able to run on a modern computer, there is the motorscanner tool for dealers ($300), or there is freeware HUD ECU Hacker with the proper cables.
1 point
-
I see a couple of these folks posting have the old Hisun models, hey Joe! Read much about them and it won’t take long to figure out they sucked. I have had only two issues with mine and one was caused by bad gas. Drained the tank and everything was fine again. Getting the shifter to smooth out was the only real issue. I’ve been able to get parts like plugs, filters and injectors with no problems.1 point
-
You would have to do the research on axle fitment hubs etc. Motorcycle doctor has most the microfiche. Unless your worried ab9ut tearing up your lawn on sharp turns unlocking diff simply has more parts to break inside... just saying1 point
-
what year is your trooper, at one time I had a lot of 08 photos on forum, may still have them on another computer hard drive1 point


This leaderboard is set to New York/GMT-04:00
