
Leaderboard


Popular Content
Showing content with the highest reputation since 07/19/2025 in Posts
-
2020 Massimo T-Boss 410 efi, UTV has approx. 600 miles on it. Traveling down a dirt road at 20 mph and slowed down to make a sharp turn, engine stuck in fast idle. Fast enough that the clutch would not disengage. Forced it into neutral and punched gas pedal trying to get the idle speed down to where it should be. Idle started to come down from the fast idle then in about four seconds the RPM dropped to zero and engine would not restart. Towed it back to the cabin. No one around here will work on Chinese UTVs so if I don’t fix it will be just another P.O.S. Checked: Spark plug sparks. Fuel injector injects. Rocker arms rock, cam turns Will not run on a prime. (Prime, squirt gas in the spark plug hole, replace the spark plug and attempt starting the engine.) Ordered an OBD reader and the adapter for the Massimo /Delphi 6 pin connector. Down loaded fault codes from the; Delphi MT05 # 28265491 ECU P0311 Cylinder 11 misfire detected P1800 Manufacture Control P0711 Trans fluid temp sensor A PIC Manufacture Control None of these fault codes matched up with any published list of the Massimo/Delphi ECU and fault code reader would not reset codes. With all these nonsensical codes it must be a faulty ECU. After all how can you have a misfire on Cylinder 11 when it’s a single cylinder engine. Ordered and Install a new Delphi MT05 28265491 ECU. (Fig. 1) After attempting another unsuccessful start the new ECU showed P0311 Cylinder 11 misfire detected. Now I know what “P0311 Cylinder 11 misfire” means. It means the engine is not running and the ECU does not know why. An engine needs three ingredients to run, Fuel, Compression, Ignition. Confirmed it has spark, fuel, and assume it has compression. After all it had enough compression to run moments ago. Ordered a compression gauge that fits that little spark plug hole used in the Massimo to get a real reading. Compression test, 35 psi. OK, now I know why it will not run. Guess the cylinder head has to come off to find out why it has so little compression. EUREKA, FOUND IT! A small piece of metal stuck in the intake valve seat. (Fig. 2) Therefore the intake valve would not fully close. After further examination found a piece of aluminum mesh stuck in the intake port. (Fig. 3) Checked the cylinder bore for defects caused by the aluminum fragments. None were found. Removed the aluminum fragments from the head and reassembled the engine. (Fig 4) The valve timing was a challenge doing this in the field. After reassembly tested compression, 165 psi. Attempted another start. Started right up and ran as good as it did before. Shut it down right away to check for more aluminum mesh in the induction path. The air filter is where the aluminum mesh came from. (Fig 5) Now that all the facts are in, this is what happened. The 352cc, Chinese made Linhai single-cylinder, 4-stroke, liquid-cooled, SOHC engine with Electronic Fuel Injection (EFI) and 25.5 horsepower is a very rough running engine with excessive vibration. It rattled and shook the air filter to the point where the screen on the inside of the filter fatigued and piece of screen broke off. The screen fragments traveled down the induction path and lodged in the throttle body jamming the throttle plate preventing the engine from returning to idle speed. When I punched the gas pedal the screen dislodged and traveled to the intake valve where the screen got stuck preventing the valve from closing. The engine died and would not restart. Now I know, change the air filter yearly whether it needs it or not. Took 20 min. of running the UTV for check engine light to go out.
 4 points
 -
Unplugging the connector doesn't cost anything and does not suggest one should not wear the seat belt. However, freedom of choice is ours in this country and as long as we accept the consequences of our choice it should not be judged by big brother.3 points
-
1st buy from a reputable dealer w their own service dept. I own a dealership in DFW and when someone buys from us we take care of legitimate warranty work regardless of hisun pre approval and we pre delivery inspection before we accept from hisun and then our mechanic does a full inspection before it is ever offered for sale, BUT if you bought box store to save a couple bucks ( you don't really as our units have far more options standard but some people only think $ 500 cheaper) they are never inspected just dropped off a truck to sit till you buy it. Box stores offer no service either - NONE! we are an authorized service center but we don't wait for hisun to approve your work if you didnt buy from us, we get it done BUT you pay for the work upfront and get reimbursed what we get when we get it and no more. So buy from a GOOD DEALER and you will get taken care of if needed without a wait for warranty approval. Plus we have numerous sources for new parts besides hisun older parts if necessary off salvage units we buy. As for massimo/ hisun as a person replied in dec 2025, hisun hasn't built Massimo branded units in many years as I inderstand because of massimo failure to handle their own customer issues on their rebranded product. Matches what you said about massimo issue you had, but massimo is the distributor and accepts that responsibility. Bad Boy UTV current does same w Hisun but they are Bad Boys units and BB responsibility. Hisun takes care of hisun branded product. Additional hisun use to be imported by a distributor in US much like massimo but Hisun factory took it back from distributor due to service and bad reputation problems with that distributor. Now Hisun is hisun owned and making big push to build US market and take care of customers. I call the head of Hisun US and he always answers or calls back promptly and is very motivated to help if we have an issue. If we cant find or fix something they will send head factory service person out to our shop to help. As for bad reviews, most people only do a review if unhappy so they tend to be higher. Also many never even owned one and post bad comments because it is Chinese, but truth is many parts and components for all brands are made or built in China. Finally, go to Facebook group for Hisun. Tons of happy long term satisfied owners. The 400 model has been around for ever, is almost just like a mule and people have owned and run them for years and love them and it's the base cheapest model. Finally all brands gave problems on some units. A friend had a can fully enclosed H and A. O paid over 40k and problems from day 1 and finally forced can to buy it back! Years ago I had Polaris unit. Would just die a refuse to restart for hours or days. Polaris never was able to fix it. Someone stole it from my farm and didn't even realize it was broke down again sitting there Ha! Long but hope all this helps. You can find us on hisun dealer list if anyone wants to reach out for anything. Glad to try and help out if we can.2 points
-
There are a lot of factors in play. This thread has been going on for almost four years and the availability of replacement batteries has increased quite a bit over that time. What country you're in comes into play, too. We have people from Europe/UK, Canada, US, and Australia and the available selection can be very different. Those in the US seem to have the greatest number of options. I did my conversion almost three years ago and at the time there were very few GC2 form-factor lithium batteries in the US market, and really only one maker that had 48V batteries with a high enough constant amp output to match the Hisun motor. You could probably spend anywhere from $1,500-$5,000 US depending on what combination of amp output, capacity, and form factor you're looking for. GC2 form was important to me so I could just drop in replacements without customizing the tray to hold a physically larger size battery, but some of the conversions here did do just that. You'll pay more for batteries that have cross-BMS connections so all the batteries "talk" to each other to optimize output and charging, but depending on your use that may not be necessary with batteries connected in parallel. Gorj got to 48V using 12V batteries wired in serial, I and a number of others went with 48V batteries and went for increased amp output and capacity by using (generally) four GC2 form factor batteries. Some of the conversions just used one or two very large form factor batteries. Most of us also added a digital readout. You just have to weigh your own local battery availability, cost, ability to customize, time, performance needs, and how long/far you want to be able to go between charges (capacity). For me, four 48V batteries that combine to 120ah and a continuous output rating of 400A has been great on my 6 acres of wooded property with lots of uneven ground and some fairly steep hills. I never get below ~70% in a day even when running a 120V inverter for power tools, but I also get to plug in the evening. If you plan on going far into the wild for a few days then of course you will need more capacity. If that includes heavy loads and steep hills you want to make sure your amp output is at least 400A. By going with the 48V GC2 form batteries, I reasoned that if I later found I needed more capacity I could easily just add more batteries in parallel. I've found those four have been enough for me, but I can see how others would need more. The good news is that there are a lot more options now than years past and you can customize your solution to you.2 points
-
2nd UPDATE: It ended up being the single wire sensor in the head that controls that light swapped it out and light went out2 points
-
cut your financial losses and your stress level....scrap it, and go buy honda or kawasaki..........2 points
-
Top quality work!2 points
-
So here’s the setup I used to replace the Silent Rider silencer. Materials 2” 16 ga mandrel bent 90 deg elbows (2 pieces) [90 deg elbow] 2” 16 ga mandrel bent 90 deg elbow with tail piece [90 deg + straight] 2” resonator [resonator] Rubber exhaust hanger (note- only used one) [hanger] 2” butt joint band clamp (2 pieces) (note- the exact brand I bought is no longer on Amazon but here’s an identical one) [butt clamp] 4” diameter band clamp (2 pieces, local hardware store) To make the exit pipe from the original muffler, I used the original spark arrestor flange cut from the arrestor and opened the ID to fit the 2” elbow OD. Then I welded the first elbow into the stock flange and welded the second elbow to the first at 90 degrees. The orginal trim ring can slide back over the pipe into place for aesthetics. This forms the new exit pipe to the resonator. In addition, I used some 1” x 1/4” flat stock and a piece of 1/2” rod (cut from a stainless bolt) to fab up the upper hanger that bolts to the Hisun frame, and a piece of 1/8” plate formed to match the radius of the resonator that I welded to a short tab and another 1/2” bolt shank rod. The 4" band clamps attach the resonator to the plate, and the rubber exhaust hanger provides support and vibration isolation. So originally I had intended to have the tail pipe extend straight down, but the elbows I chose wound up a bit longer than anticipated and conflicted with the rear wheel. I shortened the elbow legs on either side of the resonator as much as practicable while maintaining what I estimated to be minimum safe clamping area of about 1” to 1-1/4” (which also required “notching” the band clamps on the inside bends, see photos). I was able to get the tail pipe piece off of the tire, but it’s still pretty close and cannot aim straight toward the ground. Doesn’t look as clean, but I deem it acceptable and it does not heat the tire. I will turn down the last few inches at a later date, which should also reduce sound a bit more. So how does it perform I'm sure you are wondering... ***OUTSTANDING IMPROVEMENT!*** Much quieter, particularly outside the vehicle. Definitely quieter than the Silent Rider and lower cost (at least from my perspective since I could fab up the bits). Moreover, the stainless should last the life of this vehicle. Not a simple install for the average owner, but a muffler shop or local welder could do it for you. If I had to do this again I might source some tighter elbows or I would just shorten all the legs and weld up everything including the resonator in order to get the tailpipe straight down. But I didn’t want to weld in a resonator in general just to make it more serviceable, and also definitely not until I had assessed the performance of the mods and the selected resonator. You might look at the Evil Energy ones...more expensive but it looks like all stainless. Also, the exhaust clamps I ordered do not have stainless bolts. And finally there are more heavy duty band clamps available for the resonator that I may switch to in the future. Sorry I forgot to take a picture of the resonator hanger before installing, but you should be able to see it clearly in the installed pics. Post any questions and I’ll reply as best I can.
2 points
-
I have all the parts but I’m traveling. Should post installation in about 2 weeks.2 points
-
I’ve ordered some stainless pipe and a stainless silencer. It will be a while (probably 6 weeks) before I can get it all installed, but I’ll post the parts and results then.2 points
-
We have a new Axis XS 750 and live in east Texas. My wife also has a John Deere 955 tractor with loader, back hoe, auger, and brush hog. I also have a Ford 600 tractor with a cultivator, and a cub cadet lawnmower..we have 22 acres of trees and are working on trails through it. We believe that the UTV will be a great addition. Any thoughts on the winch? And we still need to get a working remote control form Lowes where we bought it. They are not UTV EXPERTS. The remote control battery reads9.3 voltage, it’s a 12V battery. I hope that is the only problem. Works with the incab switch but not really practical for normal use and requires a 2person operation to use the in-cab switch with any speed. Looking for a window kit for doors and back window, and additional support racks possibly. Any feedback would be appreciated Gar.2 points
-
Welcome from north of Tyler2 points
-
When a new clutch it is supposed to be soaked in the correct oil for 24 hours. So maybe changing to the correct oil and a few oil changes will prolong the life of the clutch. But I will probably need to be changed in the near future. When changing the oil. Disconnect the hose at the top of the radiator that goes into the oil cooler. Do not use an air compressor. Just use your lungs and blow the oil out of the cooler back into the engine. Then hook up the hose back to the tube and unhook from cooler. To blow the oil out of the tube. You'll get most of the bad oil out that way. If you do use an air compressor be careful and remember I told you not to use the air compressor. Good luck.2 points
-
Updated profile, burned wire replaced, first battery connected, CAN port connected to digital LCD screen; everything looks good so far. Glad that onboard charger didn't appear to burn out due to whatever caused the burned wire.2 points
-
All of those issues you mentioned are run off the small 12 volt battery and have nothing to do with the drive battery. Did you reprogram the charger for the lithium battery? I would check your 12 volt system. Possibly you have lost your 12 volt ground. Good luck!2 points
-
That exact failure occurred with my 750 with about 3500 km. It's clearly a factory defect...either the splines are not hardened or they just corrode and degrade from moisture. Really ought to be greased IMO but mine was dry as the desert from the factory. When I replaced, I greased the parts well for assembly.2 points
-
I asked HISUN Tech Support exactly that, and the answer is no. I also found out that it is probably not my rear differential that has gone bad. It is more likely that the splines in the coupler have sheared. It's engineered for them to fail first, in order to save the differential. In any event, the HISUN Tech Team is going to work with our local repair facility, to walk them through diagnosing and repairing our Sector 750 EPS. Hopefully it is just a $20 coupler.2 points
-
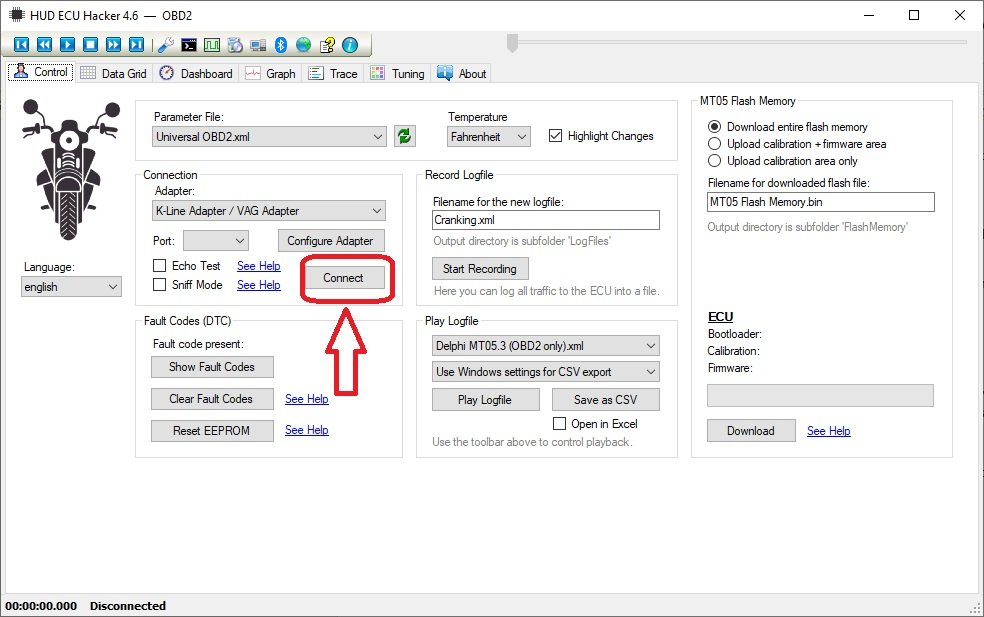
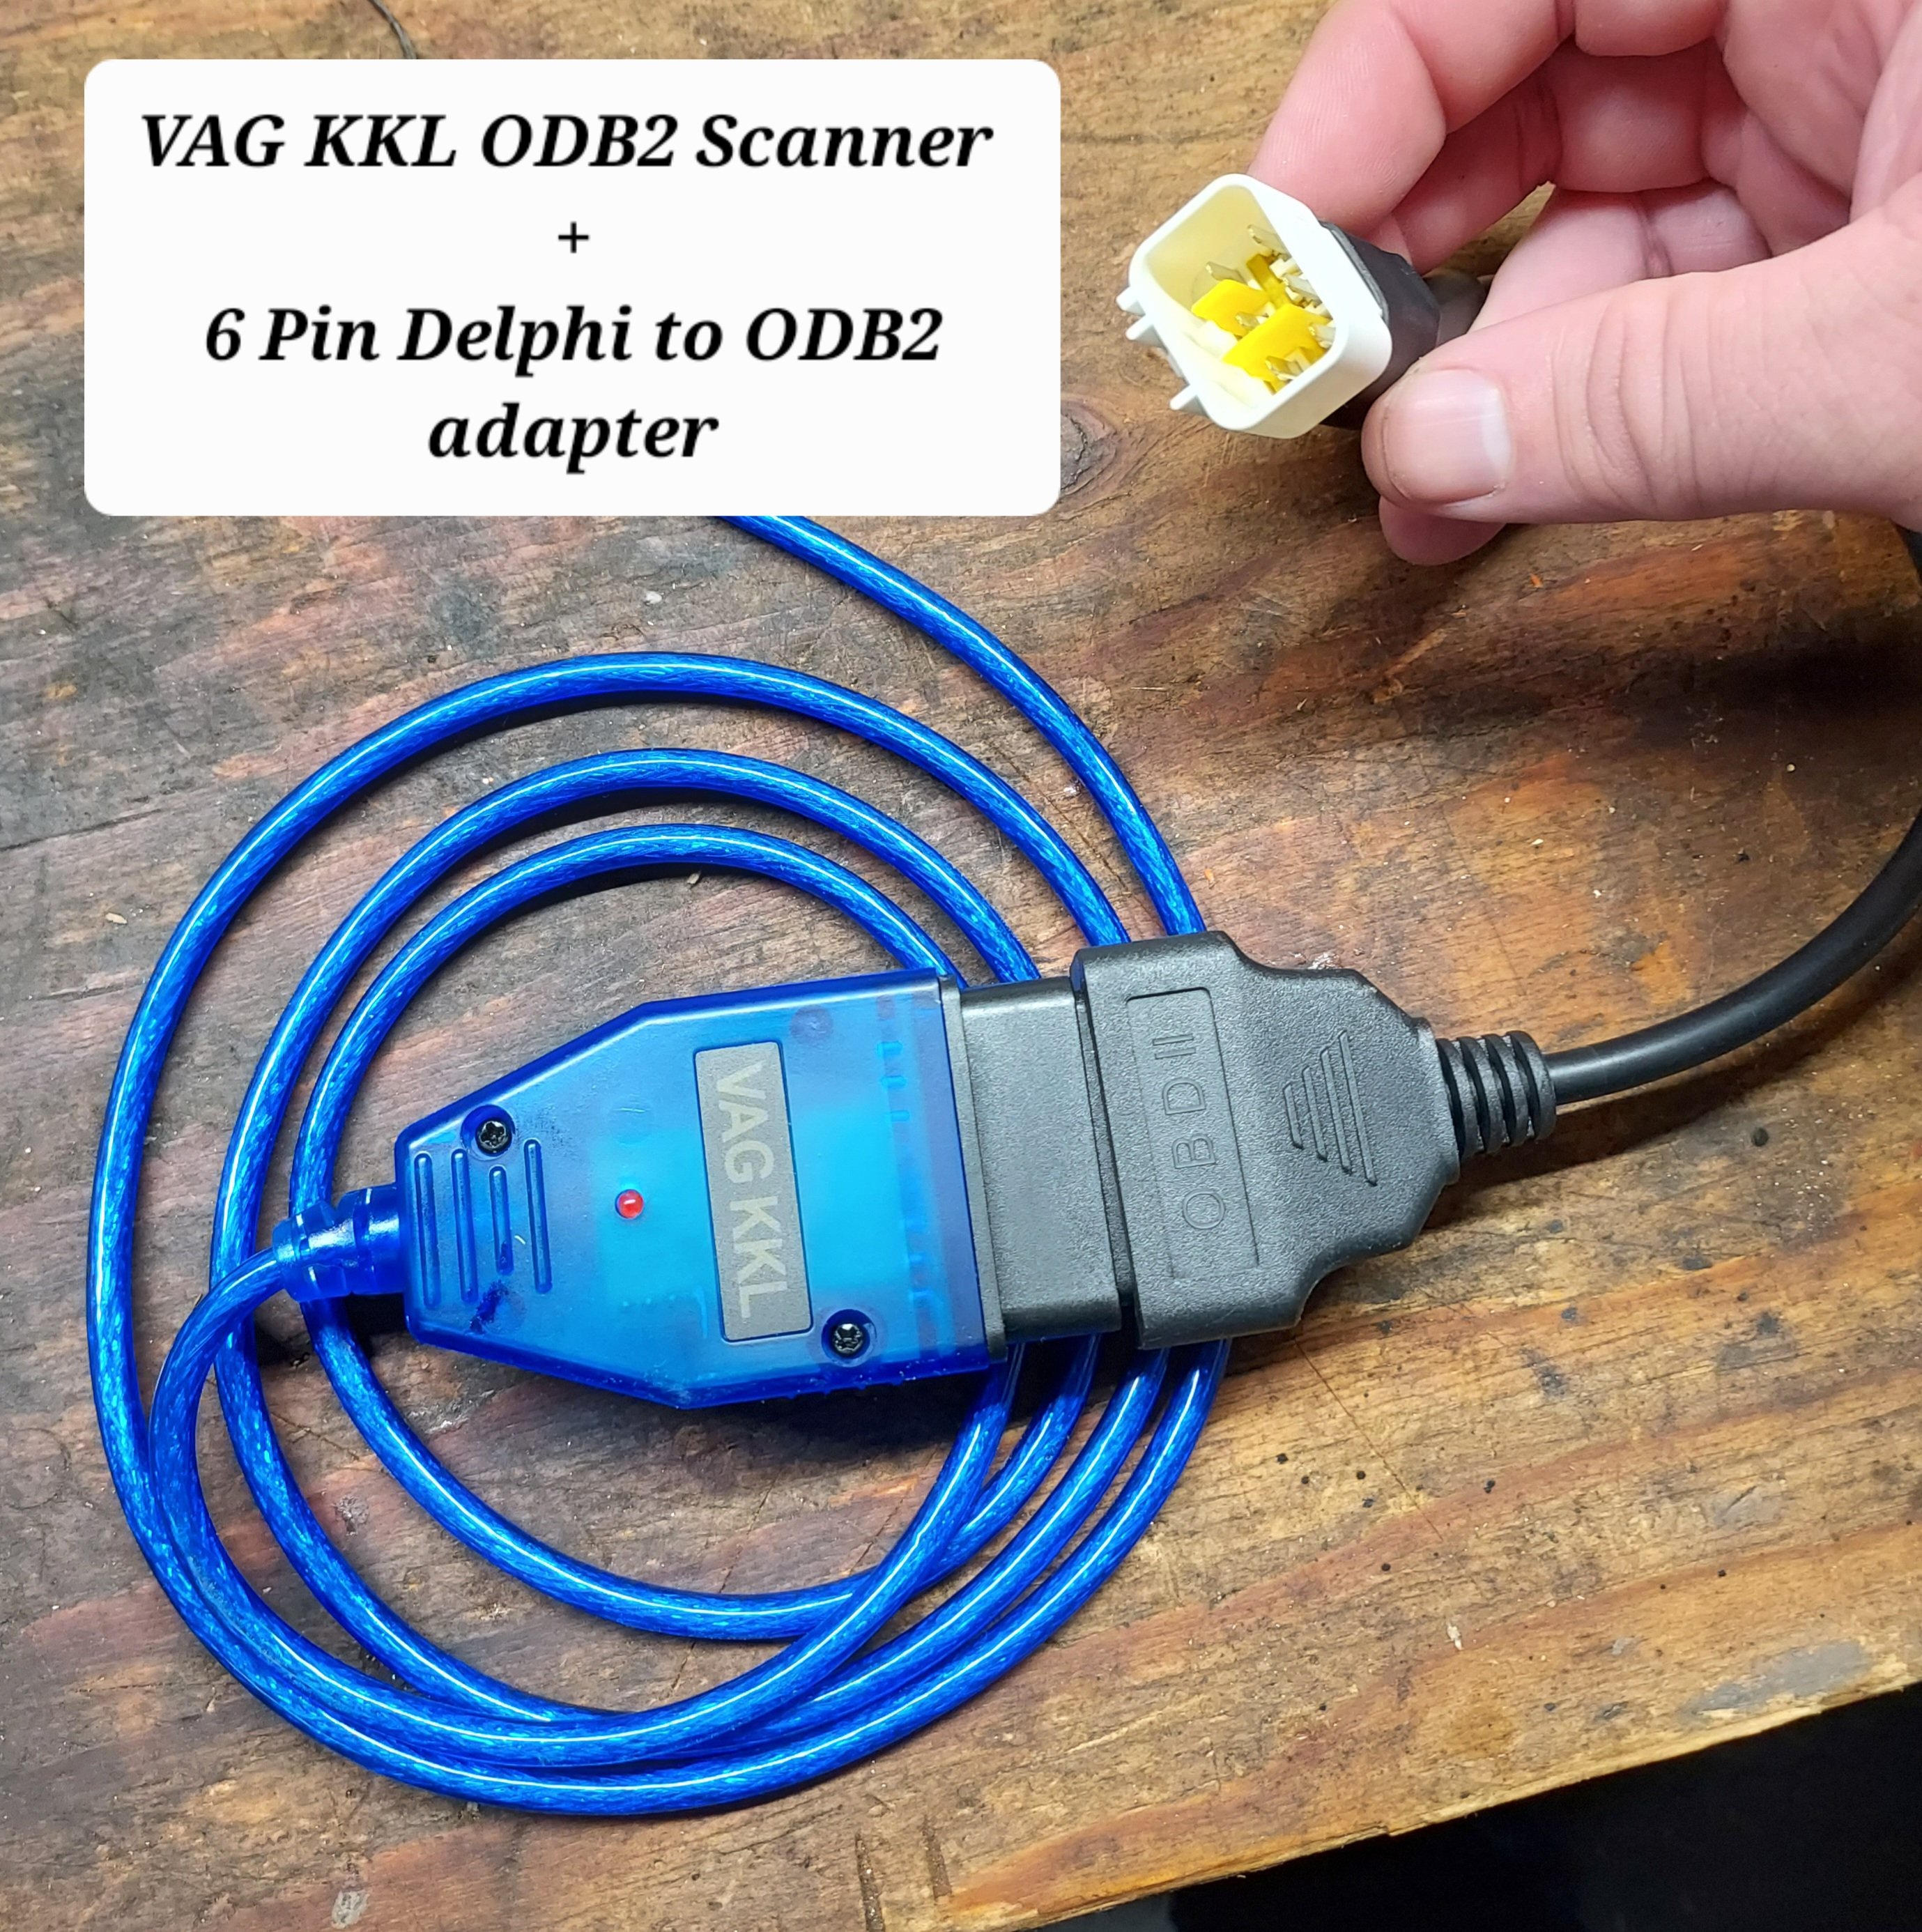
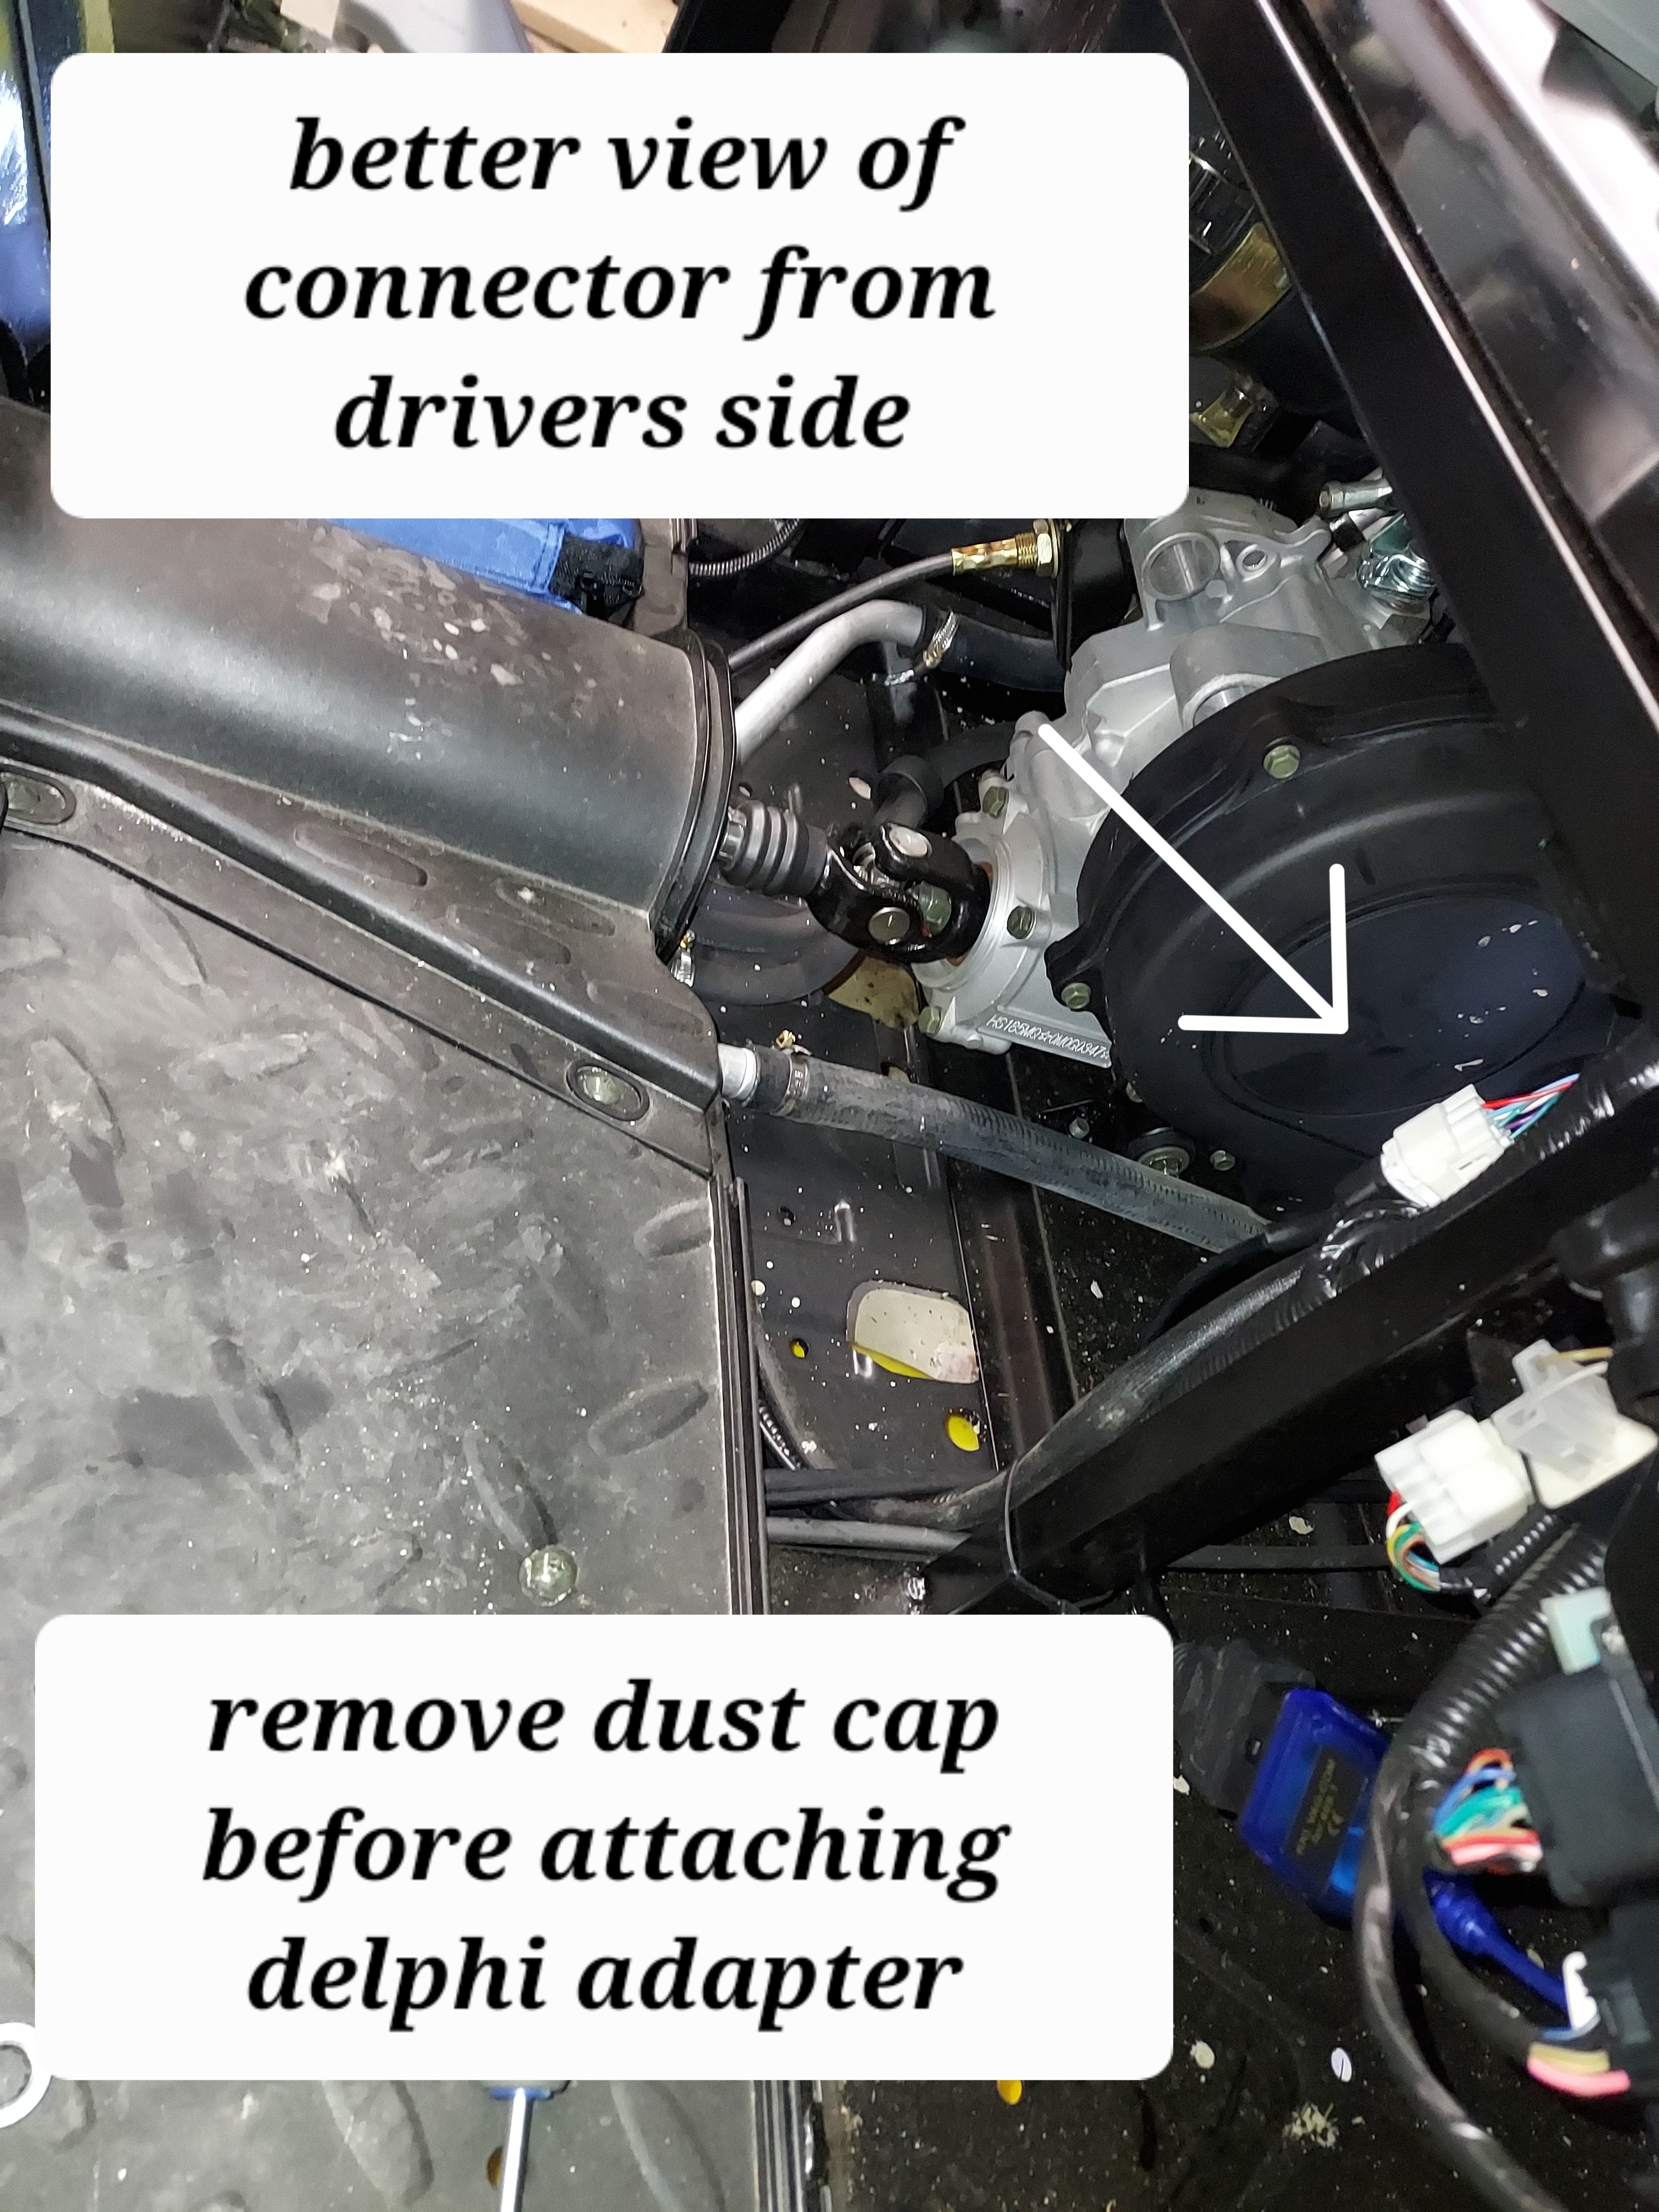
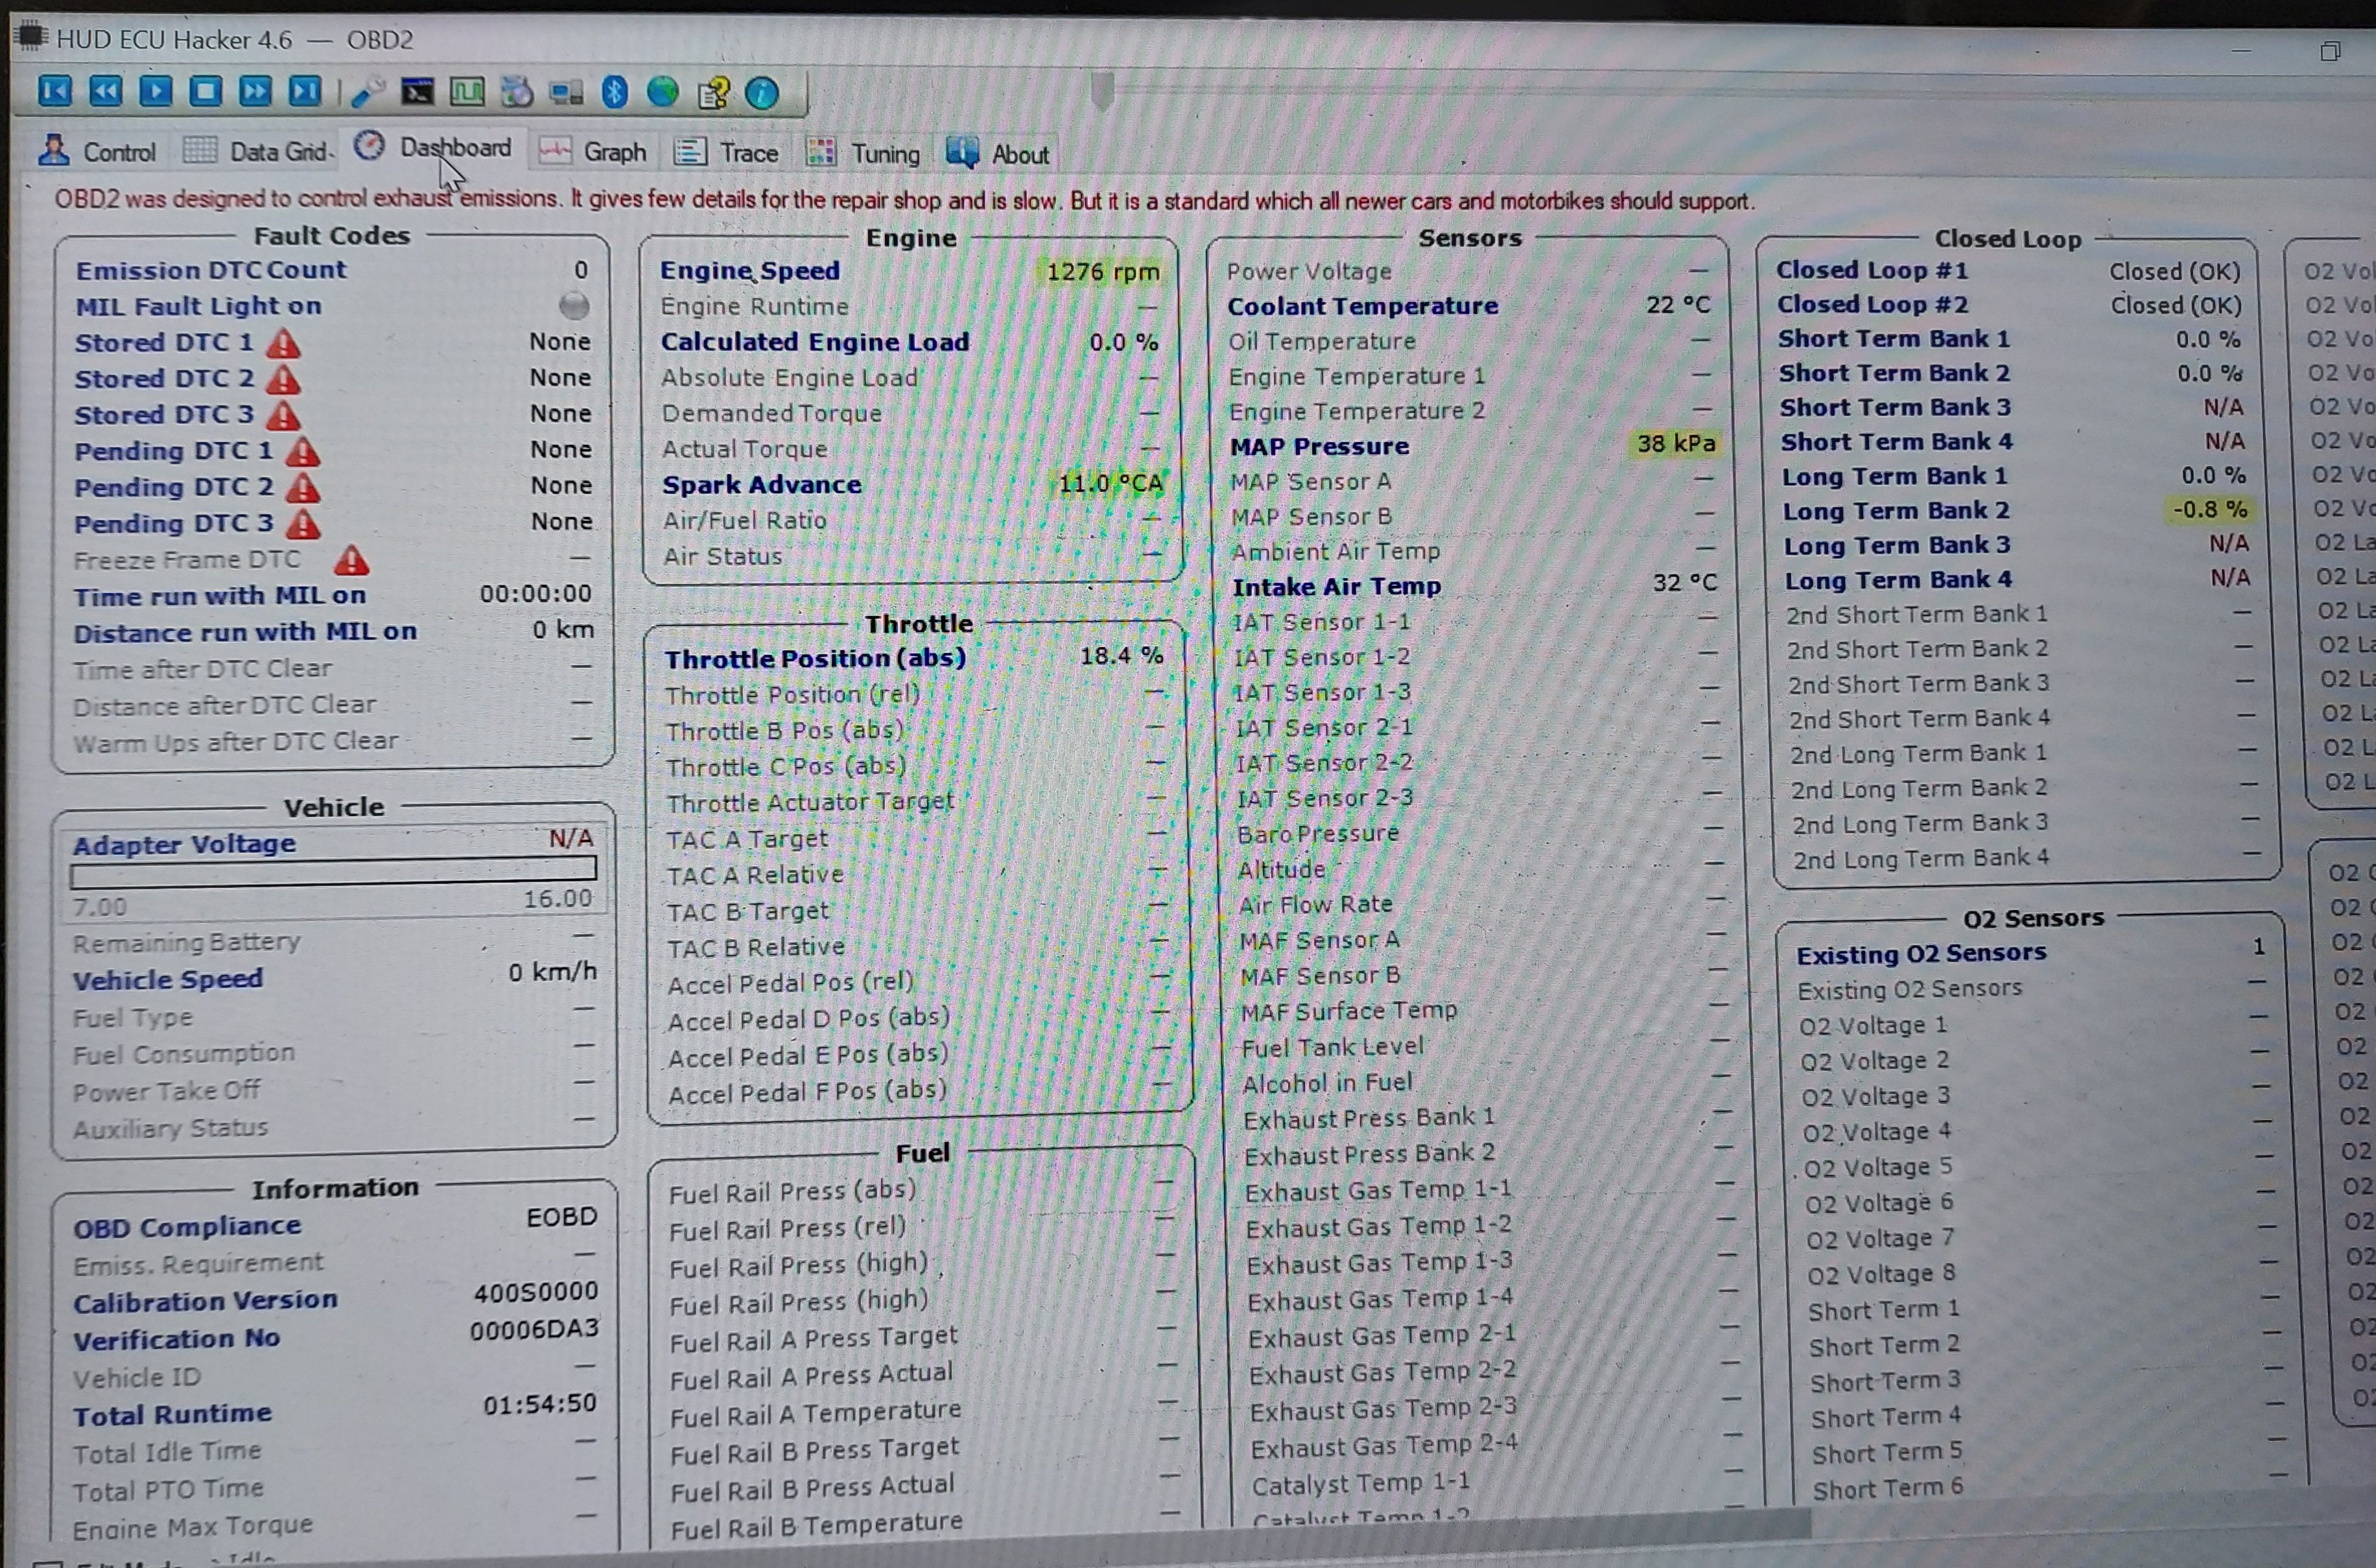
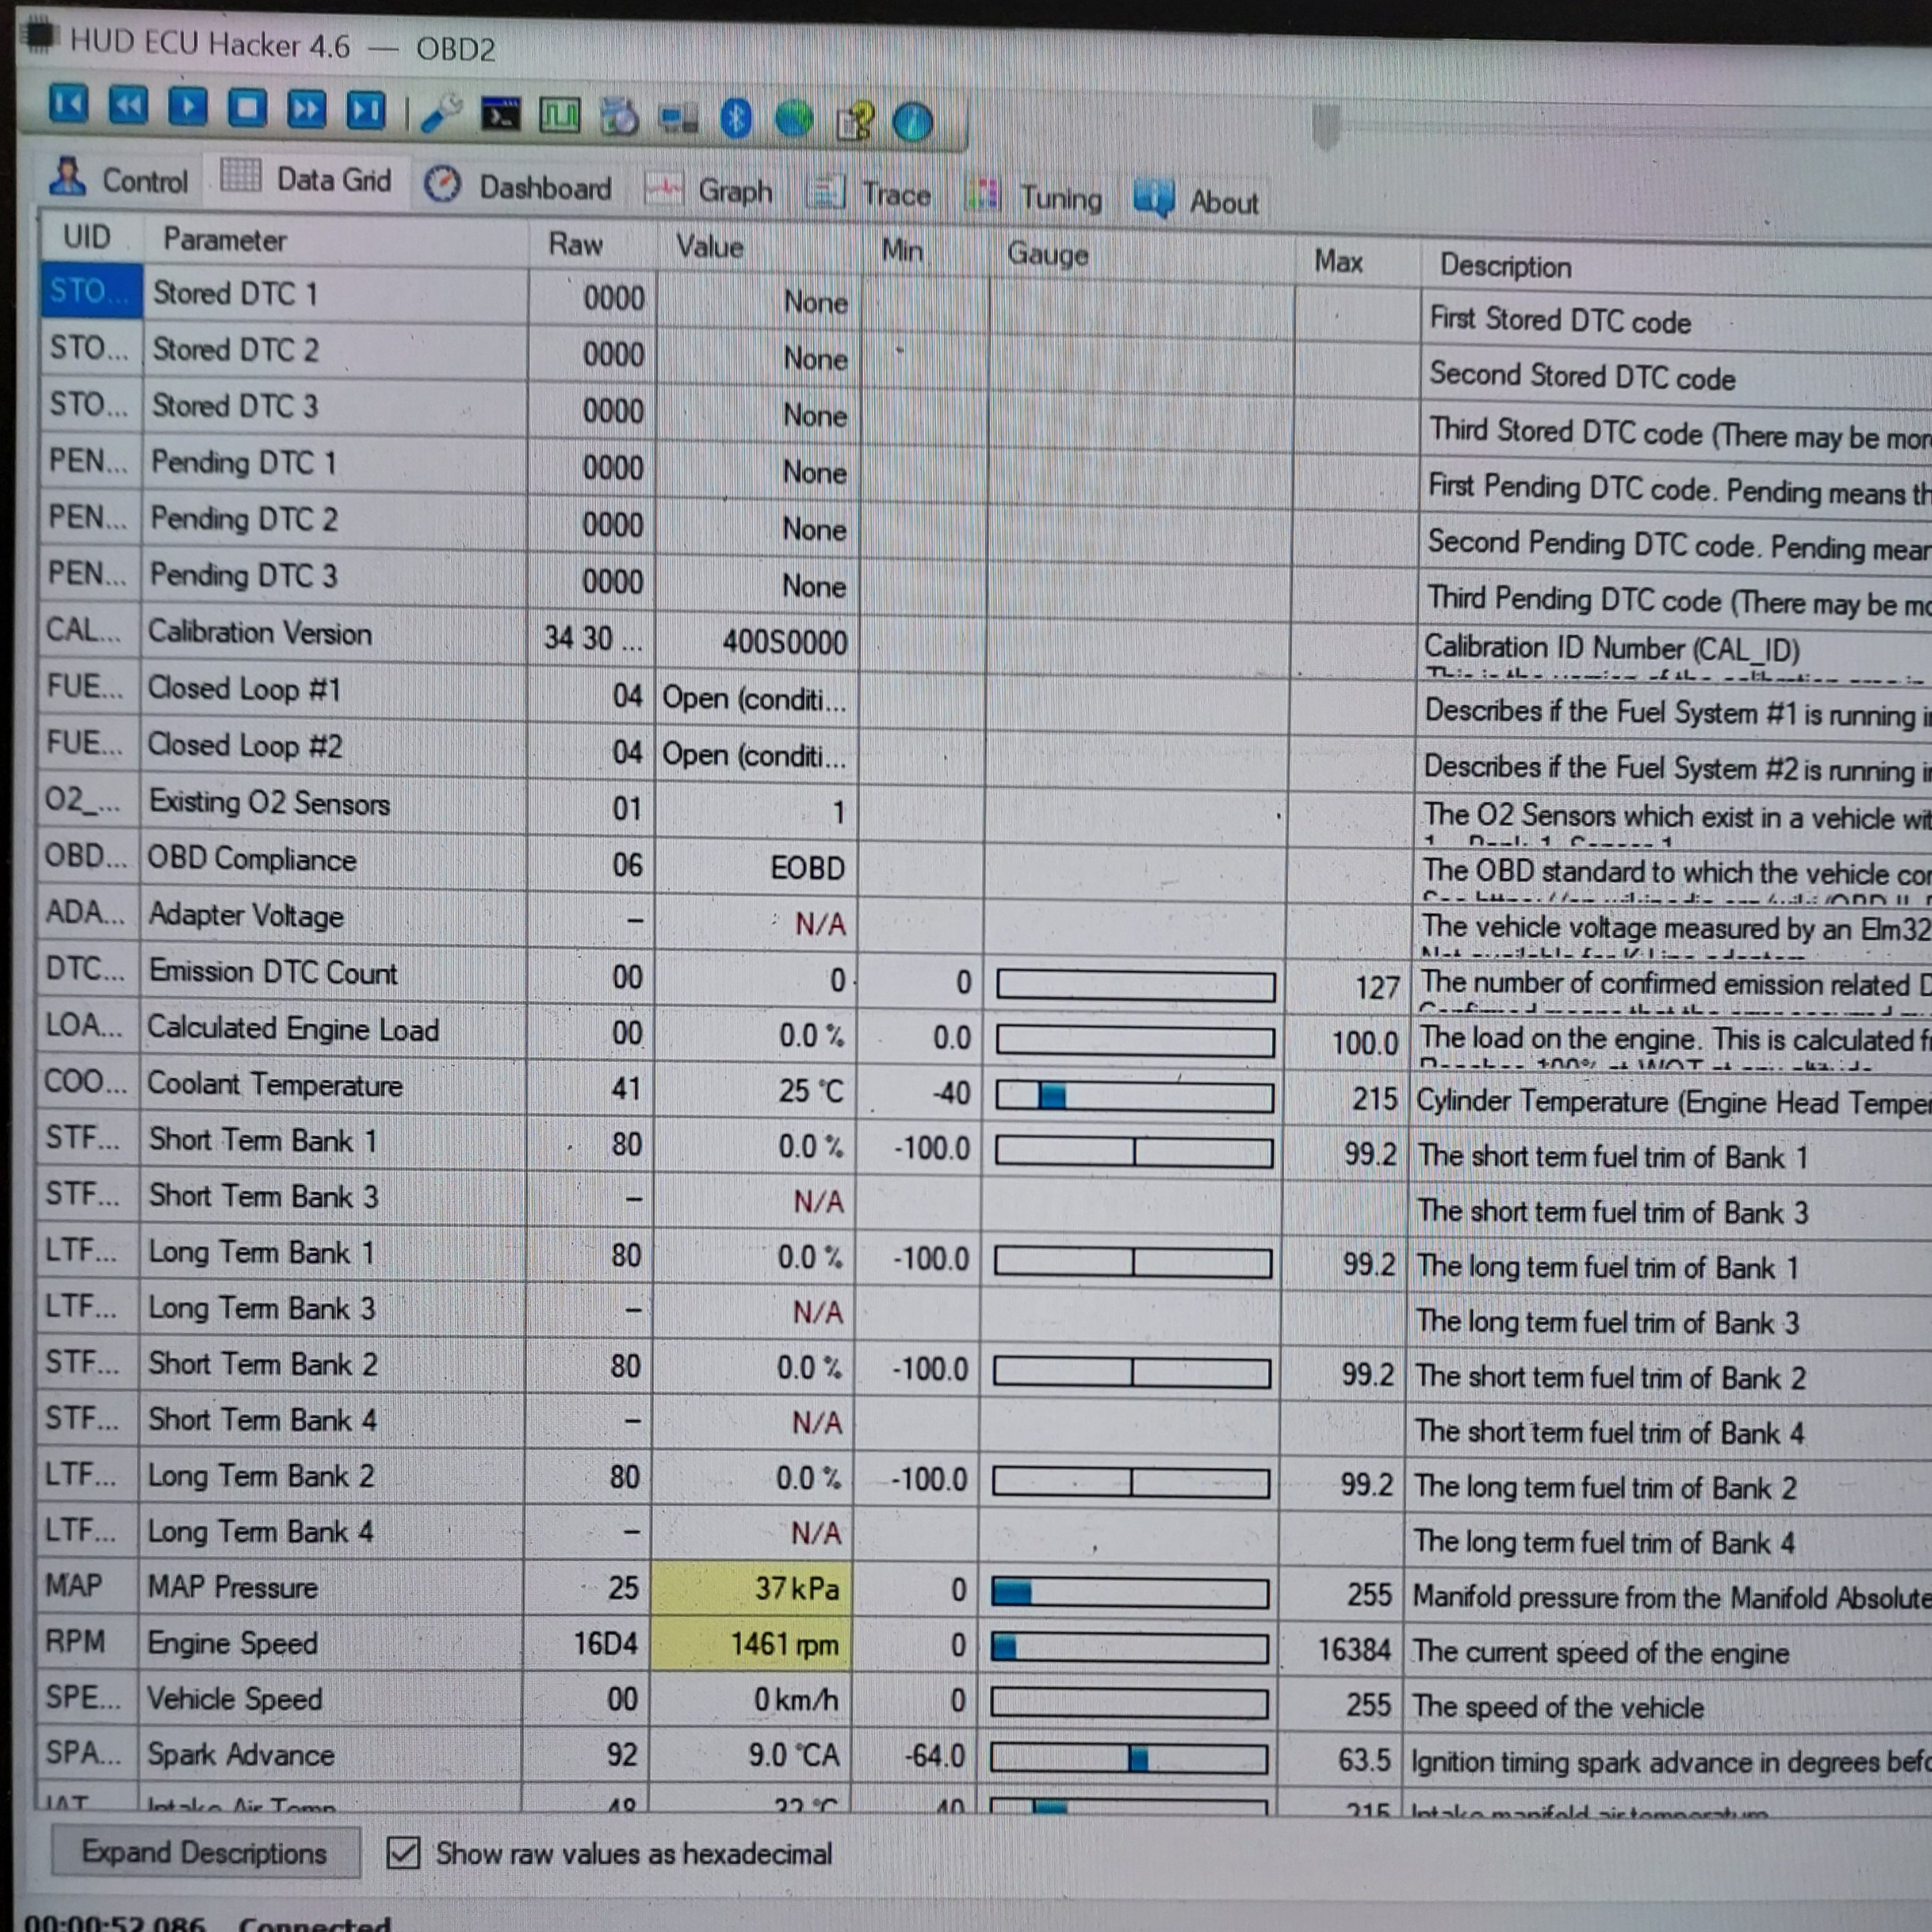
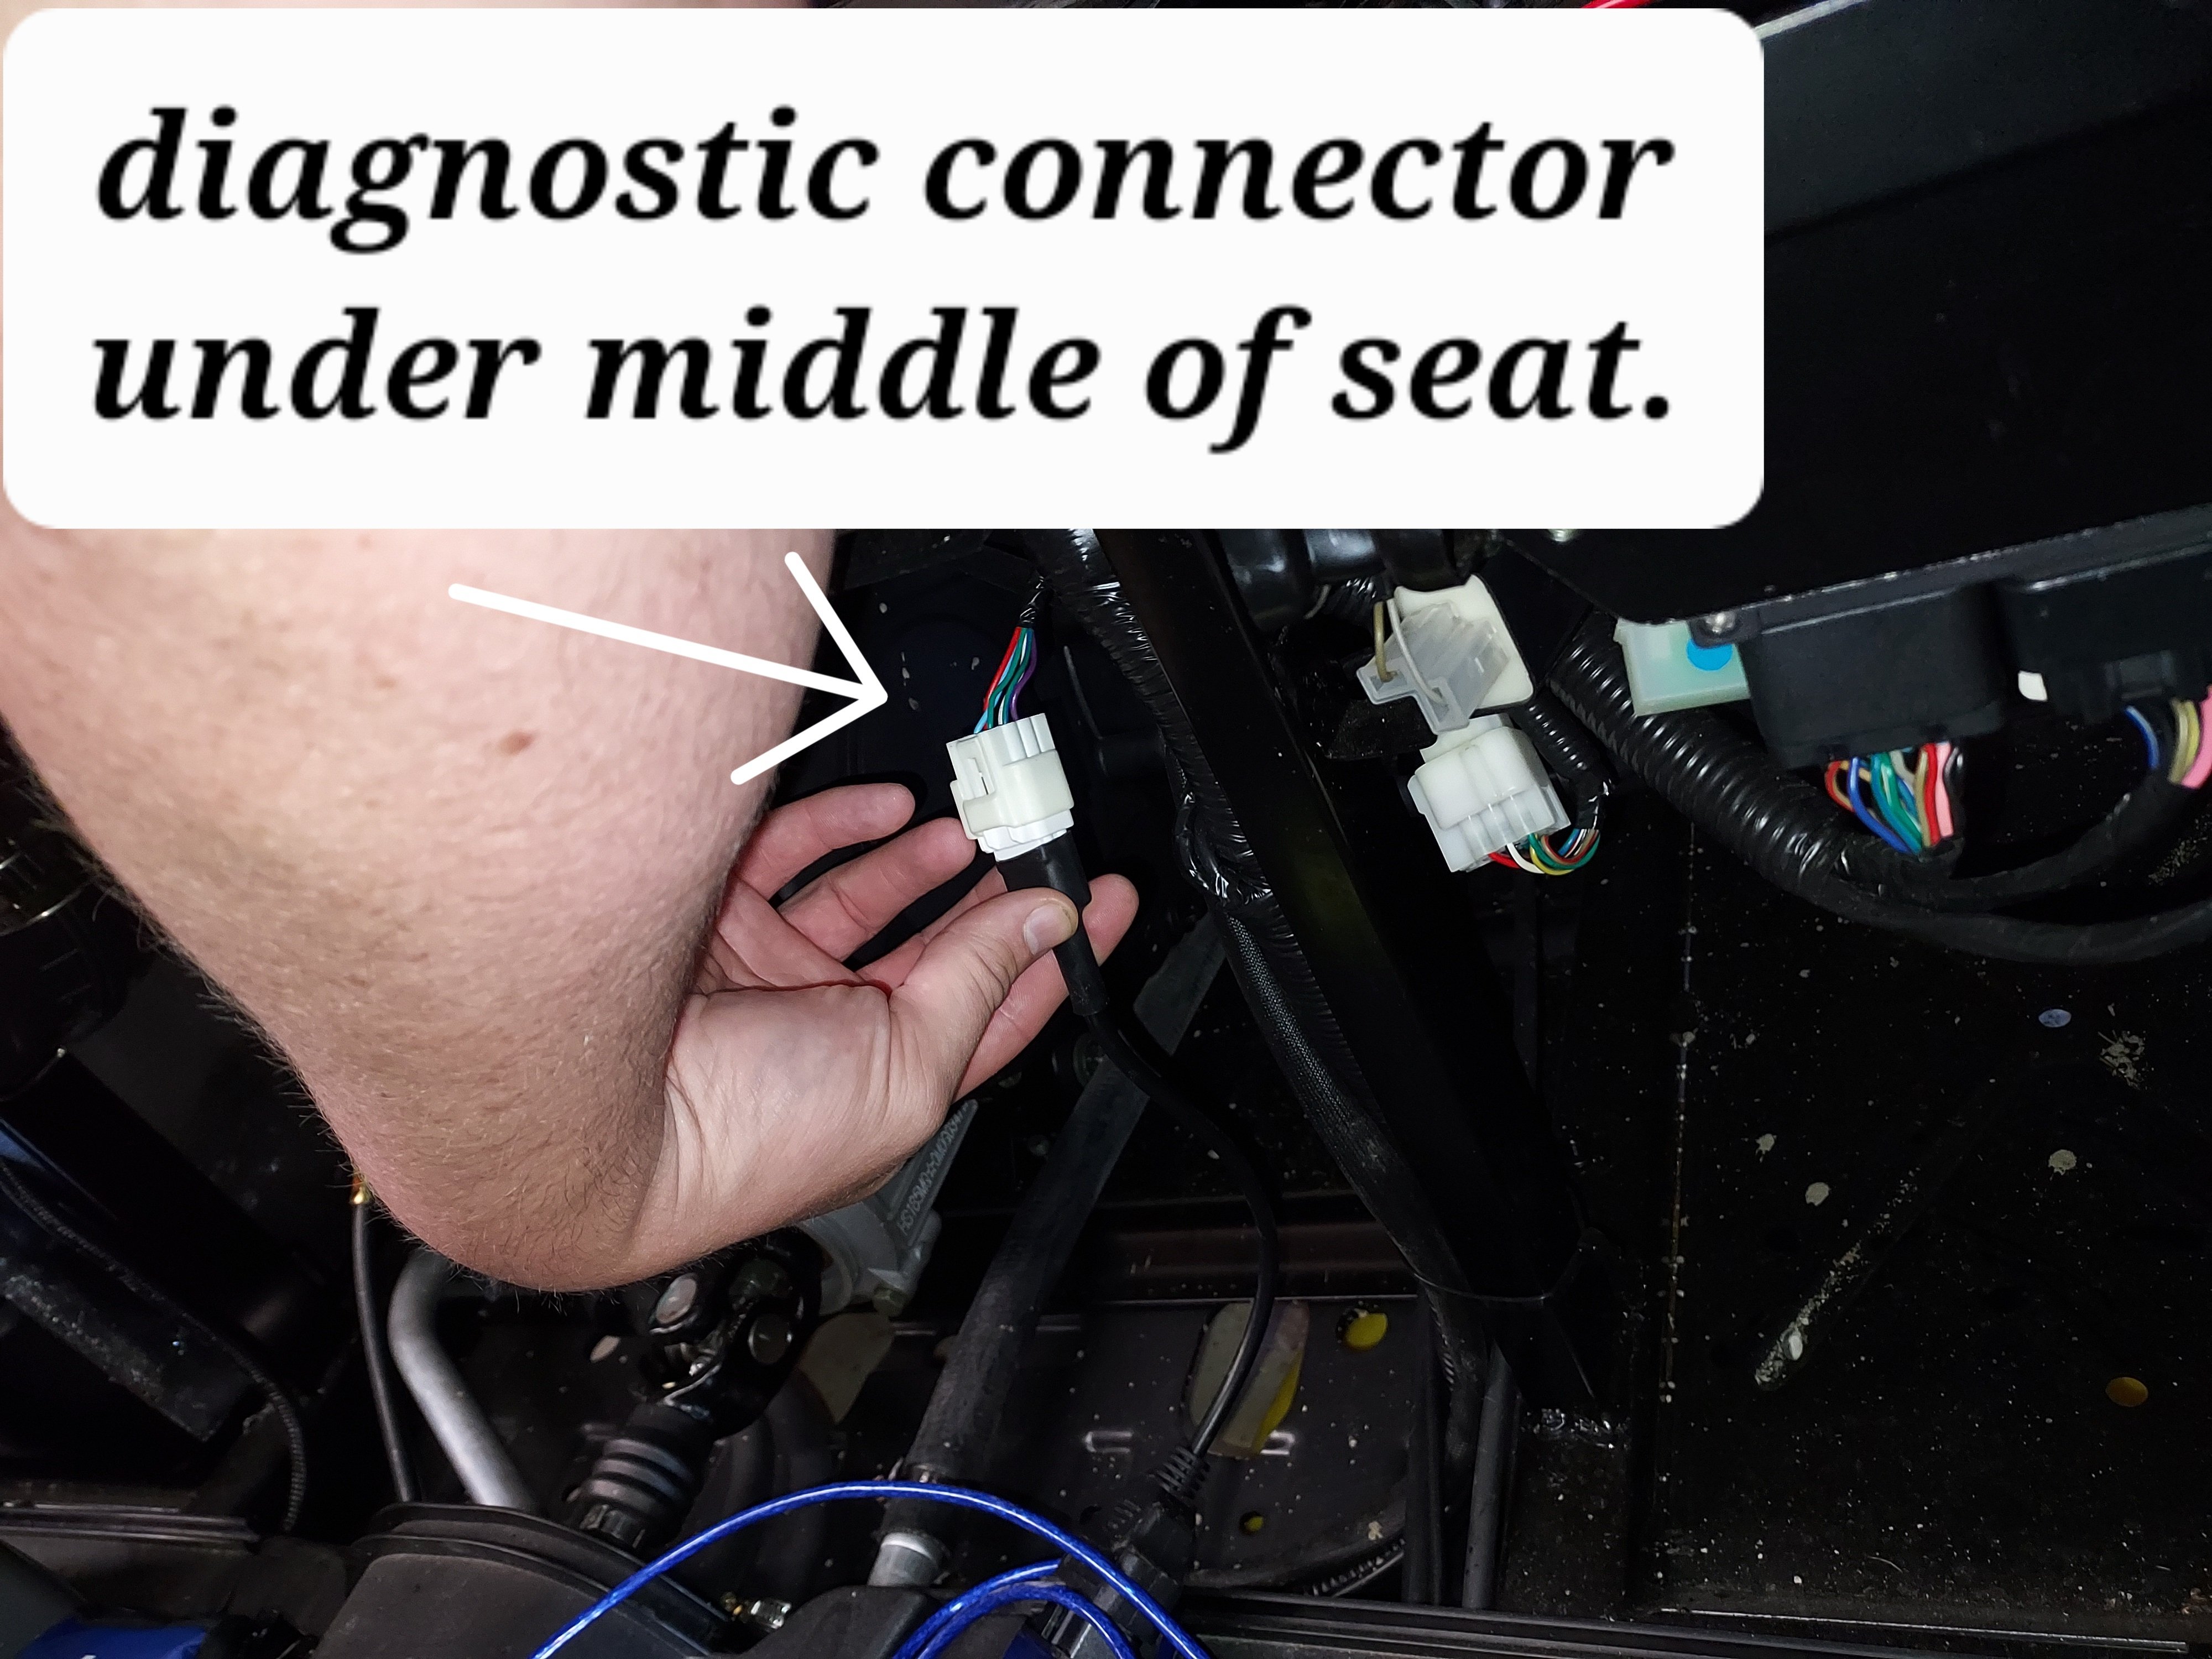
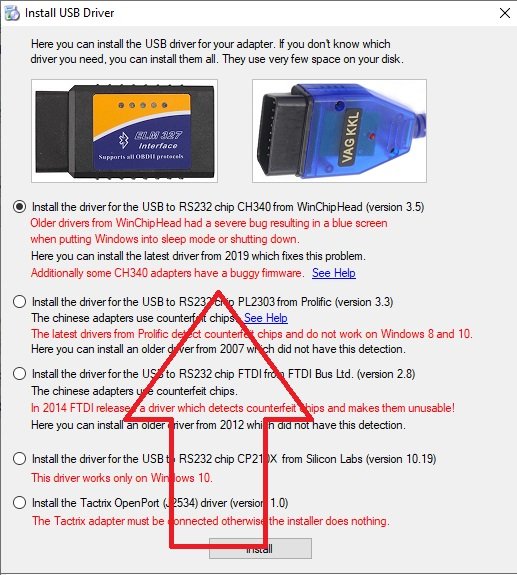
In order to connect with the ECU we need two cables. The first is a USB ODBII cable. HUD ECU Hacker’s documentation has a lot of different confusing options, but here’s what I went with and managed to get working, the cable is called “VAG KKL” it is a USB to ODB2 cable. It is available from a variety of sources for $10-15. The second thing we need is a “6 pin delphi to ODB2” adapter cable. It is also available for a similar price. In my case I ordered both from ebay, but there are other sources. Once we have our cable in hand we need to find the plug it in on your machine. My personal rig is a Coleman UT400, but the wire location should be similar for all Hisuns. My cable was located under the middle of the seat area. Just inboard of the battery, where the main wire harness split loom runs. The cable is a 6 pin (3x2) with a dust cap. Remove the dust cap and plug in the 6-pin end of the Delphi adapter cable. Note: When I was done, I left the 6-pin adapter connected, and zip tied it so it now runs to in front of the battery for easier access in the future. Next download and install HUD ECU HACKER DOWNLOAD Open HUD ECU Hacker on your PC It should prompt you to choose a driver to install. This particular cable uses the “CH340” driver (First choice on the menu) click to install, once installed hit the X in the corner to go back to the main page Once the driver is installed plug in the USB Cable, and plug the ODB2 end into the 6 pin adapter. The red led on the adapter should light up indicating it has power. Drop down and pick a com port on the main screen, it should show the VAG KKL adapter as a com port. Click connect on the main menu. It will pop up a bunch of fast scrolling text indicating it is connecting. Once connected you can click through the various tabs to see different data sets. The main menu also has the option to show fault codes, clear fault codes, reset the EPROM back to factory. The other function that may be helpful is recording a log file. You can record a log while operating the unit, and come back later and replay it to try to better diagnose what is happening. Within the various pages you will see the reading from each sensor. Sometimes a sensor reading will be off enough to cause running issues, but not enough for the ECU to realize its an issue. For example if the engine thinks it’s really warm, but its actually cold, it may not inject enough fuel to start. There are also more advanced functions, like adjusting fuel mapping, but that is beyond the scope of this tutorial. Full HUD ECU Hacker Documentation (Very technical reading) If you find this helpful give me a comment below or a thumbs up.
2 points
-
Yeah, from that document I did the figure 3 balanced charging as opposed to the figure 3 "perfectly" balanced charging. While conceptually I get that the "perfectly" is a little better, it is also more complicated to set up since you have to work out the resistances of the cable runs and any connections. In this case just balanced charging is good enough. Another thing to keep in mind is that it's a bigger issue with "dumb" lead-acid batteries. Each of the new LiFePO4 batteries has their own smart BMS to help manage balances, plus parallel in general helps balance out batteries vs the serial setup Hisun used with the awful Discover 6V batteries. I did use equal length brand new 1/0 AWG cables for my connections except for re-using the two final cables that connected to the motor controller.1 point
-
Borg I used what factory cables I could but had to get 5 cables from a local battery store in order to run them in parallel. As for the batts, I do not have a BMS, just connected them with the cam communication wires that were included with them. I hope that's good enough and don't encounter any problems later. GNFO yeah I couldn't use the Hisun jhook clamps either so I ended up securing each batt with straps for now, looping under the metal baseboard where the jhooks were.1 point
-
NVM I figured it out, copied too much of the zip file to the USB. Amazing upgrade!!! Finally!!! My son and I got stranded too many times on those old Discovery batts. The buggy zips around, accelerates with force, steers better... Do it!1 point
-
I purchased them on Amazon for a total of $1,341. I hope the manufacturer warranty is in place! Will do!1 point
-
Thats coolant ..1 point
-
It's a 2018 shows 78 mi. but there's been someone under the hood. Old guy, even older than me and I'm old, had it and didn't use it much parked in the garage. Think owner before him was a little rough on it. They installed a fuel filter inline and there's some replaced non original bolts on the clutch cover. Someone has had the fan cover off also. otherwise it's all in working order. Steering wheel is crooked I'm going to do an alignment and see if I can get it straight adjusting the tie rods. Wasn't sure if the steering wheel was splined and maybe off a tooth or so.1 point
-
Hey all, I was just wondering what you guys consider a necessary upgrade or spare part to have or mod onto your machine. I'm going for a kind of shtf survival rig that's not going to be SUPER heavy and I'm looking at getting: A spare belt (I keep seeing this mentioned everywhere I look so it must be important) A spare tire and mount( So would I need a jack like one from an old jeep or something else?) Tire chains for the winter And maybe a cargo bed upgrade so things don't slide out. Bumpers because duh. I already installed high output lights and have a windshield, roof, back window, and winch. And I outfitted a Molle panel for the back of my passenger seat with extra supplies like food, first aid, and spare mags. Any advise on increasing durability, longevity, and having something on hand because it's absolutely necessary would be a plus. Thanks so much!1 point
-
Hello, recently we converted a HiSun Sector E1 to Lithium Iron Phosphate batteries. The batteries now have 16.4 kWh (315 AH) of capacity, 24 horsepower peak, and it reduced the weight of the unit by 360 lbs. We were able to use the same onboard charger but did upload a lithium profile to it. We also needed to add custom battery trays. The conversion process is explained below in this video: We also now have a 4 port supplement charger option for those wanting a dedicated charger or are using 1 of the batterie to run a winch/snow plow with more power requirements: Finally we wanted to show cold weather use and how the unit can be setup to perform regen in the cold without problems as the batteries can regen and stay warm:1 point
-
Yeah the output really varies when it kills, it can be at a crawl pulling just a few amps or open throttle still kills exactly 5 seconds. Also, I put a multimeter on the sevcon side of the solenoid, and after the motor kills I’m still getting 52v going into the sevcon so I really don’t think it’s battery related. and no, no errors on the battery monitor anyway, I’m bringing it in to the dealer tomorrow morning, I’ll report back1 point
-
Last month there was a management change in the customer support and service section. Third time in two years! They do not seem to recover very well after each change. Document all contacts with Hisun and keep at them, do not give up. Also fill out a customer contact form about any issues if you have not already done so. If you have a contact via e-mail keep asking them for a response. Do Not Give Up! I have spent 28 months so far trying to get problems solved, changed models and have a new issue for past 2 months. I Will NOT Give UP! It's a pain in the ass, but they need to step-up their game if they want build a business like the big boys.1 point
-
Were the pieces hard like straw, or pliable like some sealant squeezed out into the interior and then broke off ? Does it run ok? I would definitely follow up in 5 or 10 hours with another oil and filter change. Good luck Pop Bob1 point
-
Yes the shaft will have to come out. Carefully remove the shift linkage(8mm) and remove it from shaft. Pop the seal out with a pick. This will allow you access to the snap ring retainer clip. Use a set of small snap ring pliers to remove clip and this will allow the shift to remove. Take your time during the mark up process after you have the old bracket cut off. You can cut right across the top/weld. Then knock the bracket off. Make sure you hold the forward and reverse gear in place when checking the orientation.1 point
-
On the top of the carburetor take off the two or three screws and remove the needle and adjust the "C" clip move it down one position and test to see if that helps. As well adjust the fuel\air adjustment screw that is either on the front or the rear of the carburetor. When the engine is running (idle) adjust the screw until the engine starts to speed up then adjust the idle screw until the engine Idles at the speed that you want.1 point
-
Also, those Kawasaki Mules that have the two cylinder engines are subject to their push rod bending, that also could cause the engine not to start and or running poorly.1 point
-
The rear seats are Wise Industrial Universal Folding Forklift Seats (Black, Model 1745P) that I purchased from Northern Tool. Unfortunately, they no longer carry them, but you may be able to source them elsewhere. I made brackets that cradle the seats and attach to the tube rail along the bed so I can easily remove them when I need the cargo space.1 point
-
2015 Mule.....same problem with not running right, bogging down, misfiring .....on mine, there are two fuel filters, one under seat, one closer to engine......that was the issue......dealer changed both, back in business.....................1 point
-
Turns out the relay switch was missing. As stated, it was a demo model, so they probably removed it and gave it to another customer or whatever the reason. They dispatched both a relay and switch and I received them the same day. Plugged them in and my issue was resolved. Hard to find something when it isn't there...OMG!1 point
-
You need a pack that under all conditions will cope with the max demands of the motor controller. If you ave a decent pack of a high Ah, its never under stress, that means lower heat, that means longer lif. When not being pushed to the limit a pack will hold its voltage up, if a too small pack is pushed the voltage drop will be much greater and more quickly show up poor cells. This is especially the case with cheaper lifepo4 which generally are not as good at holding voltage as Li Ion (Nickel, Manganeese, Cobalt ) So if you go for cheaper Lifepo4 always have enough Ah or more than the minimum.1 point
-
Wow. Excellent detective work. Great job. And thank you for the detailed report on your sleuthing and very fine pictures of your findings. Glad you were able to get it figured out and also glad there was no damages.1 point
-
I’m new to the UTV world and look forward to learning all I can. I have a hisun hs500 . I’ve been a diesel mechanic for 30 years, so I’m not afraid to do my own maintenance and repairs. I appreciate the opportunity to join utvboard.1 point
-
I noticed a bit of a harsher ride so I adjust the springs, which lowered it a bit and gave a softer ride. There is a special tool to do that, but I made one in my shop. There is also a screw adjust at the top of the shock to make the ride softer. Turn the screw to the left-counter clockwise.1 point
-
I have tried the battery reset. After some research on the gas Hisun repair manual, that except for the gas engine, is basically the same as the E1, I believe it is in the front differential servo. That is the device that connects the driveshaft to the differential.1 point
-
Funny, I never realized that the actual values are a 10x factor! Yes, it was reading around 300 amps; wow, that's a lot of current! Well, despite it showing 300a for 20 seconds or so, there were no errors. Aside from the difference in batteries, I'm wondering what gauge wire BuggyBoy used, as that can also be current limiting, but not sure if that would have contributed to triggering an error.1 point
-
You really want to use an automotive or motorcycle battery tester to test your 12 V battery, and not just a multimeter. The automototive tester will apply a load to the battery and measure the voltage while the battery is discharging through the load.1 point
-
CSM. That’s what I bought. Has worked out well for me on my Mechron. I used heavy duty zip ties.1 point
-
Well looks like you have some options now. Keep us looped in on what option you decide on.1 point
-
I Tried the everything I read and yes I do also own a 4X4 Truck with the electric switching for 4 wheel drive. I do understand you can reverse to help it switch back, but nothing has worked with my 2023 T-Boss. I called Tractor Supply and they referred me to a mechanic that they us for their warranty jobs on these machines. It has been two weeks and I gave the mechanic a call and the answer was that he was so busy he hadn't gotten to mine yet. On drop off he checked all the fuses and relys . All checked out. He said he though it was the front 4 wheel drive Servo, I don't know, but makes sense since it is almost impossible to drive the way it is now, only wanting to go straight or if you turn slightly it suddenly turns all the way, then almost impossible to get straight again. I only have 27 hours on it, but from what I am told it is out of warranty according to sale date. I loved the machine until this. Not only low hours, but an easy life. Only used to spray weeds on fence lines on property, mostly in low gear. Not even using the SUV Battery to power the sprayer, I use a marine battery to power the sprayer to save the SUV Battery. Looking forward to getting my machine back in working order. At my age I didn't want to spend over $15,000 for a machine that I probably won't use for more then 5 or 6 more years. Before this one I had a 2005 Kawasaki Mule which gave me great service until it was replaced by this machine which had so many supposed to be easier to use features. Everything on the old Mule was mechanical, only issues was battery changes, oil changes and tire changes and near the end showing rust.1 point
-
It seems like there are very few aftermarket options for these Kioti K9s. I guess there is not enough in circulation. I've contacted Mike S from EPI Performance and he said they don't make clutches for the Kioti because they never had a demand for them. Good Luck trying to find an option. Please keep us posted if you find something.1 point
-
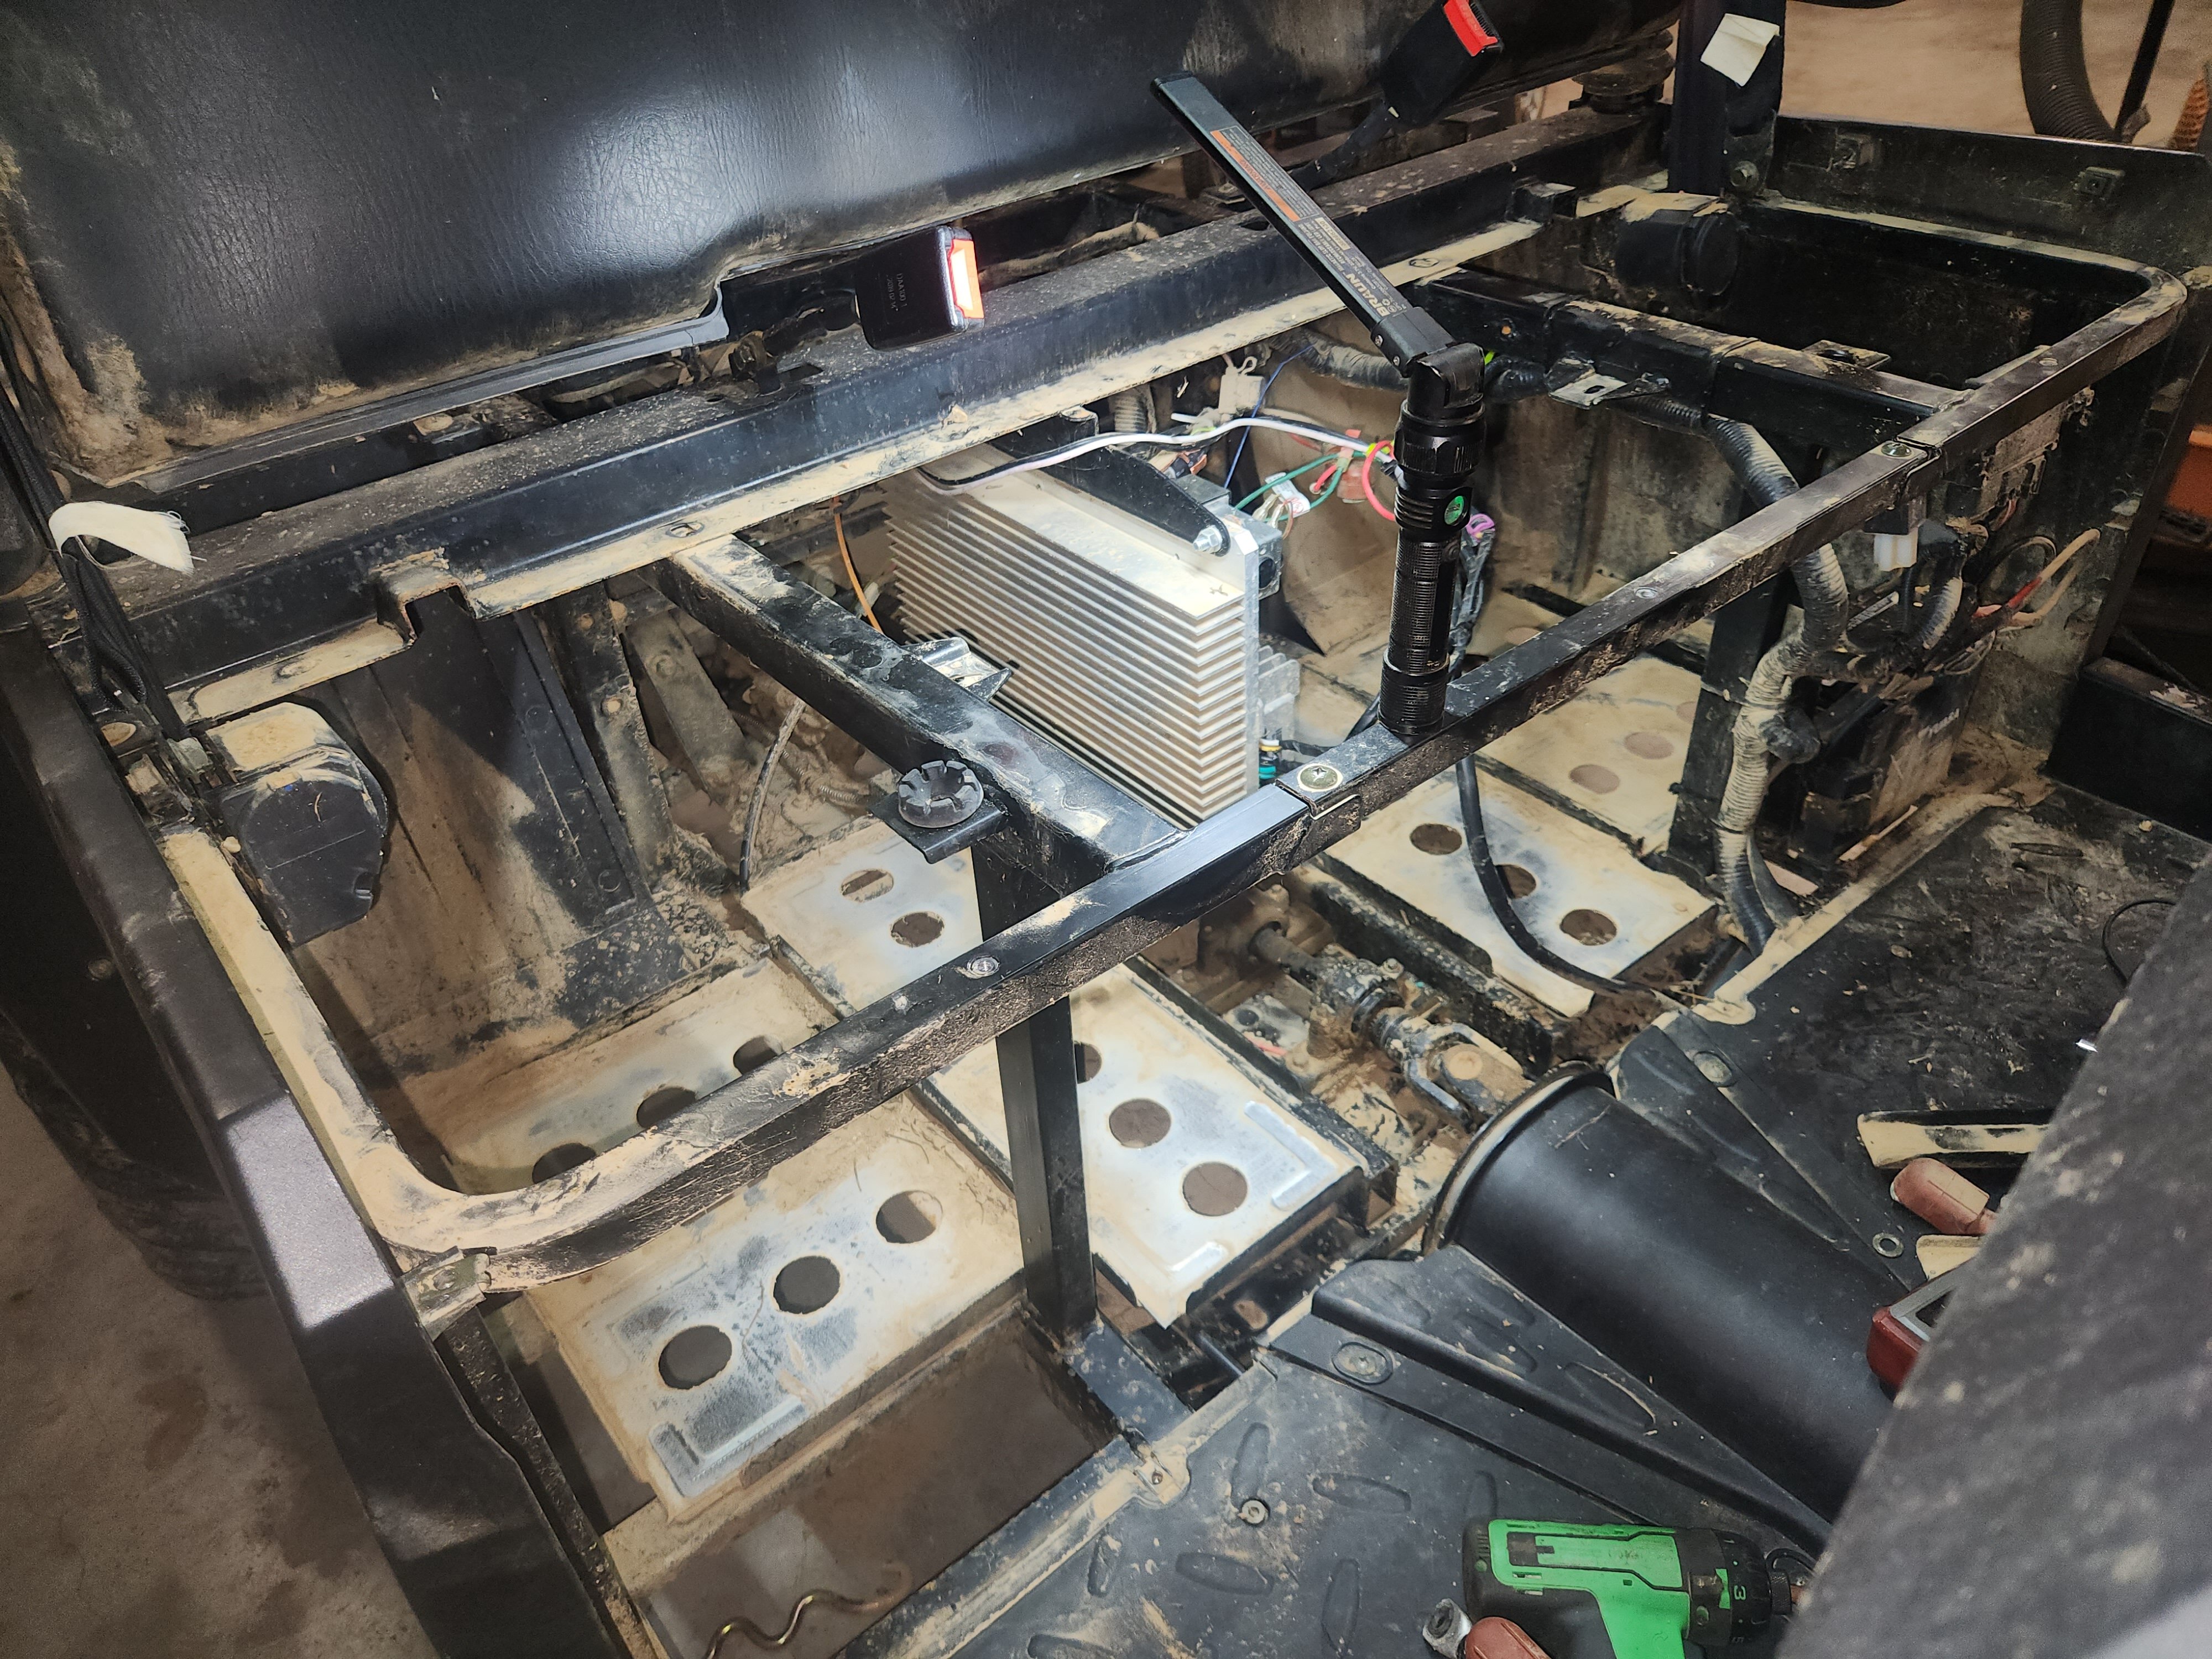
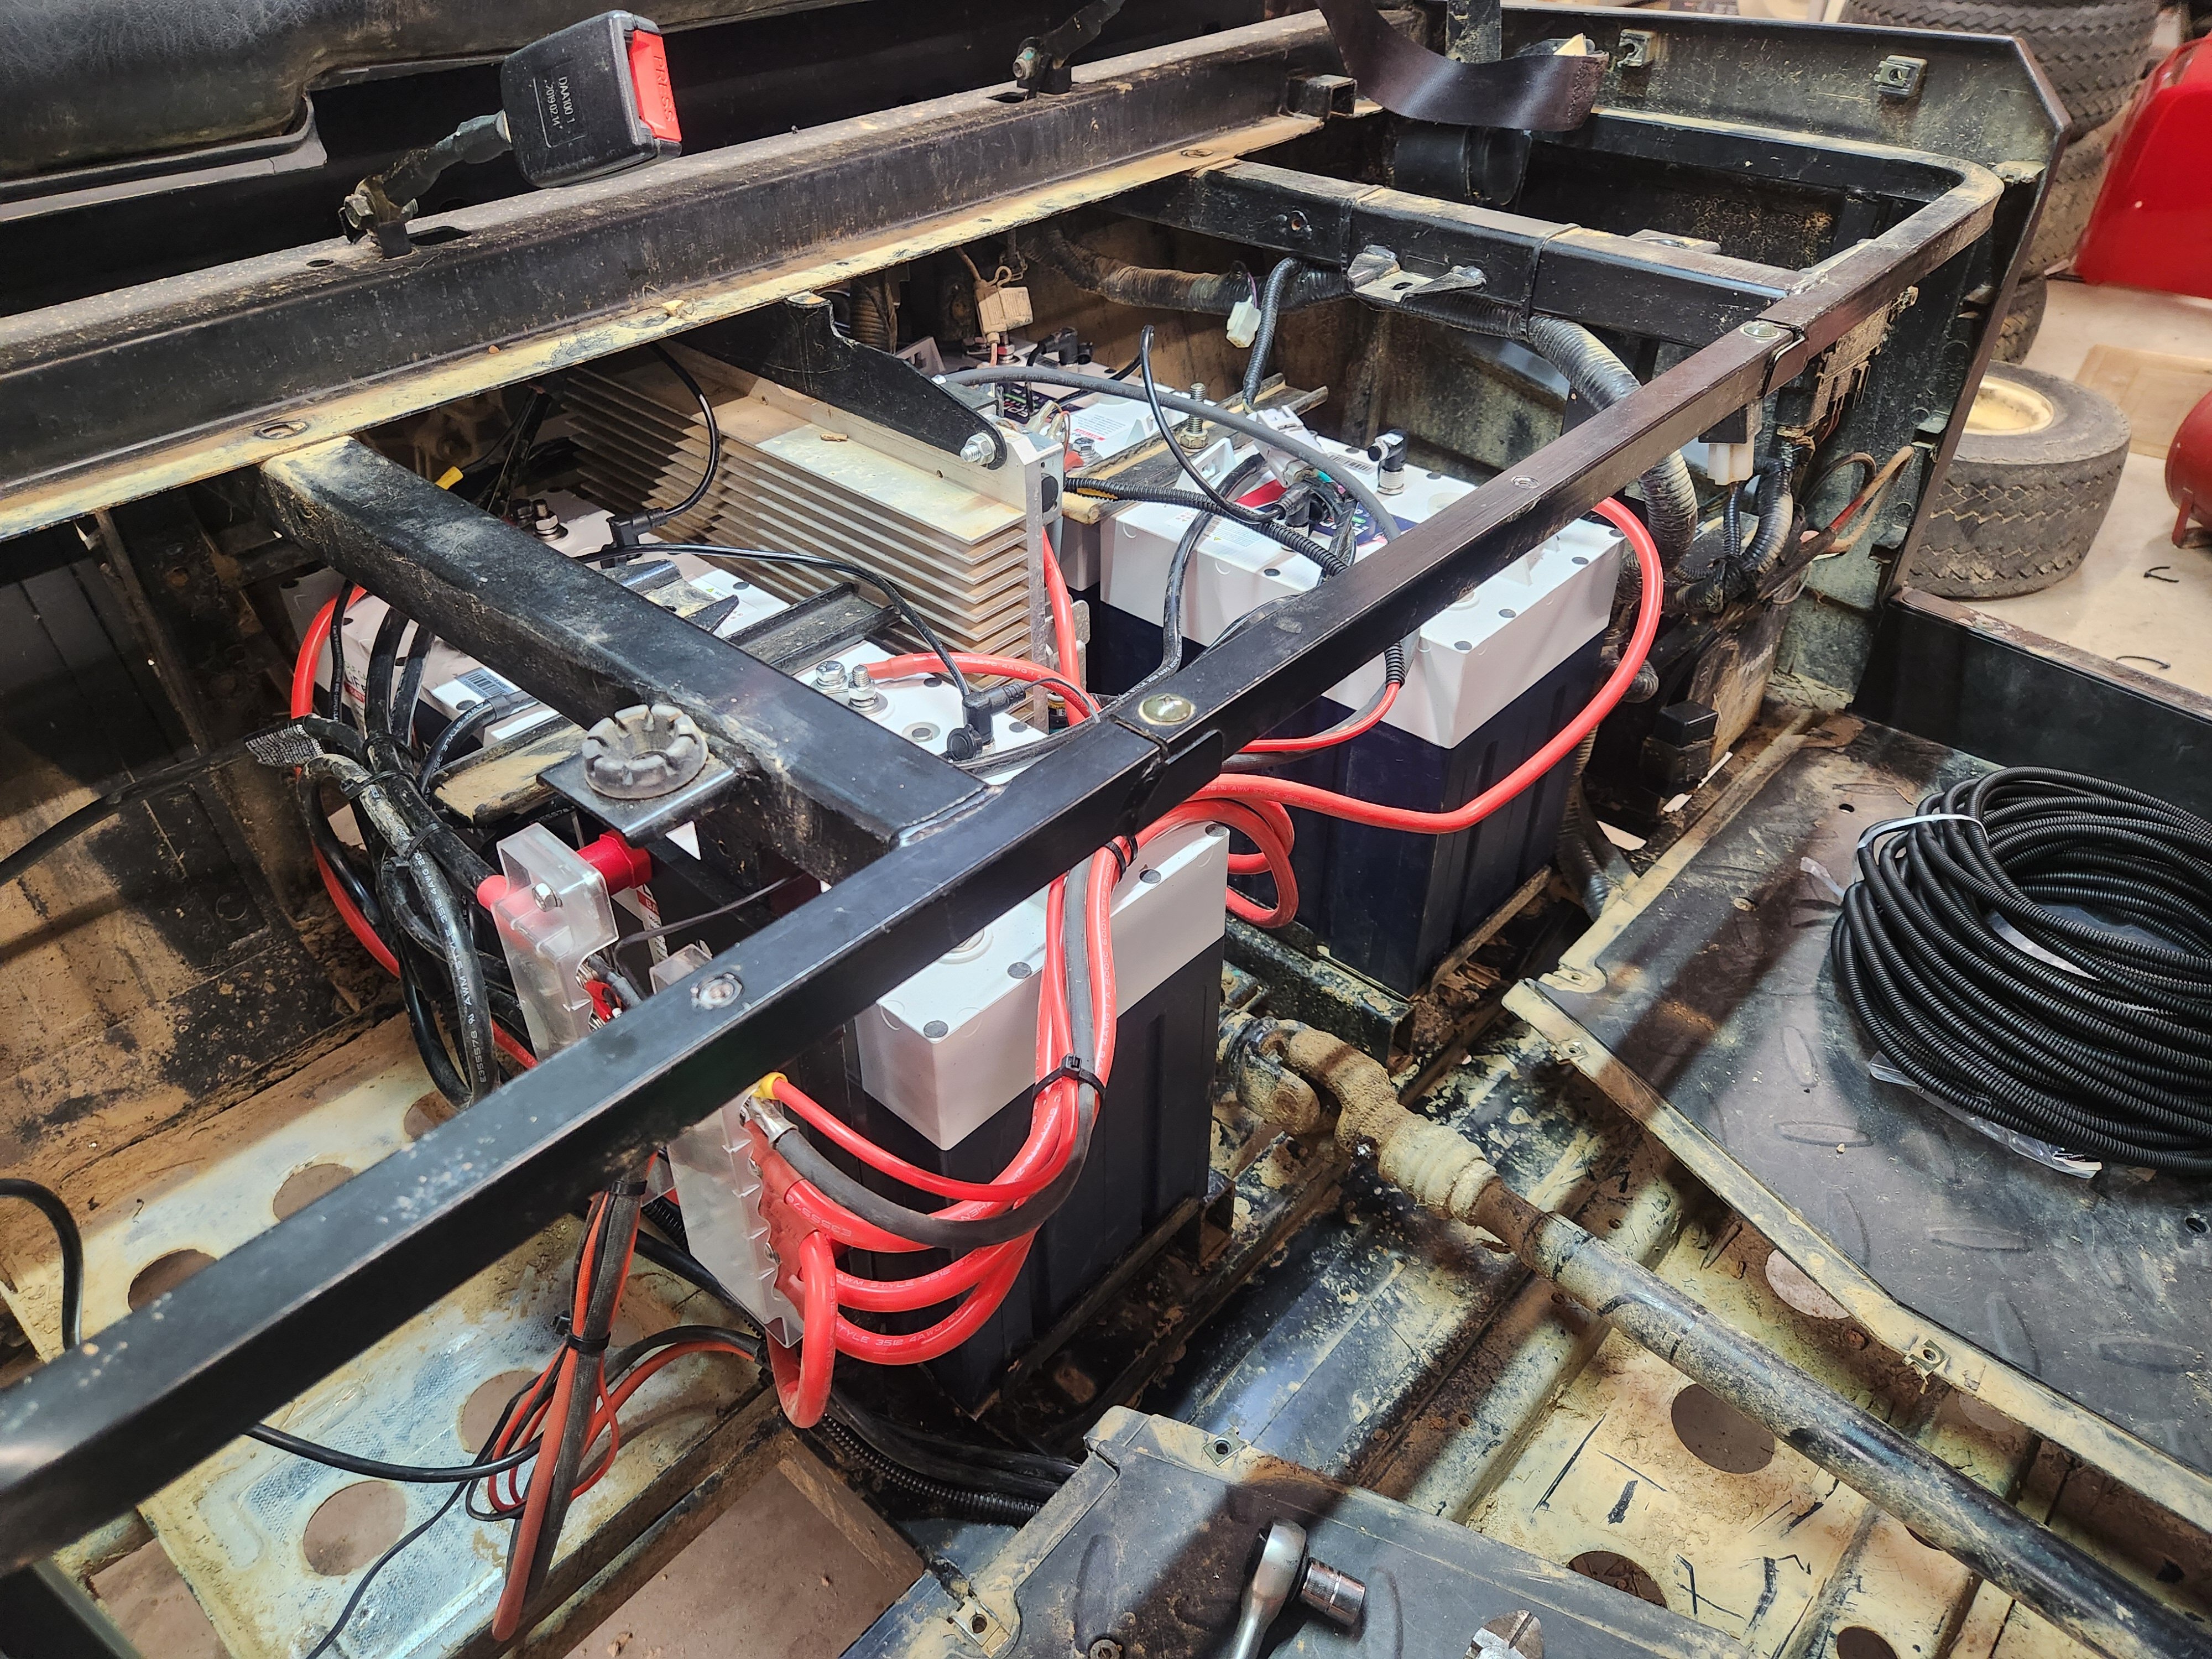
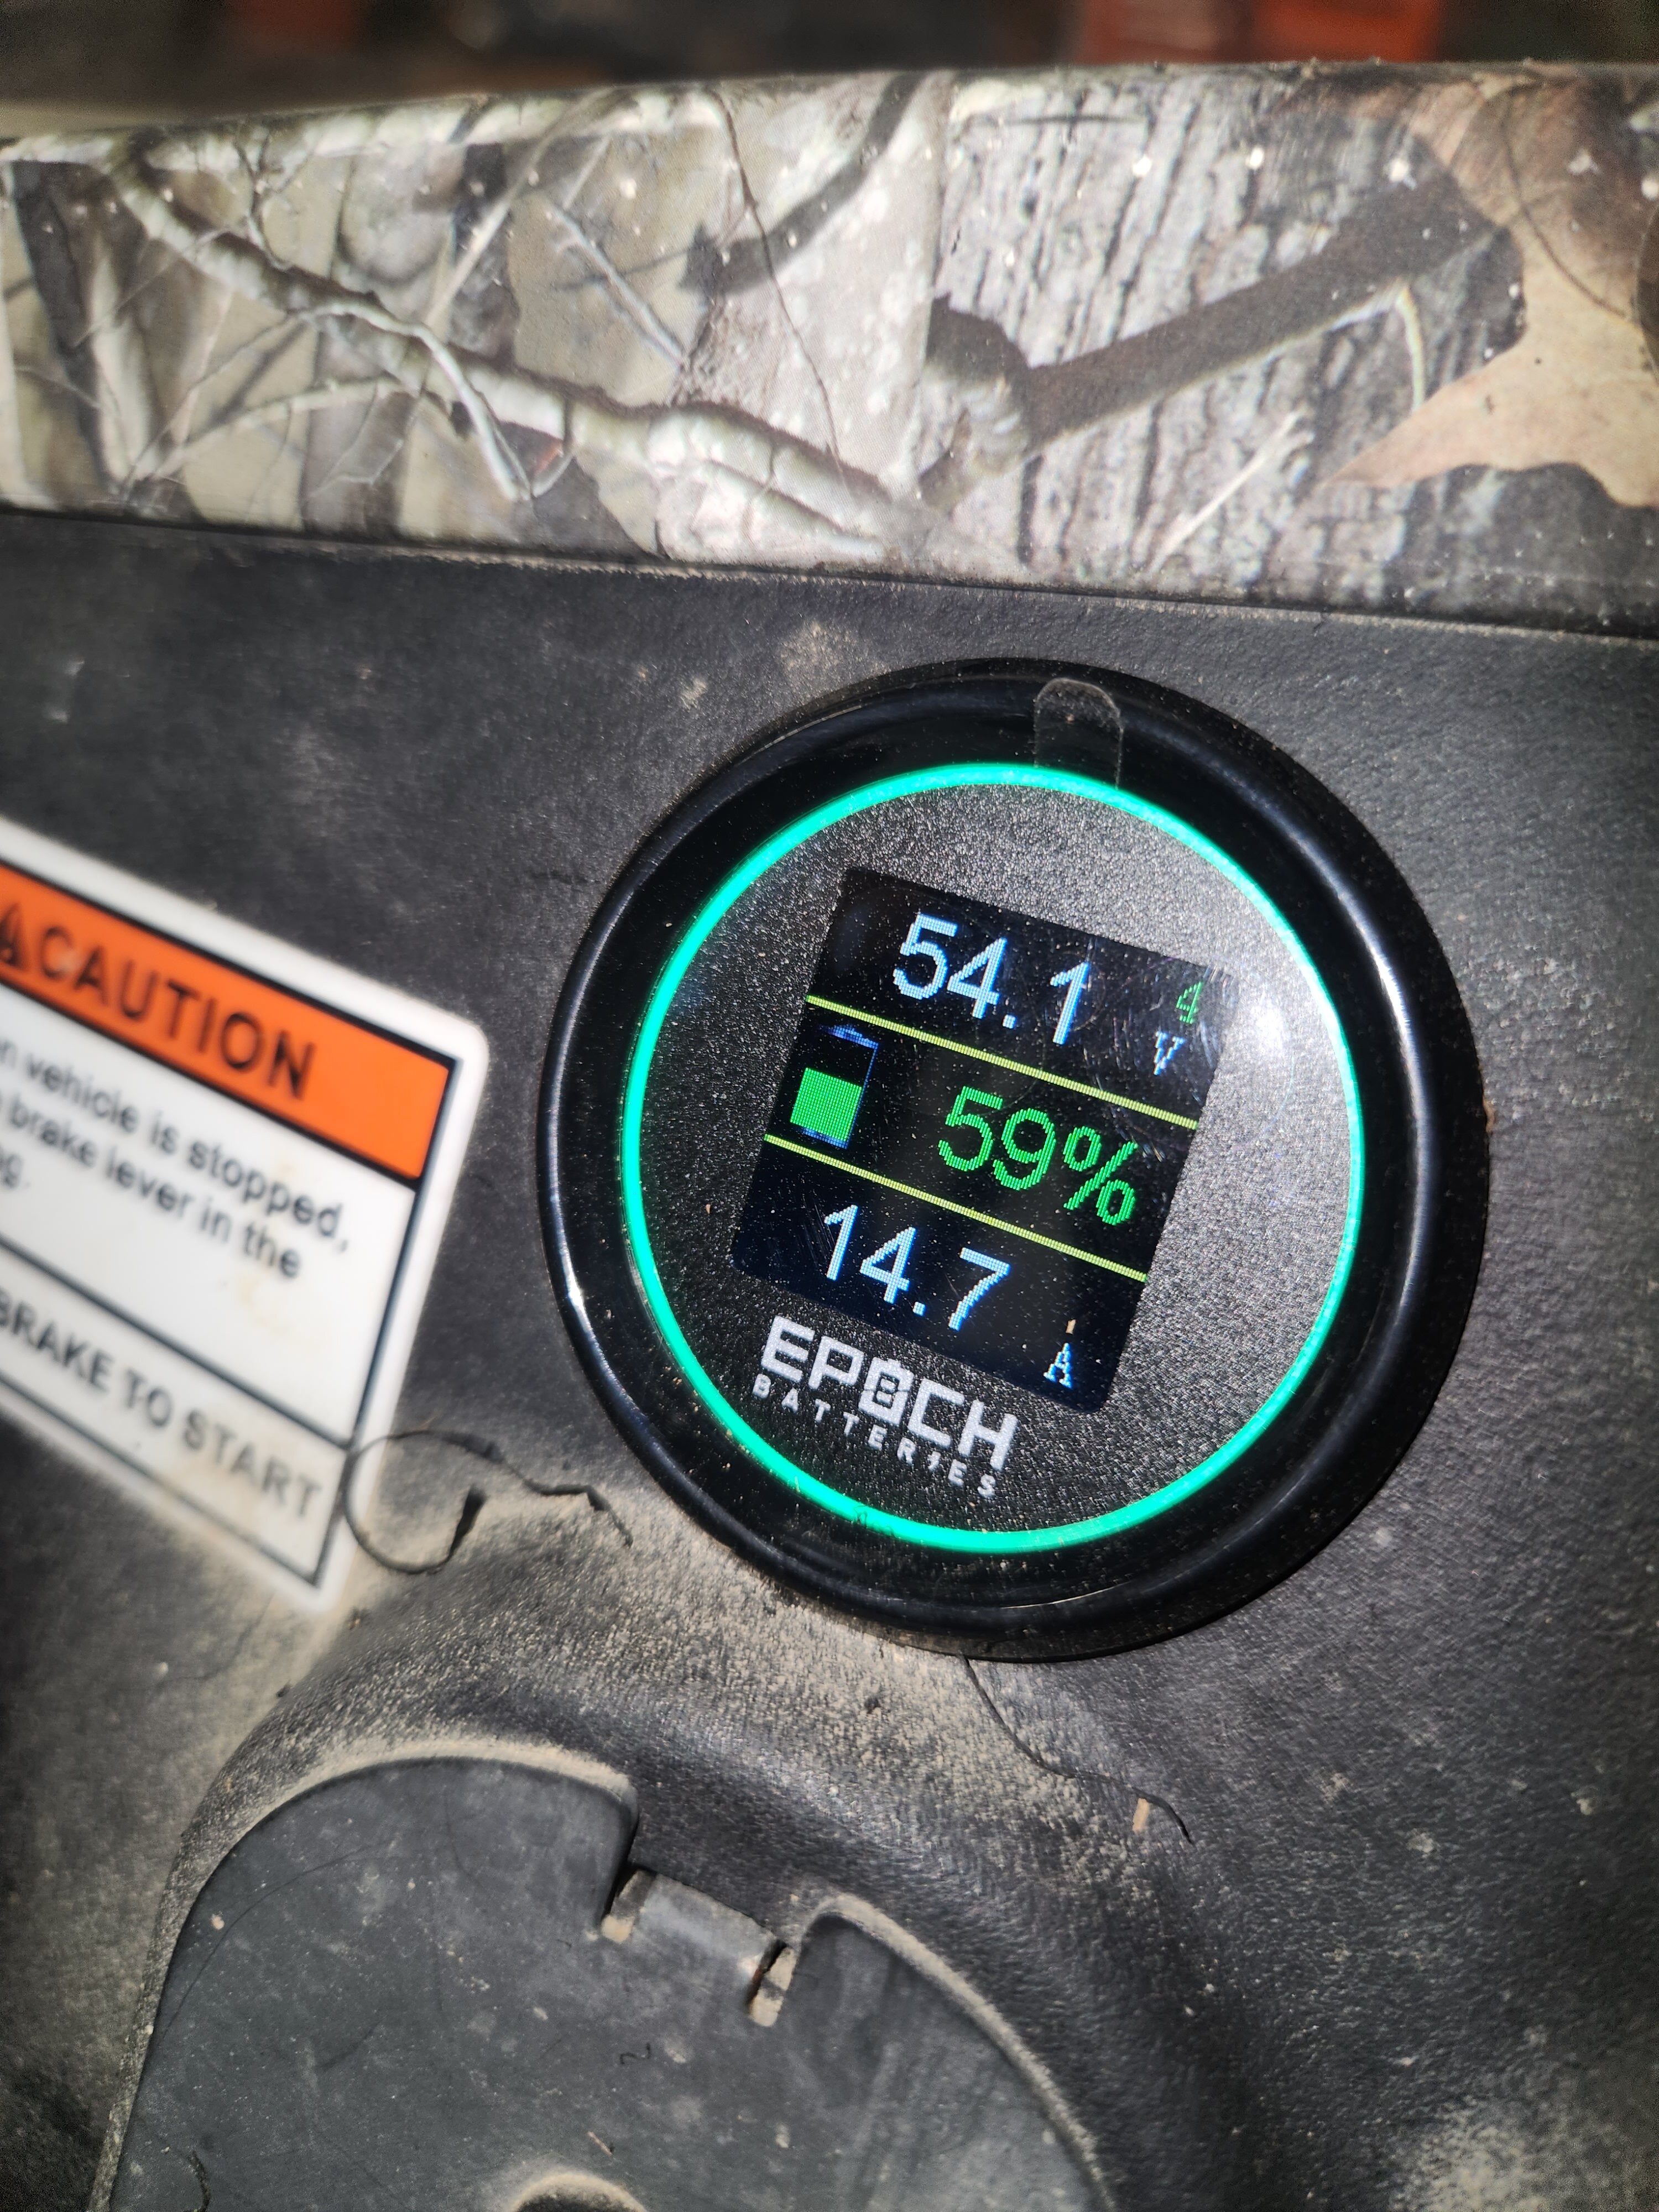
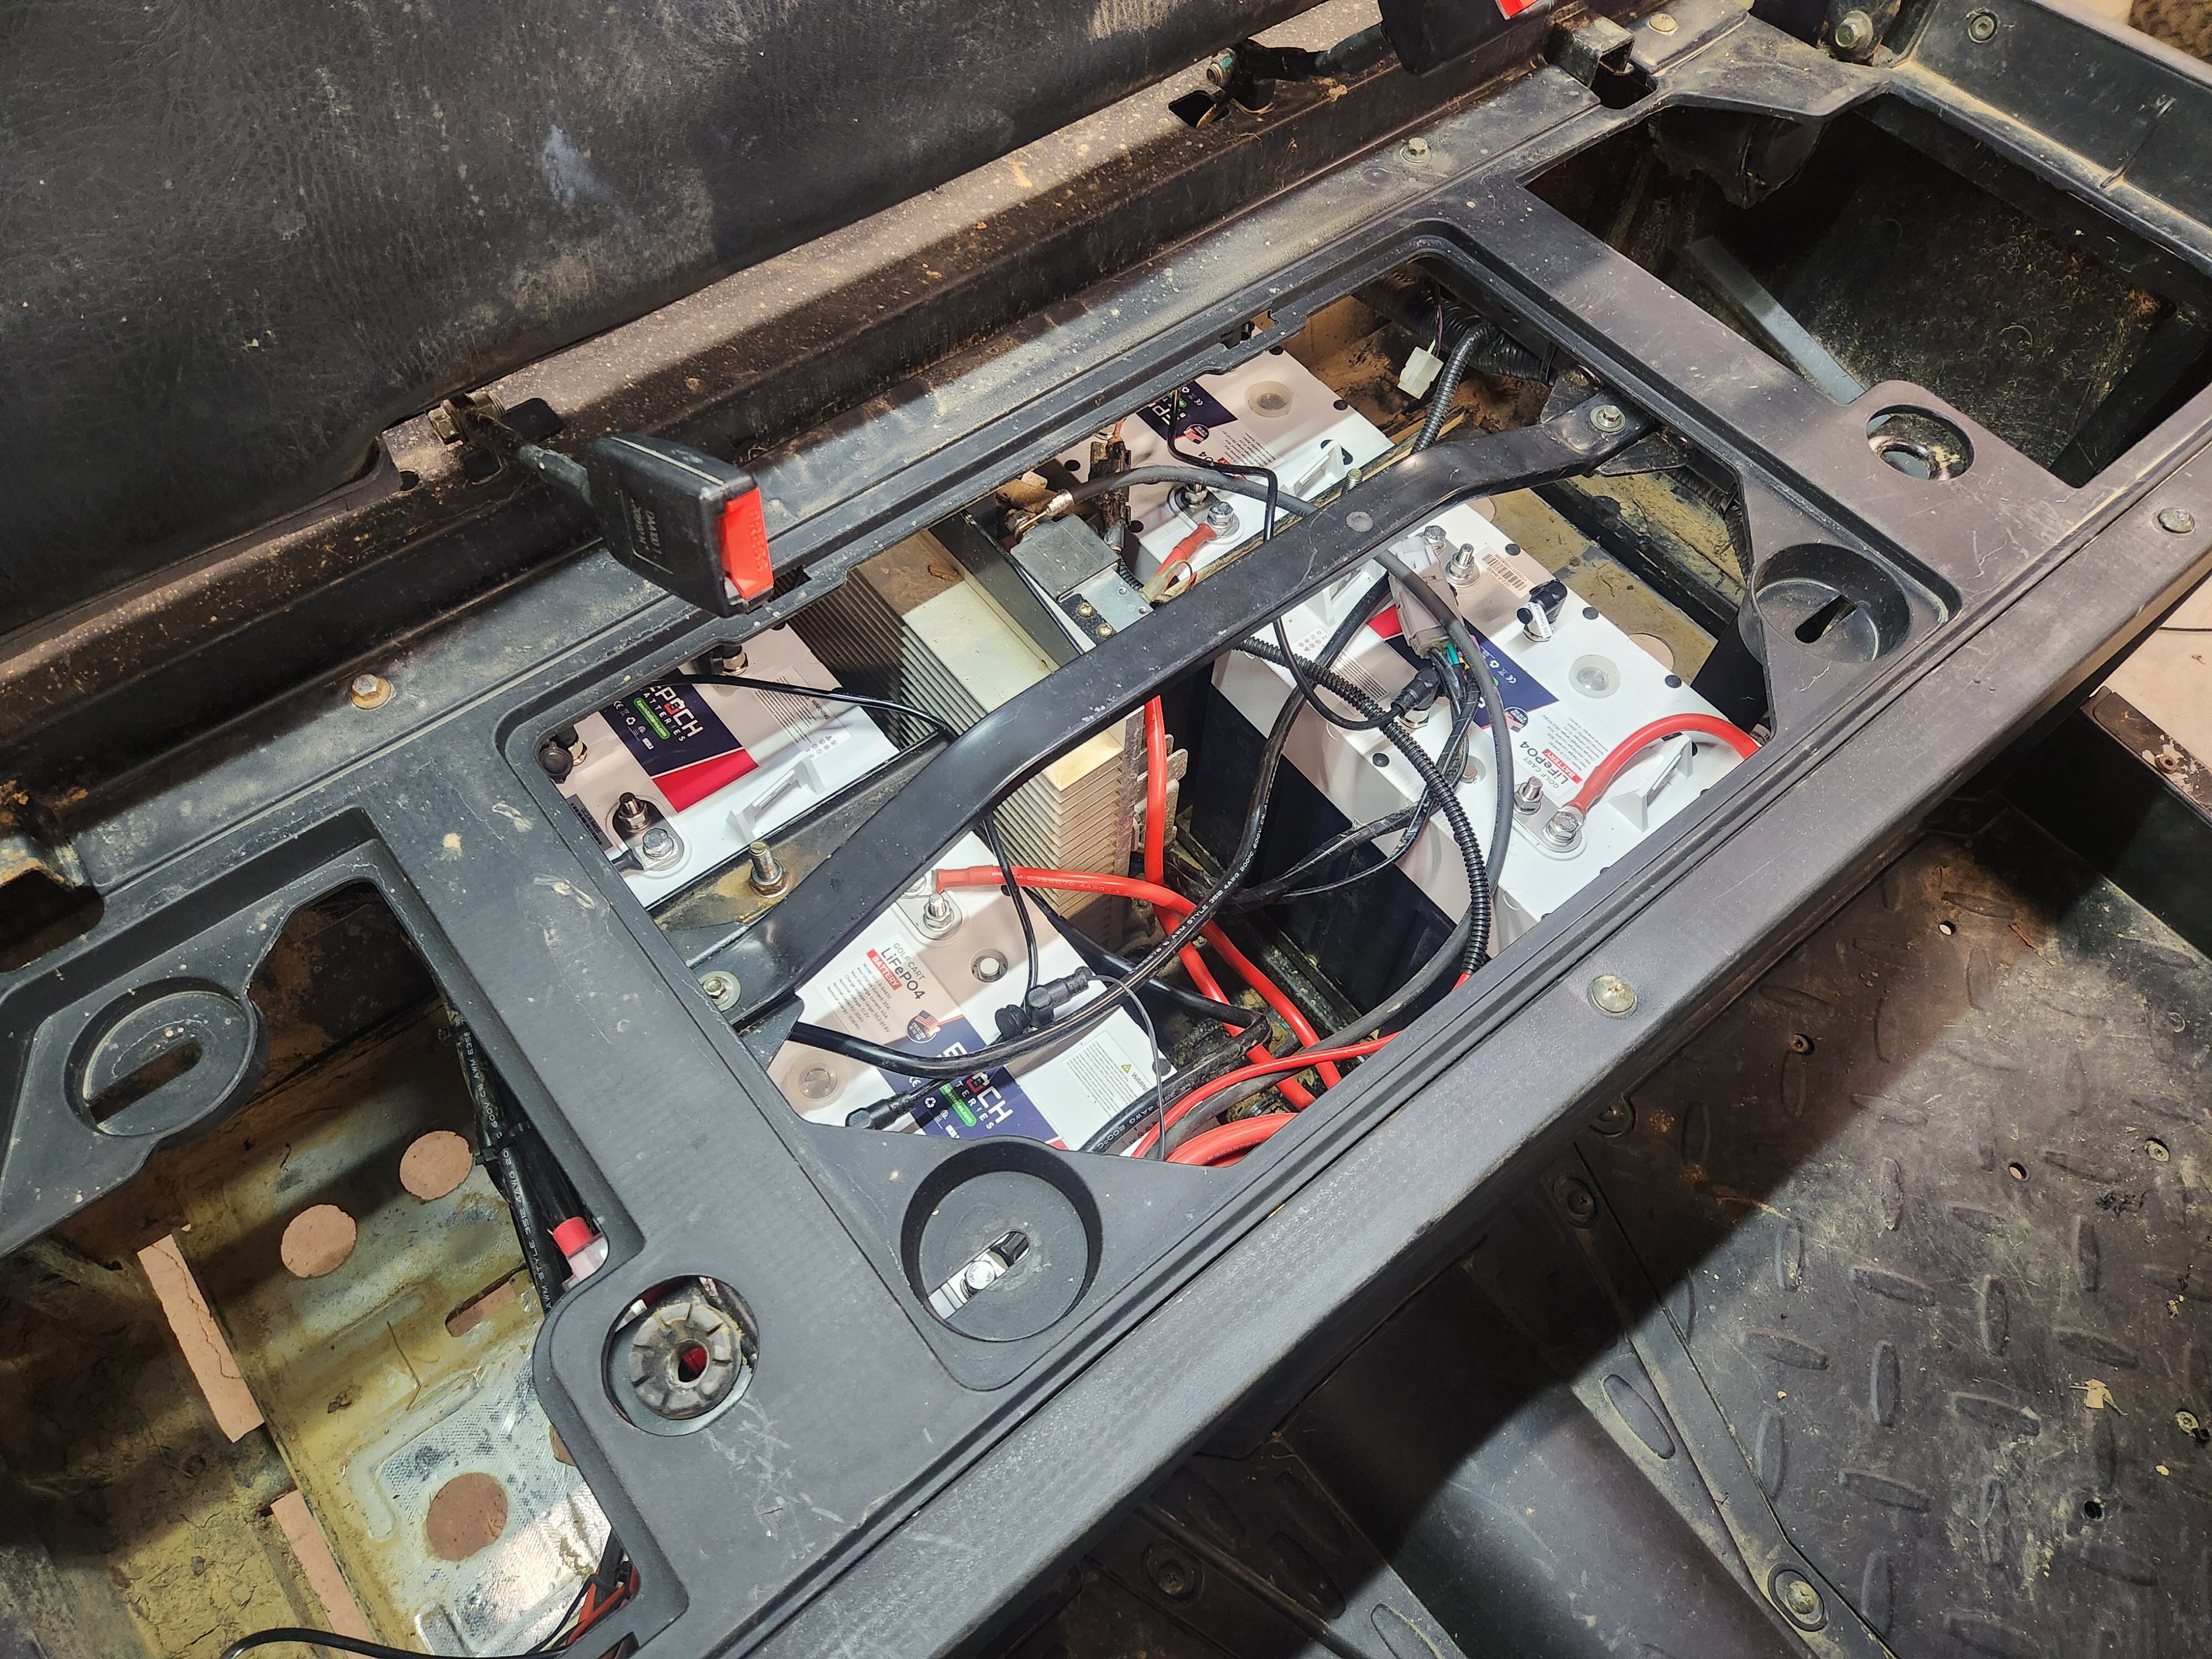
ok here is my install 2018 Hisun Sector E1 had 8 AGM 6 volts in it and went with 4 48v Epoch Lithiums. The new charger is installed where the delta Q was and installed the new gauge on the best possible spot. charger port where the gas filler would be.
1 point
-
ahhh another satisfied HISUN customer... That will be the least of your troubles my friend.. HISUN is a snowball of catastrophic events1 point
-
Never seen any issues with Sea Foam unless too much was added (like, 1/2 a bottle in a push mower tank)1 point


This leaderboard is set to New York/GMT-04:00
